Fortunately, there are several methods for how to record your screen, both on desktop and mobile devices.
Let’s get started!
Built-in Screen Recorders on Windows
Xbox Game Bar
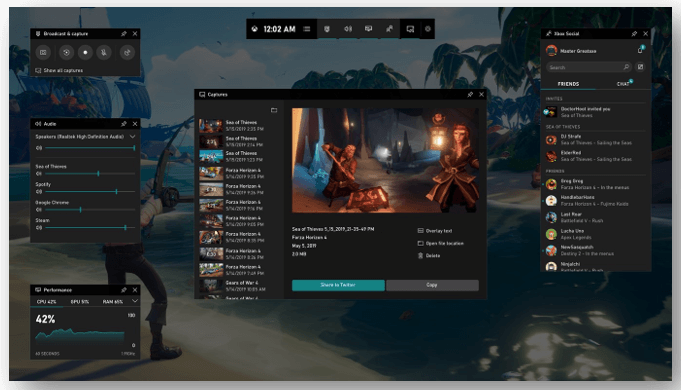
On Windows 10 and newer versions, the Xbox Game Bar offers a straightforward way to record your screen without any additional software. While it was initially designed for gamers to capture their gameplay, this built-in feature can record almost any window. However, it has some limitations; for example, it can't record File Explorer or the full desktop.
Pros:
- Ease of Use: Directly integrated into Windows, making it immediately accessible.
- No Additional Software: No need to install third-party apps or software.
- No Cost: Free video recording software that comes built-in with Windows 10 and newer versions.
Cons:
- Limited Features: Basic recording functionalities without advanced editing tools.
Step-by-Step Instructions
- Press Win + G to open the Xbox Game Bar or find it in the Start menu.
- Click on the Capture widget, which looks like a camera.
- Press the Start Recording button, or use Win + Alt + R to begin recording.
- Once done, click the Stop Recording button or use the same keyboard shortcut to end the recording.
- Your recording will be saved in the Captures folder under Videos.
Snipping Tool
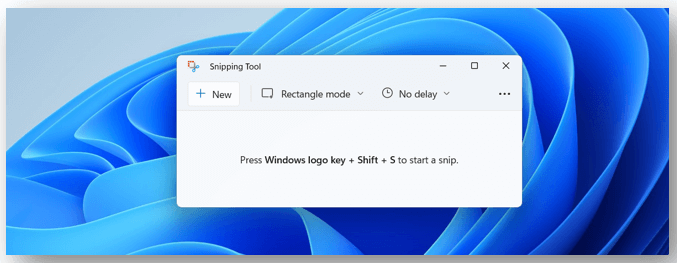
The Snipping Tool, a beloved screen-capturing tool in older Windows versions, has evolved in Windows 11 to offer more functionalities. While traditionally known for screenshots, the newer versions of this tool, combined with the Snip & Sketch feature, provide modest screen recording capabilities.
It offers users a simple way to capture screen activities without needing to resort to third-party software. Ideal for quick captures, the Snipping Tool is a handy tool for Windows users.
Pros:
- Integrated: Comes built-in with Windows, offering immediate accessibility.
- User-Friendly: Simple interface, suitable for all users.
- Multiple Capture Modes: Provides varied screenshot options, from free-form to full-screen.
Cons:
- Limited Recording Features: While it offers basic screen recording, it lacks advanced features found in dedicated recording software.
- No Editing for Videos: It provides annotation features for screenshots but lacks video editing capabilities.
Step-by-Step Instructions
- Click on the Start Menu and type Snipping Tool.
- Open the Snipping Tool from the search results.
- From the Mode dropdown, select the desired snip type (e.g., free-form, rectangular, window, or full-screen).
- If recording a video, follow the prompted instructions to start and stop the recording.
- Once done, you can save, annotate, or share the capture directly from the tool.
Built-in Screen Recorders on Mac
QuickTime Player
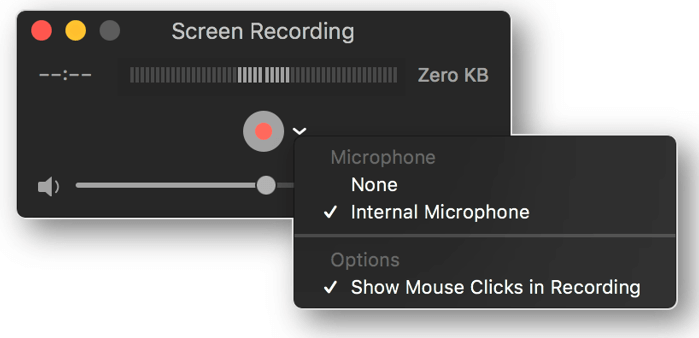
QuickTime Player, Apple's default media player for macOS, comes with an often-overlooked screen recording feature. This makes it a convenient option for Mac users who wish to record screen activities without installing additional software. It's especially useful for short tutorials, presentations, or software demonstrations.
Pros:
- Built-in: No need for third-party software, as it comes integrated with macOS.
- Audio Recording: Allows users to include voiceover using the Mac's microphone.
- Portion Selection: Users can opt to record the whole screen or just a specific portion of it.
Cons:
- Basic Functionality: Lacks the advanced features and customization options of specialized recording software.
- File Size: QuickTime recordings can sometimes be larger compared to other recording tools.
Step-by-Step Instructions
- Open the QuickTime Player from the Applications folder.
- Click on File in the menu bar.
- Select New Screen Recording from the dropdown menu.
- A recording control panel will appear. Click the red record button to start.
- You can choose to record the entire screen or drag to select a portion.
- Once done, click the stop button in the menu bar or the control panel.
- Save the recording to your desired location.
Screenshot Toolbar
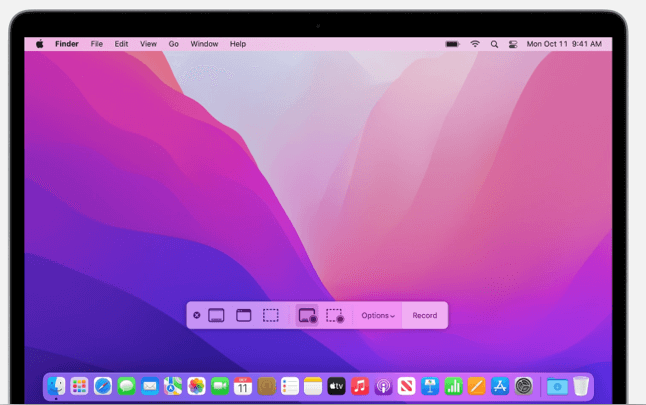
For macOS users, the Screenshot Toolbar provides a simple yet effective way to capture your screen, whether it's the entire display or just a section. This built-in feature also allows you to include audio and even set a timer before the recording starts. It is perfect for quick recordings but lacks advanced editing features.
Pros:
- Integrated: Directly built into macOS for immediate access.
- Selection Options: Can record the entire screen or just a portion.
- Audio Capture: Includes the ability to capture audio.
Cons:
- Lacks Advanced Features: No sophisticated editing or enhancement tools.
Step-by-Step Instructions
- Press Command + Shift + 5 to open the Screenshot Toolbar.
- Choose between recording the entire screen or a selected portion.
- If needed, click on Options to add a microphone for audio recording.
- Press Record.
- Click the Stop button in the menu bar to end the recording.
- Your recording will be saved to your chosen destination, like the desktop or a specific folder.
Third-Party Screen Recorders
Third-party software often provides more advanced features than built-in tools. These features may include robust editing capabilities, easy sharing options, and more.
Movavi Screen Recorder
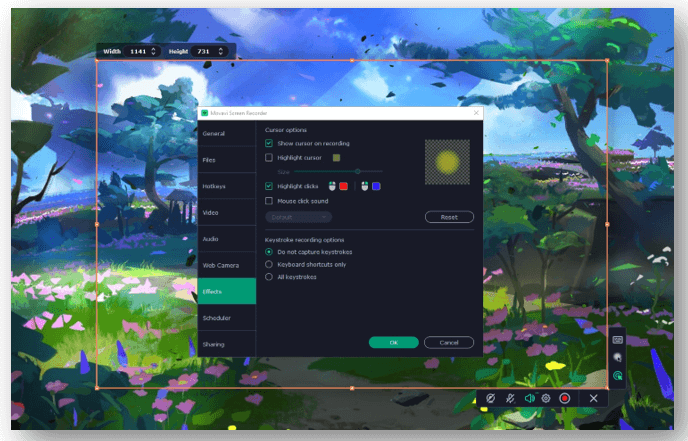
Movavi Screen Recorder is versatile screen capturing software suitable for all kinds of tasks. One of its strengths is its user-friendly interface, allowing even beginners to navigate the program with ease. The software also includes a built-in editor to tweak your recordings.
Pros:
- User-friendly: Intuitive interface suitable for beginners.
- Editing Capabilities: Built-in editor to quickly trim your recordings.
- Drawing on Screen: Quickly add annotations while recording.
- Scheduling: Automatically record videos at set times.
- Quality: Allows for high-resolution recordings.
Cons:
- Paid Software: Unlike some options, Movavi Screen Recorder is free only for 7 days. If you want to use it after that period, you have to purchase the software.
Step-by-Step Instructions
- Download and install Movavi Screen Recorder from the official website.
- Open the software and choose the Screen recording option or use the default F10 shortcut.
- Select the area you wish to record. You also have the options to record mouse clicks and turn on an AI noise removal feature.
- Click the red recording button to start.
- Pause if you need and press the stop button when you’re finished.
- Trim the recording if needed and save the video in the desired format. Users can also share their recordings directly to platforms like Google Drive, YouTube, Telegram, and WhatsApp.
AWZ Screen Recorder
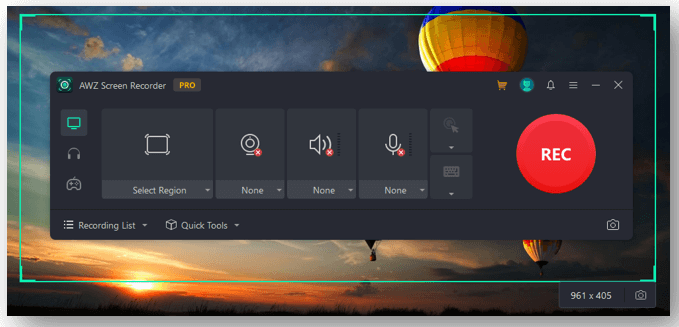
AWZ Screen Recorder is an easy-to-use screen recording solution with easy navigation. It allows you to record your screen and audio for hours of activities. Both the speaker and microphone are accepted as the sources of audio. The flexible recording settings make it handy to customize the recording area as you want.
Pros:
- Various output formats: MP4, MKV, AVI, WMV, FLV, and more formats are available.
- Recording features: Capture your on-screen footage and audio without latency.
- Easy editing tools: Innate video editor and compressor to trim or compress your video for free without a watermark.
- Quick to annotate: Add different shapes, insert text, or handwrite on the screen to highlight information when recording.
- Beginners-friendly: The UI achieves a level of simplicity that is suitable for all creators.
Cons:
- Compatibility: It now only runs on the Windows system.
Step-by-Step Instructions
- Download and install AWZ Screen Recorder from the AWZware website.
- Launch the program on your computer. Click Full Screen and choose Select Region to decide where to capture.
- Tap the speaker and microphone buttons to allow it to access the audio.
- Press REC to start recording.
- If you want to stop recording, hit the stop button shown in the toolbar.
- Go to Recording List to view the recorded video. If necessary, right-click on the video and select Edit or Compress to reduce the video file size.
OBS Studio
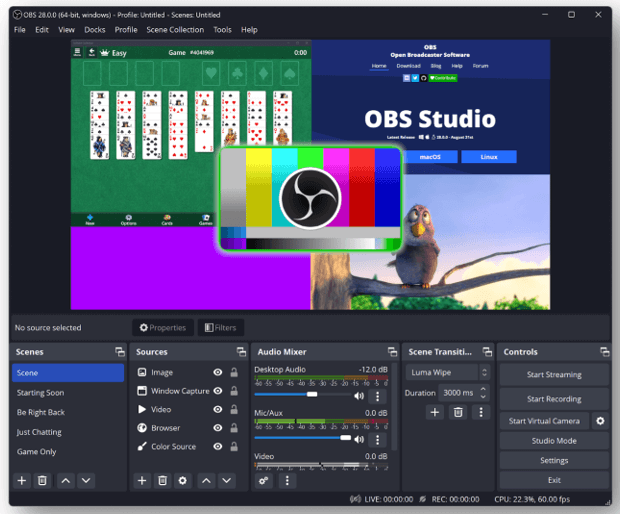
OBS Studio is free and open-source software popular among streamers and content creators. The software offers advanced features like multiple scene setups, audio mixing, and robust customization options.
Pros:
- Highly Customizable: Offers advanced features like multiple scenes setup and audio mixer.
- Free and Open-Source: No cost to use and it's open-source.
- Streaming Capabilities: Can be used to live stream content.
Cons:
- Complex for New Users: Has a steeper learning curve than simpler tools.
Step-by-Step Instructions
- Download and install OBS Studio.
- Open the program and set up your scene and sources. You can also customize keystrokes for different purposes.
- Click the Start Recording button at the bottom right.
- Perform the actions you want to capture.
- Click Stop Recording to finish.
- Your video will be saved in the output directory you set up earlier.
Free Cam
Free Cam is a screen recording software that offers a simple interface with no watermarks or ads. Despite its simplicity, it also features a built-in audio and video editor, making it suitable for creating basic tutorials or presentations.
Pros:
- No Watermarks: Recordings are clean without any imposed branding.
- Built-in Editor: Suitable for basic video editing needs.
- Free: No payment required.
Cons:
- Few Advanced Capabilities: Doesn't match up to more sophisticated paid alternatives.
Step-by-Step Instructions
- Download and install Free Cam.
- Open the program and adjust your recording settings.
- Press the Record button or use the hotkey F9 to start.
- Press Stop or F9 again to finish.
- Edit your video as needed and save or share it.
FlashBack Express
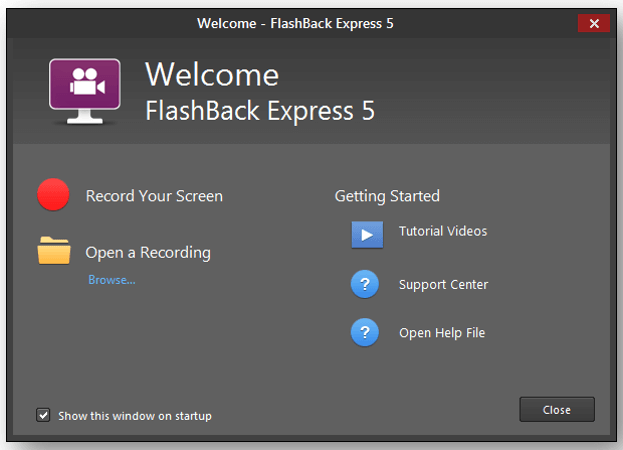
FlashBack Express by Blueberry Software is a comprehensive screen recorder that stands out for its no-watermark policy in the free version. It allows users to capture screen, sound, and webcam without time limits.
The software is designed for creating tutorials, demos, training materials, and more. With its multi-track editing feature, users can seamlessly blend different recordings and improve video quality.
Pros:
- No Watermark or Time Limit: The free version offers unlimited recording without branding.
- Scheduled Recordings: Can schedule recordings at specific times.
- Multi-track Editing: Edit multiple tracks simultaneously for better video production.
Cons:
- Limited Editing in Express Version: For advanced editing, users need to upgrade to the Pro version.
- Lacks Integrated Cloud Sharing: Doesn’t offer integrated cloud hosting like some competitors.
Step-by-Step Instructions
- Download and install FlashBack Express from the official website.
- Open the software and choose your recording settings (screen area, audio sources, and webcam).
- Press the red record button to start capturing.
- Once done, press the stop button.
- The recording can be previewed, and if needed, opened in the player for basic edits.
- Save or export the video in the desired format.
ScreenPal
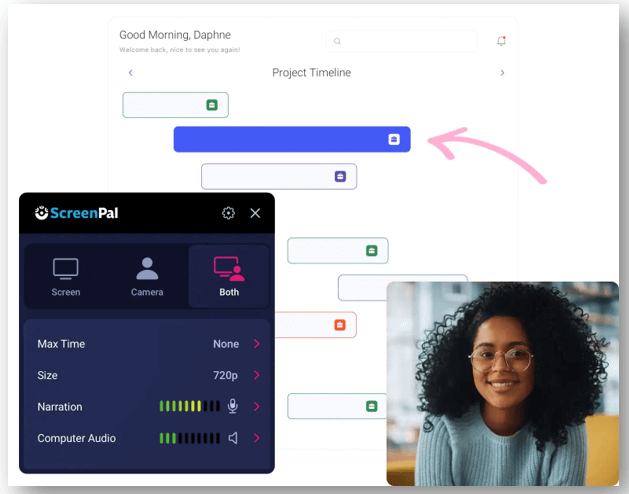
ScreenPal, formerly known as Screencast-O-Matic, has made a mark with its versatile and user-friendly features that cater to educators, businesses, and individual creators. It seamlessly records screen activity, webcam footage, or both, making it a popular choice for video tutorials, presentations, and more.
Pros:
- Intuitive Interface: Its user-friendly design ensures even first-timers can easily navigate and use the application.
- Browser-based Functionality: Offers the flexibility of direct browser usage without the need for application download.
- Integrated Cloud Hosting: Provides an integrated cloud service for hassle-free video storage and sharing.
Cons:
- Watermarked Free Version: Videos recorded with the free version include a watermark.
- Time Constraint: The free version restricts recording to 15 minutes per session.
Step-by-Step Instructions
- Download and install ScreenPal from the official website.
- Launch the application.
- Choose between screen recording, webcam recording, or both.
- Select the desired area of the screen you intend to capture.
- Click the red record button to initiate recording.
- Upon completion, click the pause button and then the green checkmark to finalize the recording.
- Utilize the built-in editor for any annotations or edits you'd like to make.
- Save your video locally or use the option to upload it to the cloud.
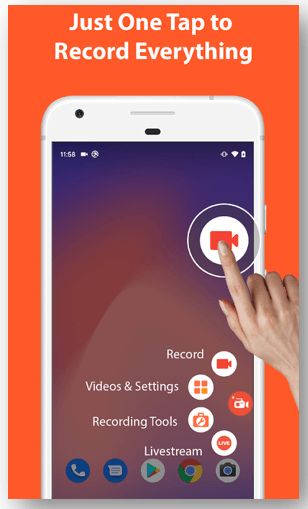
Mobile Screen Recording Methods
Screen recording on mobile devices is just as important as it is on desktops. Most modern smartphones come with native screen recording capabilities, but third-party apps offer more features.
Native Screen Recorder on iOS
iOS devices come with a built-in screen recorder that can be accessed from the Control Center. It offers basic functionalities such as capturing touch interactions and enabling microphone audio.
Pros:
- Easy Access: Easily accessible from the Control Center.
- Integrated into iOS: No need for third-party apps.
Cons:
- Basic Features: Lacks sophisticated editing and customization options.
- Storage Limitations: Long recordings can quickly consume storage space.
Step-by-Step Instructions
- Open Settings, then go to Control Center.
- Add Screen Recording to your Control Center.
- Back in the Control Center, tap the Record button to start.
- To stop, tap the red time indicator at the top left, then tap Stop.
Native Screen Recorder on Android
Most new Android devices offer built-in screen recording options accessible through the notification shade or system settings. The native feature typically allows you to capture audio and on-screen taps.
Pros:
- Convenience: Integrated into most modern Android systems.
- Customization: Some versions offer audio and touchpoint capture.
Cons:
- Varies by Manufacturer: The feature's appearance and functionality might differ across devices.
- Basic Editing: Most built-in tools lack post-recording editing capabilities.
Step-by-Step Instructions
- Swipe down from the top of the screen to access the notification shade.
- Locate and tap on Screen Recorder (this might vary by device).
- Choose your recording settings and tap Start.
- Press the Stop button in the notification shade to finish recording.
AZ Screen Recorder
AZ Screen Recorder is a robust mobile screen recording app available for Android devices. Not only does it allow users to record their screens in high-quality resolutions, but it also offers internal audio recording, making it ideal for game recordings or tutorials.
Pros:
- High-Quality Recordings: Offers high-resolution screen recording options.
- Internal Audio Recording: Can capture in-game or in-app sounds.
- Built-in Video Editor: Provides basic editing tools to enhance the captured videos.
Cons:
- Free Version Limitations: Contains ads and might have a watermark.
- Occasional Glitches: Some users have reported occasional lags or crashes.
Step-by-Step Instructions
- Download and install AZ Screen Recorder from the Google Play Store.
- Open the app and access its overlay control bar.
- Tap the record button to start capturing your screen.
- Once finished, pull down the notification shade and tap Stop to end the recording.
- Access and edit the recorded video directly from the app if needed.
DU Recorder
DU Recorder is a versatile screen recording app compatible with both Android and iOS platforms. What sets DU Recorder apart is its feature-rich package, offering not just screen recording but also video editing, GIF-making, and live streaming functionalities.
Pros:
- Multi-Platform: Available for both Android and iOS.
- Versatile Features: Not just for screen recording, but also for video editing, making GIFs, and live streaming.
- External Sound Recording: Can record voiceovers or external sounds using the device's microphone.
- High-Resolution Output: Allows users to choose the resolution of the recording, ensuring high-quality captures.
Cons:
- Free Version Drawbacks: Contains ads and might limit some features.
- Size: The app can be large due to its multiple features, taking up storage space.
Step-by-Step Instructions
- Download and install DU Recorder from your device's respective app store.
- Launch the app and provide it with the necessary permissions.
- On the main interface, tap the record button.
- Conduct your on-screen activities as per your requirements.
- Once you're done, navigate to the app or the notification bar and tap on the Stop button.
- The recorded video will be available in the app’s gallery, where you can also edit or share it.
RecMe Screen Recorder
RecMe Screen Recorder is another noteworthy app in the realm of mobile screen capture, designed for Android devices. It boasts powerful features such as recording both video and audio (internal and microphone) simultaneously, making it stand out from many competitors.
Pros:
- Simultaneous Audio Recording: Can record both internal sounds and microphone audio simultaneously.
- Customizable Settings: Users can adjust video settings for the best results.
- Lightweight: Despite its features, it doesn't consume a lot of storage space.
Cons:
- Watermark in Free Version: The free version places a watermark on recordings, requiring a purchase to remove.
- Compatibility Issues: While it works on most devices, some specific models might face issues with internal audio recording.
Step-by-Step Instructions
- Download and install RecMe Screen Recorder from the Google Play Store.
- Launch the app and grant it the necessary permissions.
- Adjust the recording settings as desired from the app’s interface.
- Press the red recording button to start capturing your screen activities.
- To finish recording, either access the app or use the notification shade control.
- Access your recording directly from the app's built-in library.
Conclusion
Whether you're looking to capture gameplay, and tutorials, or just want to learn how to record your screen to share moments with family and friends, there's a screen recording solution for you. From built-in tools on Windows and macOS to specialized third-party software and mobile apps, you're sure to find a method that fits you best.