A screenshot is a great way to record useful information. But sometimes the screenshot doesn't work as well as it should, like when you only want a screenshot of a part and you get a screenshot of the whole screen. Or you want to hide the dock and some private information.
So, how to crop a screenshot on Mac becomes a frequently asked question. Don’t worry, this page on AWZware will give you a full guide to crop screenshots on Mac. Check out the following sections.
How to Record Video on Mac [Step-by-Step Tutorial]
Do you need to know how to record video on Mac? This post lists four quick recording approaches to let you screen capture videos on Mac freely.
READ MORE >
Part 2: How to Crop Screenshot Mac with Online Tool
If you don’t want to open too many apps or you need a more powerful editor. You can try Fotor, a feature-rich online picture editor. With this useful tool, you can crop screenshots and edit them in one place. Let’s see how to crop a screenshot on MacBook Pro with it.
- Navigate to its official website.
- Press the “Edit a photo” button. Import the screenshot by dragging it or uploading it.
- Choose “Crop” and now you can crop the screenshot. You can crop in freeform, 1:1, 3:2, and other sizes. It even allows you to crop screenshots in the shape of a heart.
- Download the edited one to your desktop.
Tips: It is an all-in-one tool. You can also add effects, stickers, text, and so on to your pictures. You can enlarge a picture, and remove passengers and backgrounds.
How to Screenshot on Mac and Crop with Shortcuts
If you have no idea how to take a screenshot with shortcuts on Mac, you’d better read this section. There are many ways to do that, but the fastest way definitely is using shortcuts. According to Apple’s official website, you can use these combinations:
- To take a screenshot on Mac of the entire screen: Press Shift + Command + 3.
- To take a screenshot on Mac of a part of the screen: Press Shift + Command + 4.
The pointer will turn into a crosshair, you can click and drag to select where you want to record. Press the Escape key before releasing the trackpad if you want to cancel.
- To take a screenshot on Mac of a certain window: Press Shift + Command + 4 + Space.
It changes the pointer to a camera, and move it to the window or menu as you want. Click your trackpad or mouse to capture it.

All the screenshots will automatically be saved on your desktop by default. You can check and review them anytime.
How to Take A Cropped Screenshot on Mac with Built-in Toolbar
The last method applies to all Mac users, but there is a more convenient way for Mac Mojave, Catalina, Big Sur, or Monterey users. That is to use the snipping tool, Screenshot Toolbar. It sounds like it can only crop screenshots on Mac, but it has more functions. Let’s see what it can do.
Firstly, you should open it with a snipping tool shortcut. Press “Shift + Command + 5”. The toolbar will generally display at the bottom of the screen, but you can move it anywhere you like.

From left to right, these icons represent, in order, capturing the whole screen, taking a screenshot of a window, capturing a part of the screen, recording an entire screen, and recording a part of it.
Bonus Tip: How to Take a Cropped Screenshot on Windows in One Click
After learning about how to crop a screenshot on Mac, you may want to take a look at how to do that on a computer equipped with the Windows system. After all, who knows when it might come in handy.
This page gives you AWZ Screen Recorder, an all-in-one screenshot and recording tool. It enables you to take screenshots and record the screen in one click. You can drag the mouse to select which area to keep. This app offers you edit tools to draw and put rectangles, arrows, and circles on this screenshot. After that, the software helps you to instantly share your creations on social media.
Read the following part to learn how to take a cropped screenshot on Windows with it.
Step 1. Download and launch it on the computer.
Step 2. Navigate to the tab, window, or anywhere you like. Tap on the camera icon.
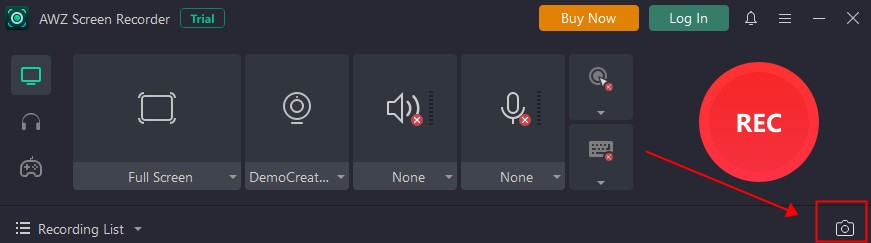
Alt: How to Take a Cropped Screenshot on Windows in One Click
Step 3. Finishing take screenshots.
Select any part of the screen and release the trackpad or mouse. Here you can use the editing tools down below to highlight the key points. Then tap the blue check icon in the editing bar to finish the task.

The Conclusion
Today’s blog shows you how to crop a screenshot on Mac with two built-in apps and an online tool. You can also learn how to screenshot on Mac with shortcuts. Just in case you need it, this page also offers you AWZ Screen Recorder to help you capture screenshots and record screens on Windows. Download and try now!
Carol