During any online meeting, live chasing, or video calling, displaying different content, such as videos, images, documents, etc., has become difficult using your system's webcam. OBS Virtual Camera lets you control and replace your webcam feed with your desired and custom footage. You display anything like photos, recordings, videos, etc, in your live video meeting, calling, or chatting sessions. So, let's see how to use OBS Virtual Camera on your computer with different apps.
You can be even more creative by showing some live video feed or custom-made video recording through your webcam using the OBS Virtual Camera during your Zoom meeting or Skype session. So, to get a complete hold on your system's webcam, let's see how to use OBS Virtual Camera on Discord or Google Meet and in Zoom or other applications from this AWZware post.
What Is OBS Virtual Camera?
The virtual Camera in OBS Studio is an exciting and innovative feature for controlling and manipulating your computer's webcam. The virtual cam tool is an integral part of the free, open-source OBS studio app, which is primarily known for screencasting, live streaming, screen recording, editing, etc. Using OBS Virtual Camera, you can show any digital content on your computer screen through a webcam. You can also customize the screen scene with your creativity.
For example, you can play any self-recording video on screen using the OBS Virtual Camera by replacing the webcam's real-time video feed. Behind the Camera, you can do some other work. This virtual cam can also enhance the webcam feed by adding special filters and editing tools. So, let's get started with the steps of how to use virtual cameras on Windows and Mac.
How to Turn on OBS Virtual Camera to Use on Windows or Mac
No matter what app you will use for live streaming, you must know how to use the OBS virtual camera on your Windows or Mac system. So, here you go with the steps to use a virtual camera on OBS.
On Windows
Step 1: First, you must install the OBS program on your computer from the OBS official website for free. Then open it > select "Help"> Check for updates to get the latest version.
Step 2: It's time to add various sources to the OBS camera feed, such as webcam, media source, monitor display, etc. To do this, head to the "Source box" at the bottom> select the " + " icon > select the preferred sources that you would like to show in the OBS virtual camera.
Step 3: Now, to start the virtual Camera, move to the "Control dock" at the bottom right side > select the "Start Virtual Camera" option.

On Mac
Step 1: As the latest version of OBS studio already has the built-in virtual camera feature, you don't have to add any separate camera plugin for using OBS virtual webcam. Therefore, after installing the latest version of the OBS studio on your Mac, you need to follow the same steps that you followed on Windows.
So, after setting up the virtual Camera on your Windows or Mac, you are ready to use the OBS virtual camera with any live coating app like Zoom, Google Meet, etc.
How to Use OBS Virtual Camera on Discord
Being a very trendy and functional virtual communication app, Discord is highly demanding, with more than 150 million active users. While enjoying a live chat, video calling, and text messaging, you can also explore group chatting, media, file sharing, etc. So, to make your virtual communication more exciting and creative, let's see how to use OBS Virtual Camera in Discord.
Step 1: For OBS version 26.0 or higher users, the OBS virtual camera comes as a default setting. However, for older version users, the OBS virtual camera plugin needs to be installed separately.
Step 2: After installing the OBS latest version of 26.0 or higher, you should launch the OBS studio > Control Menu > select the "Start Virtual Camera" option.
Step 3: Go to your Discord app and log into your account using your authentic credentials. Enter a channel in the main server to initiate streaming on Discord.
Step 4: Click on the "Screen" icon at the top of the profile picture. Select an option from the whole screen/ specific window from the pop-up window. Next, select FPS & quality, or as a default setting, you can enjoy streaming in 720p at 30 Fps.
Step 5: As you have already launched OBS studio, you can add sources like videos, images, etc.> Select "Start Virtual Camera." Next, head to the Discord app > start streaming video > go to the "Settings" > Video icon.
Step 6: From Discord's camera option, select OBS virtual camera > the OBS Virtual camera will be mirrored on Discord. To adjust the camera settings, go to the sources and select "Properties." You should select the advanced settings to customize your webcam appearance.

![Top 5 Video Compressors for Discord to Meet 8MB Size Limit [2023]](https://img.swifdoo.com/image/video-compressor-for-discord.png)
Top 5 Video Compressors for Discord to Meet 8MB Size Limit [2023]
Are you seeking a good-to-use video compressor for Discord? Check the introduced top 5 compressors to compress your Discord video to 8MB or less easily.
READ MORE >How to Use OBS Virtual Camera on Zoom
Zoom is another virtual communication app with cloud-based video telephony and online chat service. It offers various types of online communication, such as video calling, conference meetings, online chatting, etc. So, using the OBS Virtual camera on Zoom, you can show or share any kind of content through your computer's webcam. So, let's get to the steps of how to use the OBS virtual camera on Zoom.
Step 1: After launching the latest version of the OBS studio on your system, you should add sources and scenes that you would like to show through the Zoom call.
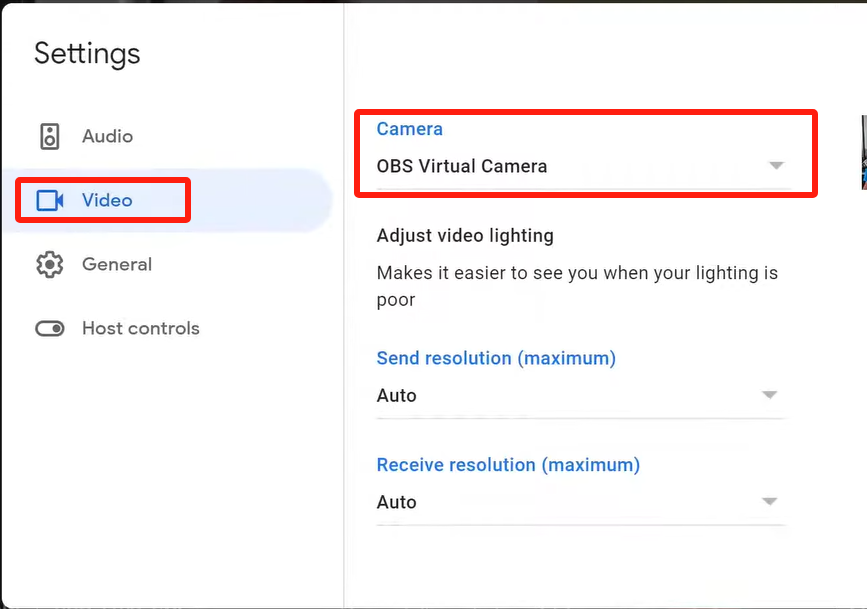
Step 2: Next, start the Zoom meeting and start the OBS virtual camera to replace your webcam feed. To do this, select "Settings" in Zoom > select "Video" > select OBS virtual camera in the Camera drop-down menu.

Step 3: Go back to the OBS app > select "Start Virtual Camera" to use the OBS virtual camera and sync with the Zoom app. You are good to go to show and switch between sources you want to display to your Zoom callers.
How to Use OBS Virtual Camera on Google Meet
Google Meet is a top-rated online communication app with multiple services like live chat, video calls, etc. You can use OBS as a virtual camera in your live chatting or video calling session in Google Meet. To show your favorite media, other scenes, or sources to your friends or family, you must know how to use the OBS virtual camera in Google Meet.
Step 1: Once you have installed the latest version of the OBS studio, you need to select sources and scenes that you want to show in your Google Meet call. To do this, select the "+" sign in the Sources box > add each source one after another.
Step 2: Return to the Google Meet > Settings Menu > Camera option > OBS virtual camera > You will see a still photo in the present OBS window.
Step 3: Go back to OBS > select "Start Virtual Camera" in the Control section. Go back to Google Meet and start your call or meeting, and the people who have joined the call or meeting will be able to see your selected scenes or sources through the OBS virtual cam. You can record Google Meet with audio using OBS as well.
How to Record Screen with Yourself Using OBS Virtual Camera
In OBS Studio
As an open-source and free screen recording software, OBS Studio has evolved with innovative features and functions. The advanced OBS virtual webcam has a unique facility to record your system screen simultaneously with the webcam and your own voice. You can replace the real webcam feed with any other scenes or sources using a virtual cam.
You can also record this webcam feed with your own voice or other audio. To film any gaming instruction video or tutorial video, sometimes you must record your face and voice simultaneously with the screen. So, let's see how to use the OBS studio virtual camera to record yourself.
Step 1: Once the latest OBS version is launched into your system, select File > Settings > Select an audio source to customize output specification.
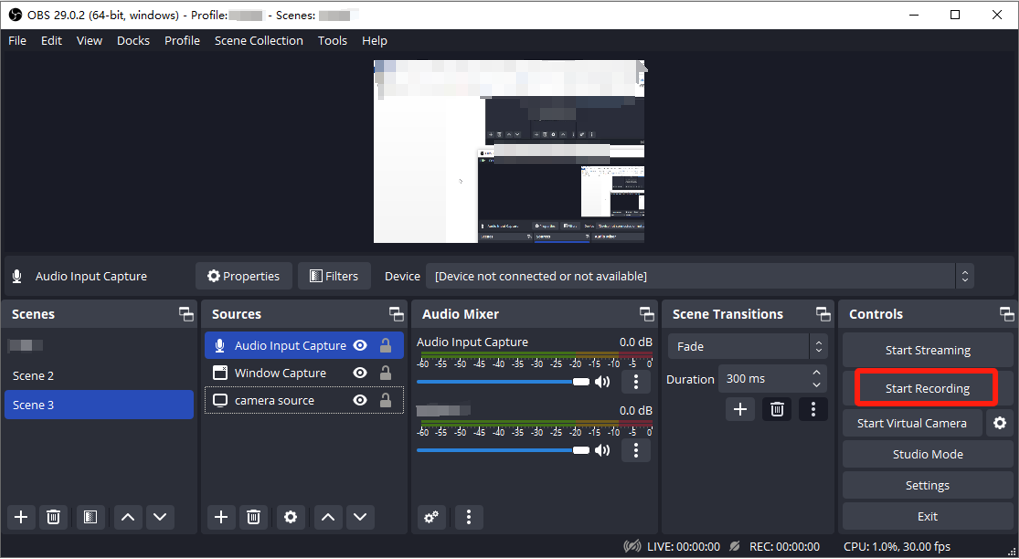
Step 2: Select + sign in the "Scenes" section and select your desired screen as the recorded scene. Next, under the "Sources" section, select the + icon > click the Video Capture Device to choose the Camera. You will see the webcam on the screen.
Step 3: Select "Start Recording" from the right-side menu, and the OBS app will record your screen with audio and face. Once you are done with your recording, select the "Stop Recording" option.
In AWZ Screen Recorder
Using an OBS virtual camera is quite challenging for beginners, and there is no proper technical guidance or assistance to use this function for your best use. Recording audio in OBS studio is also a bit difficult as the audio recording option doesn't come with default settings, and you have to do it separately. So, suppose you don't want to get into all of these technical complications. In that case, you should try the easiest and most effective alternative, the AWZ Screen Recorder, with its powerful and customizable screen recording function with webcam and audio.
Features:
- Record webcam & microphone audio simultaneously within a few clicks
- While recording 2D or 3D games, you can create gameplay highlights
- Create a presentation with customized screenshots
- Explore extensive video editing features with advanced annotation to customize the recording.
- Record the full screen or any part of the screen.
- You can customize the webcam by blurring the background or putting any image.
- Explore noise reduction while recording a microphone or speaker voice with a webcam.
- You can record any live streaming, such as movies, video calls, online meetings, etc.
Download AWZ Mac Screen Recorder
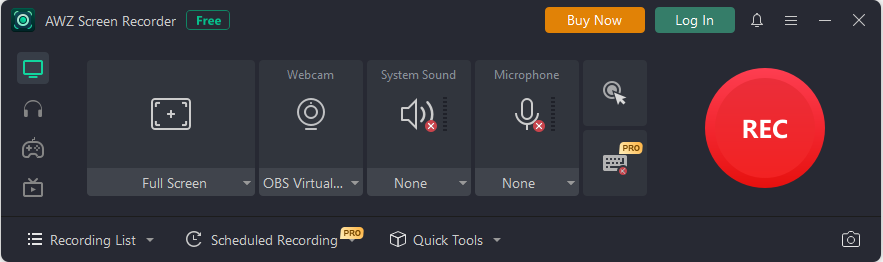
Step 1: To record your system's screen, you must launch the AWZ Screen Recorder and then select the screen recording mode, such as webcam, screen, microphone, or audio.
Step 2: Next, go for the full-screen recording or partial-screen capture option, and then go for the advanced capture option. Select the "REC" option to start the screen recording.
Step 3: To edit the recording or audio source, you should playback the video and get your desired output in your preferred HD quality format.
FAQs
Why is the OBS Virtual Camera not working?
If you can't use the virtual Camera in OBS, you must look into the given factors:
Restart the OBS program
Activate the virtual Camera
Change the output settings of the OBS studio
Go for a different resolution or FPS
Grant permission to OBS Studio camera
Install the latest updated version of OBS studio
Conclusion
So, if you are using OBS Studio and wonder how to use the virtual Camera, this article will surely guide you thoroughly in the best possible way. However, if you still find it difficult to use the OBS program, you must try the hassle-free screen recording option of AWZ Screen Recorder with webcam and audio.