What Is a Replay File
A replay file is a game recording based on data that lets players review past matches or sessions in detail, exactly as they happened. It’s frequently used in competitive and multiplayer games like Fortnite, Valorant, League of Legends, Rocket League, and StarCraft. Unlike typical video files such as MP4, replay files do not hold actual video; they record player inputs, character movements, and in-game events so the game can recreate the match for playback.
Because replay files depend on game-specific data, they can typically only be opened and viewed within the original game that generated them. To turn a replay into a shareable video clip, users must watch the replay in-game and record it in real time with a screen recorder. This process captures the visual output and audio as a normal video file, making it easy to edit, upload, or share with others.
Why Convert Replay to MP4
Replay files are great for reviewing gameplay, yet their game-specific design makes them hard to view or edit outside the game that created them. Converting a replay file to MP4 converts it to a standard video format that works everywhere and better supports real-world sharing and editing.
Here are some reasons to convert Replay to MP4:
- Easy sharing and uploading: MP4 files can be posted straight to YouTube, Twitch, Discord, or social media, making them accessible without the original game.
- Universal playback: MP4 files work smoothly on almost every device, media player, and operating system, making them highly versatile.
- Better editing support: Video editors have full support for MP4, making it simple to trim highlights, add effects, or include voice commentary.
- Permanent preservation: MP4 files aren’t affected by future game updates or changes in replay compatibility.
- Professional use: MP4 fits well for tutorials, esports evaluations, bug documentation, and marketing content.
How to Change Replay to MP4 on PC
On PC, changing a replay file to MP4 is usually done by capturing the gameplay as the replay runs in the game. This method applies to nearly all games and doesn’t depend on extra conversion tools, making it a useful choice for most users. Below are the most effective ways to change replay to MP4 on a PC.
Method 1. Change Replay to MP4 with AWZ Screen Recorder
When it comes to converting in-game replays into polished MP4 videos, AWZ Screen Recorder stands out as one of the best game recording software options for PC. It’s created to record Fortnite, Valorant, and other games efficiently, capturing all gameplay, actions, and highlights without lag. With versatile recording modes, customizable settings, and effortless video export, AWZ lets you transform any replay into a professional, shareable clip in just a few clicks—making replay-to-MP4 conversion smooth and hassle-free.
Let’s take a look at how to change a replay file into MP4 with AWZ Screen Recorder.
Step 1. Begin by downloading and installing AWZ Screen Recorder on your Windows computer. Then, open the program to proceed with the conversion.
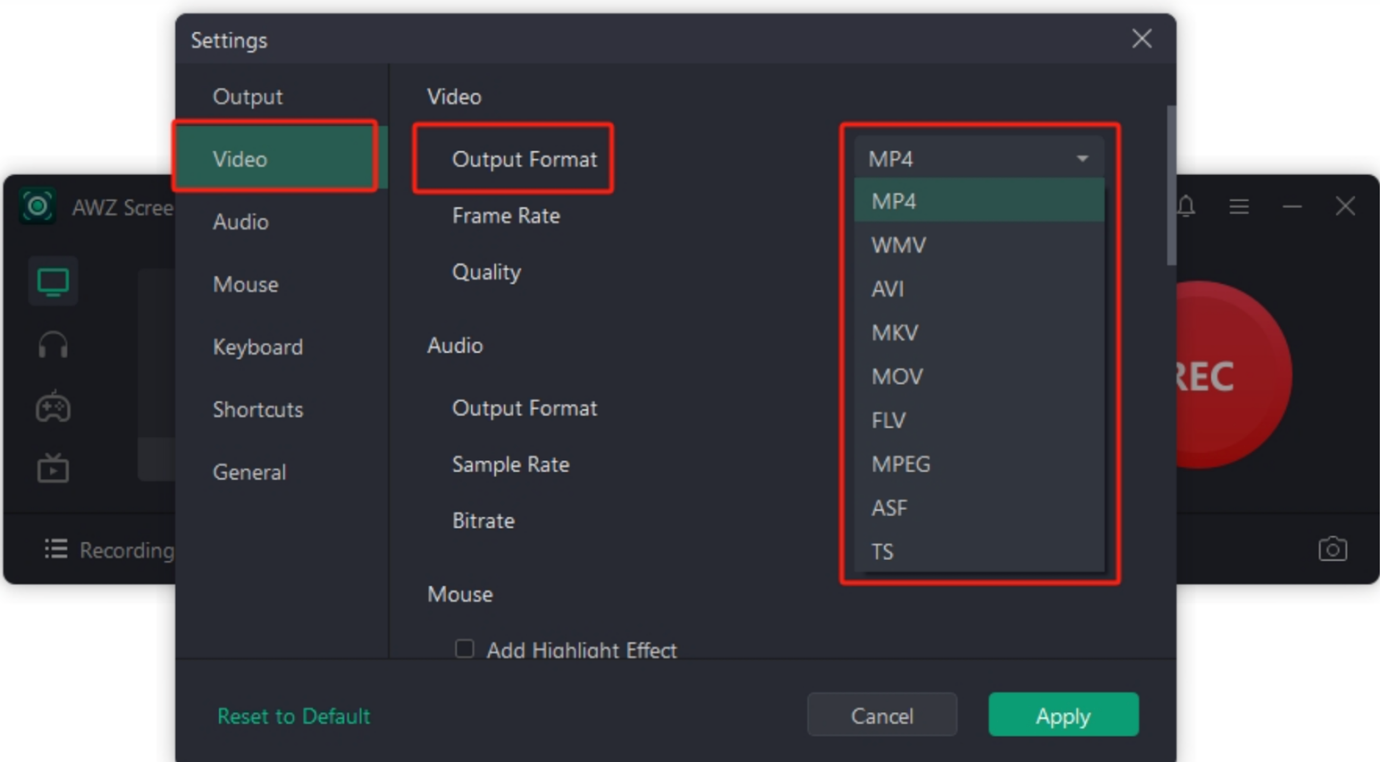
Step 2. Next, tap the Hamburger icon at the top-right corner. And navigate to Settings.

Step 3. Select Video from the menu and pick MP4 from the Output Format dropdown menu. Set the relevant parameters as per your needs. Then, hit Apply to confirm the changes.
Step 4. On the homepage, start playing the replay file you want to record as an MP4. Then, pick a recording mode and click the REC button to start your screen recording.
Once recorded, click the Stop button. Your replay will be saved as a high-quality MP4 file.
Method 2. Record Replay to MP4 Using OBS
OBS Studio is another well-known free and open-source option for gamers wanting full control when turning replays into videos. By letting you record gameplays on PC while a replay is running, OBS records exactly what you see with configurable quality and performance settings. It’s widely used by users who need professional-quality, adjustable replay recordings without needing additional programs.
Let’s see the step-by-step guide to convert Replay to MP4 using OBS.
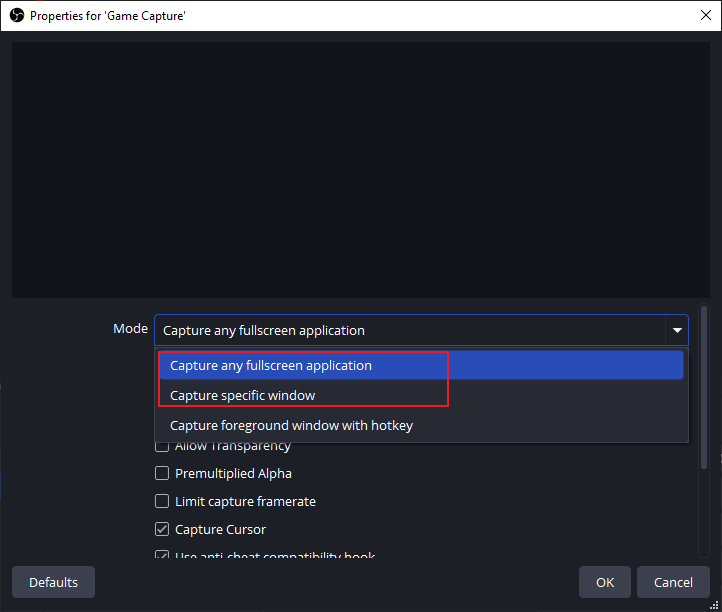
Step 1. Download and launch OBS on your computer. On the main screen, tap the + (Add) button at the bottom left corner and then go to Game Capture from the Create/Select Source section. Hit the OK button after the new window opens.

Step 2. Then set the Mode in the prompt window as needed. You can choose either Capture any full-screen application or Capture specific window. After that, click OK.
Step 3. Next, go back to the home screen and click the Audio Mixer tab to adjust the audio source: one for Desktop audio and the other for Mic/aux. After that, click the Start Recording button.
Step 4. Once finished, click the Stop Recording button, and then the MP4 file will be saved to your computer's Videos folder or to the output path you’ve set in Settings.
Method 3. Change Replay to MP4 on Mac with QuickTime Player
QuickTime Player provides a simple, no-fuss method to convert replay files into videos directly on macOS. As a free screen recorder for Mac, it lets users play a replay in-game and capture it smoothly with just a few clicks. This makes QuickTime a convenient, built-in choice for Mac users who want to record and play MP4 videos without extra tools.
These are the detailed steps for converting Replay files to MP4 with QuickTime Player.
Step 1. Open QuickTime Player on your Mac and go to File in the menu bar.
Then, press New Screen Recording to bring up the screen recording controls.

Step 2. Click on Options to expand the menu. Then, depending on your preferences, select a storage location for your recording or adjust microphone audio settings.

Step 3. After selecting the area to record, click Capture to start capturing your screen.
Next, play the replay files that you want to record.
Step 4. Once the recording is done, click on the Stop button in the menu bar to end it.
Next, visit the output location to ensure your MP4 recording has been saved correctly.
How to Convert Replay to MP4 Online
For users looking to convert replays to MP4 without downloading software, Panopto is a dependable online option. It lets you record replays directly from your browser, capturing both gameplay and on-screen activity in real time. With its easy-to-use interface and cloud-based recording, Panopto makes it simple to turn in-game replays into shareable MP4 videos.
Discover how to convert Replay to MP4 online using Panopto.
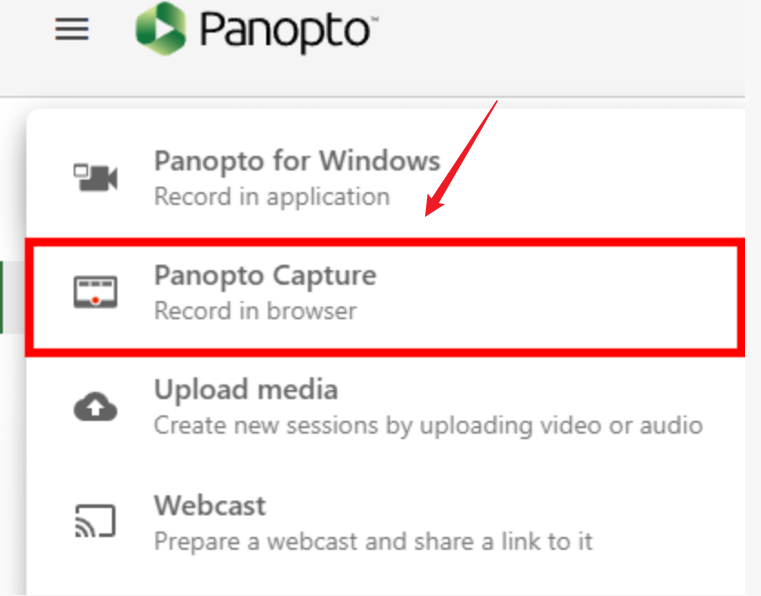
Step 1. Access Panopto through your web browser and log in. Then, choose the folder in which you want to store your video.
Then, click the + Create button and select Panopto Capture. A new browser tab will open with the Panopto Capture interface.
Note (optional). Choose your microphone and camera sources from the top toolbar.
Test your microphone to ensure it’s picking up sound, and select the camera you want as your primary video source.
Step 2. Click the monitor icon to choose a screen, application window, or browser tab to capture. Then, play your game replay file in the selected window while recording.
Step 3. After all the settings, click the red Record button to start recording the gameplay in real time. Once the replay ends, press the red Stop button.
Step 4. After finishing the recording, Panopto automatically uploads and prepares your video. When your video is ready, you have the option to update details, share it, or download it as an MP4 file for convenience.
A Quick Sum Up
Converting a replay to MP4 lets you easily share, edit, and enjoy your gameplay on any device. Whether on PC with AWZ Screen Recorder or OBS, Mac with QuickTime, or online via Panopto, converting replays to MP4 makes your highlights easy to watch or upload. With these methods, capturing and preserving your best gaming moments has never been easier.
Steven