Introduction:
People frequently need screen recordings for tutorials, meetings, game sessions, or solving technical problems. However, it’s irritating when screen recording not working on Mac stops you from completing tasks. This AWZware article will explore the causes and dependable fixes, and introduce a reliable Mac screen recorder.
1. Why is My Screen Recording Not Working on Mac?
You might be asking why is my screen recording not working on Mac, and many others do too. This problem occurs for many Mac users because of permission settings, software errors, or system limits. Identifying the underlying cause is the first step in finding the correct solution. In the following, we’ll detail the usual reasons for this issue.
❌ Insufficient disk storage.
❌ Software conflicts.
❌ Outdated macOS versions.
❌ Microphone settings issues are preventing audio capture.
❌ Restrictions from browsers or corporate software.
2. How to Fix Screen Recording Not Working on Mac
For those with QuickTime screen recording not working, there are easy methods to fix it. By adjusting permissions and reviewing system settings, most problems can be fixed with just a few easy steps. Below, we’ll walk you through effective methods to fix the problem and restore smooth screen recording on your Mac.
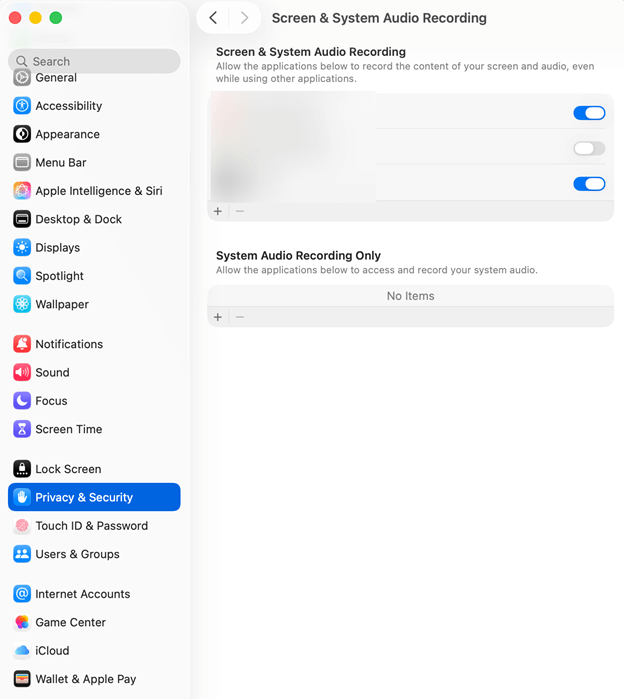
Fix #1. Enable the Screen Recording
One of the most common reasons QuickTime screen recording fails is that screen recording permissions are disabled. Ensuring the app has the necessary permissions often resolves the issue quickly. Check out how.
Step 1. Click the Apple icon in the top left corner.
Step 2. Select System Settings…
Step 3. Tap Privacy & Security.
Step 4. Now, under Privacy, select Screen & System Audio Recording. Click the + icon to add apps that record screen and audio content, even while you use other apps.
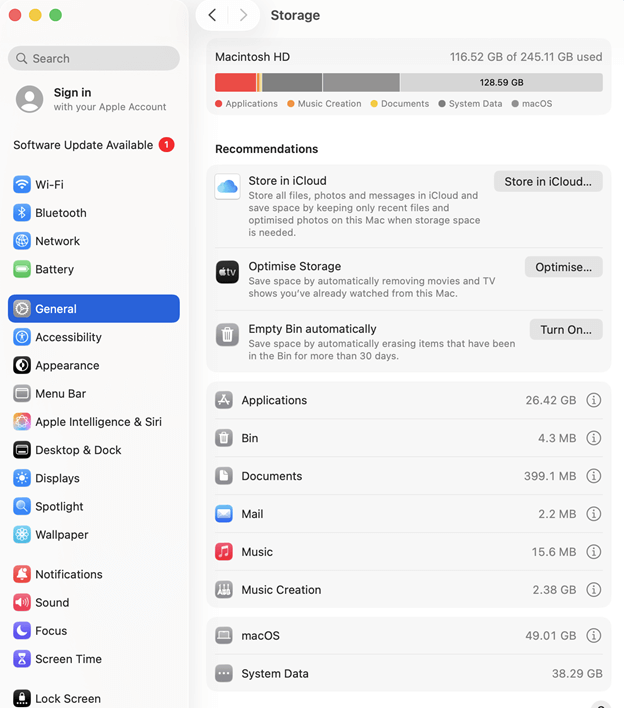
Fix #2. Check and Free the Device Storage
Due to insufficient device storage, your Mac may run low on space, and recordings may fail to save properly. Freeing up storage ensures QuickTime can capture and save recordings smoothly. Here’s how.
Step 1. Press the Apple logo in the upper-left corner.
Step 2. Select System Settings…
Step 3. Click General in the left sidebar and choose Storage in the right pane.
Step 4. Take note of your available storage. If your Mac lacks sufficient storage, remove unneeded files to create more space.
Fix #3. Set the Microphone to None
At times, recording can fail when QuickTime attempts to use a microphone that isn’t connected or isn’t working properly. Choosing the microphone option as “None” can avoid conflicts and let QuickTime record the screen smoothly without audio input problems. Find out how.
Step 1. Press the Shift + Cmd + 5 keys.
Step 2. In the floating menu that appears at the bottom, select Options.
Step 3. Under the Microphone option in the list, select None.
Fix #4. Create Screen Recordings with QuickTime Player
Another effective approach is to record a new screen directly in QuickTime Player. Temporary glitches, background processes, or conflicts from earlier attempts can interfere with screen capture.
A restart often resolves these glitches, helping QuickTime run smoothly and capture your screen without issues. Find out how.
Step 1. Open the QuickTime Player app on your Mac.
Step 2. Select File and choose New Screen Recording.
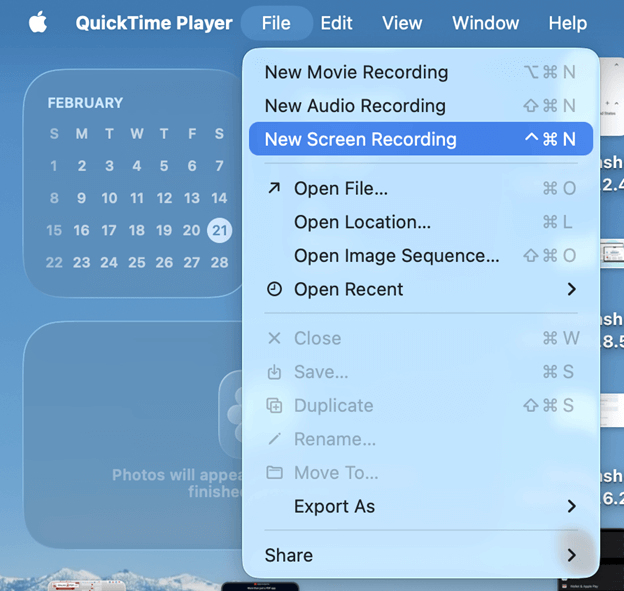
Step 3. Next, tap the Options tab, and you’ll see a few recording options.
- Microphone: Click None to disable audio in the recording, or click the microphone icon to enable it.
- Options: Click “Show Mouse Click in Recording” to make clicks during the screen recording appear as a circle on the screen.
Step 4. Click the red circle to start recording. Then tap Stop to cease it.
Step 5. Go to the File tab and click Save. Next, enter a name for the recording and save it.
Fix #5. Reboot Your Mac
Restart your Mac to eliminate temporary bugs or background tasks disrupting the app. Restarting your Mac refreshes resources, clears small conflicts, and restores functionality, allowing QuickTime to record smoothly. Check how it’s done.
Step 1. Click the Apple icon in the upper-left area.
Step 2. Click Restart… to proceed.
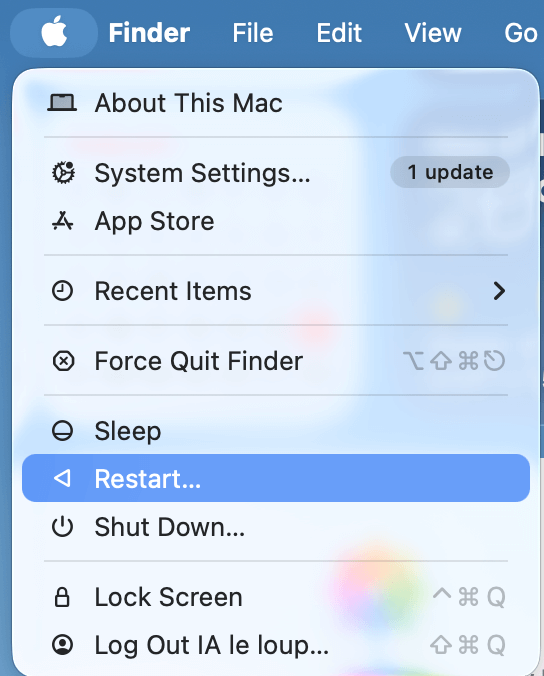
Alternatively, just press and hold the Power button, then release it once the Mac has completely powered off. After waiting briefly, press the Power button to reboot your Mac.
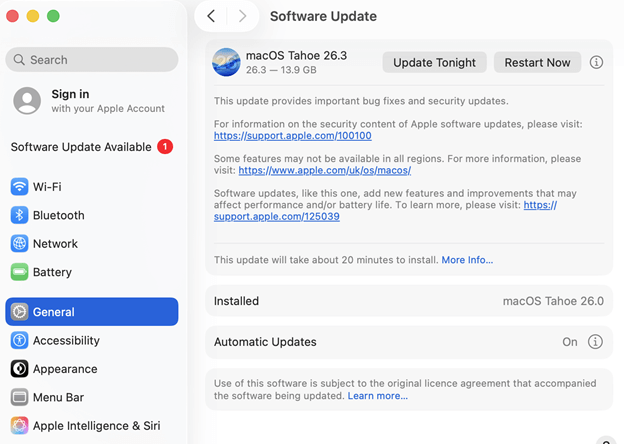
Fix #6. Update Your Mac Device
Sometimes, using an old macOS can trigger this issue. Installing updates can resolve bugs and improve both system stability and app functionality.
Keeping your Mac updated helps QuickTime and other apps run properly, fixes recording issues, and prevents similar problems from occurring. Check how it’s done.
Step 1. Tap the Apple icon in the upper-left section of your display.
Step 2. Select System Settings…
Step 3. Click General and select Software Update.
Step 4. Check for any available updates. Install the updates on your Mac if offered.
Fix #7. Use a Different Program or App
If none of the previous fixes work, you can try using a different program or app. Occasionally, QuickTime encounters limitations or compatibility issues that prevent screen recording.
Using a dependable third-party app, such as a trusted Mac screen recorder, offers additional features, improved performance, and a smoother recording experience with fewer common glitches. Keep reading to learn more.
Bonus Tip: Another Simple Mac Recorder You Should Try
Once you’ve examined the reasons and remedies for screen capture not working on Mac, the built-in feature should function properly. However, for those who need extra functionality, greater recording control, or want to record Netflix and streams seamlessly, AWZ Screen Recorder provides a dependable third-party solution.
AWZ Screen Recorder is a powerful, professional, user-friendly screen recorder for Mac that delivers high-quality recordings with smooth performance. It allows users to record the entire screen, a chosen area, or a particular window smoothly and without lag.
You can record system audio, microphone input, and webcam simultaneously. With adjustable settings, scheduled recordings, and versatile output options, it provides professional, smooth, and hassle-free screen recording for any purpose.
Key Features of AWZ Screen Recorder
- Enables to screen record on Mac with audio.
- Capture audio, video, and webcam simultaneously.
- Take custom screenshots to make presentations or document a process.
- Edit recorded videos and quickly upload them to YouTube, Vimeo, or TikTok.
- No lag in recording online meetings, tutorials, live streams, and more.
Let us see how to record a Mac screen with AWZ Mac Screen Recorder in just a handful of clicks.
Step 1. Download and launch AWZ Screen Recorder on Mac.
Step 2. Click the Record Screen on the first interface.
Step 3. Select the Full Screen mode to record the whole screen. Another option is to select Select Region for a custom recording area or Fixed Size to choose a set aspect ratio.
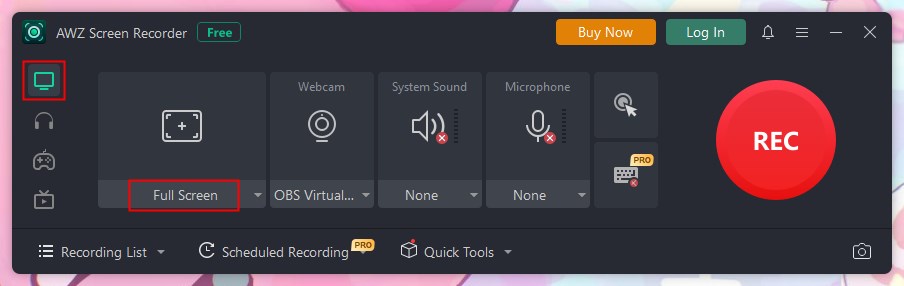
Step 4. Next, hit the REC button to begin recording the current screen session. After recording, press the Stop button to finish.
![]()
Final Wrap Up
Experiencing screen recording not working on Mac can be frustrating. However, most problems can be fixed by reviewing permissions, clearing storage, updating macOS, or rebooting your device.
For greater control and reliability, a trusted third-party tool like AWZ Screen Recorder guarantees smooth, high-quality recordings every time. With the right approach, capturing your screen on a Mac becomes hassle-free and efficient. Try it now!
Lena