In this blog, AWZware aims to give the general yet best OBS settings for recording. Of course, they may vary for each user depending on the model and internet speed, but this shall work to get started. Let's quickly look at all the settings parameters.
6 Best OBS Settings for Recording
This part will discuss OBS's best recording settings to record your screen and generate professional results.
1. Recording Settings
Be mindful of the general recording settings, such as:
⭐ Output Mode: Advanced
⭐ Recording Format: MP4
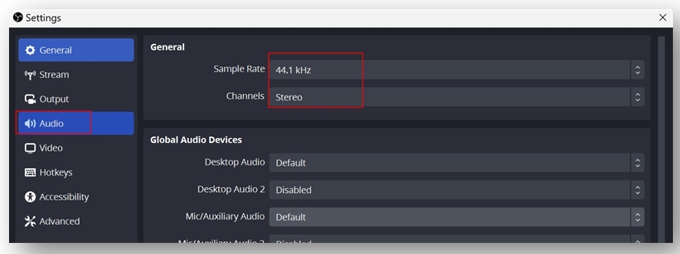
⭐ Audio: Keep Sample Rate (44.1 kHz) or others by default
⭐ Video and audio encoder: Hardware encoder first: NVENC > QSV > software x264
If you think about what encoder to use OBS screen recorder, go for x264. Have a look at the best OBS recording format, especially for YouTube.
Step 1: Launch OBS on your computer and go to Settings.
Step 2: Click the Output tab and choose Advanced for Output Mode.
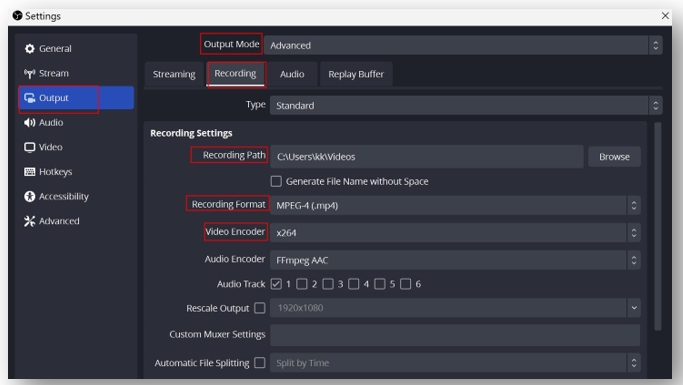
Step 3: Click Recording, and choose the Standard Type. Click Browse to select the recording path where you want to save your recording for YouTube videos.
Step 4: Open the dropdown menu next to Recording Format, and choose MP4 for most YouTube videos.
2. Encoder Settings
If you talk about encoder settings, the best OBS encoder settings are NVIDIA NVENC (when applicable).
⭐ Software (x264): It is OBS's default option and uses your CPU to process the video. It's renowned for its consistent quality and fits most streaming setups well.
⭐ Hardware (NVENC, AMD VCE): It uses your GPU to process video, offloading your work from the CPU. It helps improve performance and reduce CPU usage, which is beneficial for many resource-intensive tasks such as gaming. However, the quality may slightly lag at lower bitrates than software encoding.
Let's see how you can set encoder settings to attain the best OBS settings for recording.
Step 1: Launch OBS on your computer and go to Settings.
Step 2: Click the Output tab and choose Advanced for Output Mode.
Step 3: Click Recording and choose your dedicated graphics card to adjust its settings. If you don't have one, select x264.
How to Record Discord Audio with OBS Studio | Full Guide
This guide will show you how to record Discord audio with OBS Studio. In addition, you will also learn another easier way to accomplish the recording.
READ MORE >3. Audio Settings
Audio Settings are also crucial in maintaining the best OBS settings for recording. Go for an audio bitrate of 128, a sample rate of 48 kHz, and stereo channels for a seamless output.
Step 1: Navigate to the Audio menu and set the audio rate to 320 in track one. Boost the scale to 320 for multiple tracks.
Step 2: Go into the Audio menu from the list on the left. Set the sample rate to the same rate as your microphone.
Step 3: Finally, select the microphone you want to record with. Leave all the other settings as they are.
4. Video and Audio Bitrate
Talking about the best bitrate for recording OBS (video), you can set custom bitrates to match the video quality you want to put out. When you increase the bitrate, ensure you also increase the file size. Go for a high bitrate, such as 8000 for full HD recordings, or lower down to 6000 for 720p files.
For the best recording settings for OBS (audio), adjust the audio bitrate according to your available HDD space, internet connection speed, and desired audio quality— a higher bitrate results in better sound. If you record a video in full HD, setting the audio bit rate in OBS to 320 is better. For 720p, 192 is just enough. You can open the Output tab and change the Audio Bitrate.
5. Video Resolution
Video resolution plays a vital role in setting the best OBS settings for recording. Base (Canvas) Resolution and Output (Scaled) Resolution actually depend upon your output needs. You can always match the OBS recording settings to your monitor's screen size to get the full screen and have the highest-quality video output. Ensure setting your bitrate to either 30 or 60 FPS.
Step 1: Move to the OBS Settings menu and click Video.
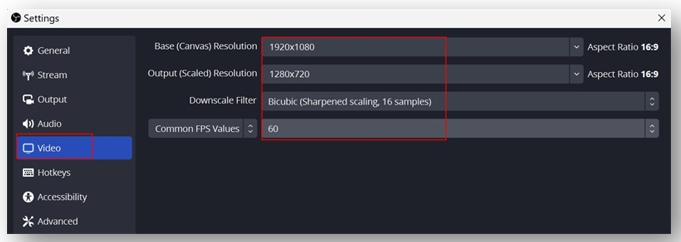
Step 2: Now drop your resolution settings.
⭐ Base (Canvas) Resolution: 1920 x 1080
⭐ Output (Scaled) Resolution: 1920 x 1080
⭐ Downscale Filter: Lanczos (Sharpened scaling, 36 samples)
⭐ Common FPS Values: 60
6. Snap Sensitivity
Snap Sensitivity is one of the best OBS settings for recording that helps line up the sources nicely and smoothly on the scenes. If you don't have this enabled, you can freely move all your sources around, but it is suggested that you enable Source Alignment Snapping and set your Snap Sensitivity.
Step 1: Open OBS Studio on your desktop and move to Settings in the bottom right corner.
Step 2: Move to the General tab and scroll down to find Snap Sensitivity under Source Alignment Snapping.
Step 3: Enable Source Alignment Snapping and set your Snap Sensitivity to 10.0
Step 4: Check the other boxes to align everything nicely, smoothly, and even throughout the scenes.
Bonus Part: Best Alternative to OBS with Simple Steps for Recording
We hope our guide helped you have the best recording settings for OBS. But sometimes, the program confuses us about whether it's running or stopped recording. You may need to force quit the program at other times as the commands may not work. In such a case, you can look for a dependable alternative like AWZ Screen Recorder for a seamless video recording experience.
AWZ Screen Recorder is an ideal solution to capture your screen, webcam, and microphone audio. The program helps you record gameplay highlights and take custom screenshots to make presentations or document a process. AWZ Screen Recorder also has a built-in video editor for a one-stop recording convenience. You can even share the recorded videos directly to social media sites without hassle.
Check out the step-by-step guide to use the AWZ Screen Recorder:
Step 1: Download the program and select a recording layout. Choose a recording mode like screen, webcam, microphone, or audio.
Step 2: Record the whole screen or the desired region and set up advanced capture options.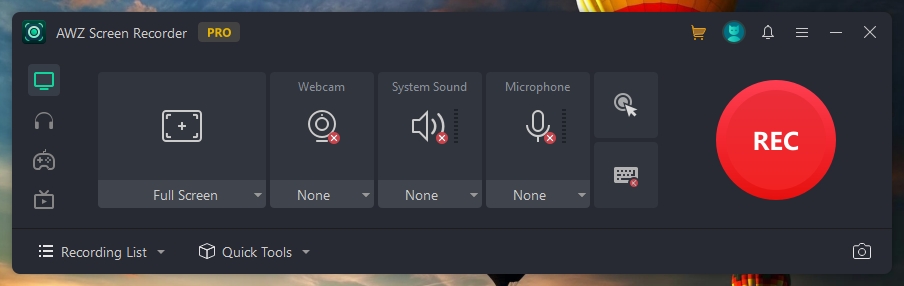
Step 3: Tap the REC button to capture your screen and playback the video to make edits to the recording or audio source and output it to any format in HD quality.
Final Words
We have familiarized you with the best OBS settings for recording, considering the encoder settings, video resolution, audio settings, audio and video bitrate, and much more for a seamless recording experience of your tutorials, gameplays, movies, etc.
If you ever find lags or connectivity issues with OBS, feel free to switch to a better alternative like AWZ Screen Recorder. The program lets you record high-quality videos and offers a built-in editor for basic editing.