If you're also confused about where to start with this software for live streaming and recording, read this guide. AWZware will walk you through detailed steps for how to record with the OBS screen recorder. The article covers what OBS is, how to download it, how to use OBS to record screen, and the best OBS alternative.
What Is OBS Screen Recorder
OBS, or Open Broadcaster Software, is a proficient video recording and live streaming program. With various capabilities to capture screen, record audio, and do more, this application allows you to access all the features for free. No extra fees will be charged when you use OBS to record screen on a computer. It now is compatible with computers working with Windows, Mac, and Linux.
Some major features of the OBS screen recorder that you may need:
- Easy to record gameplay on your PC;
- Capture screen in 1080p resolution to make an HD video and stream it right away;
- Record on-screen activities for hours without limitation;
- Accept webcam and microphone as the video and audio sources.
How to Download and Install OBS Screen Recorder
Speaking of the OBS Studio download, the process is pretty easy regardless of the system running on your computer. This program allows you to free download the installer file from its home page and you can follow the steps below to install the OBS screen recorder:
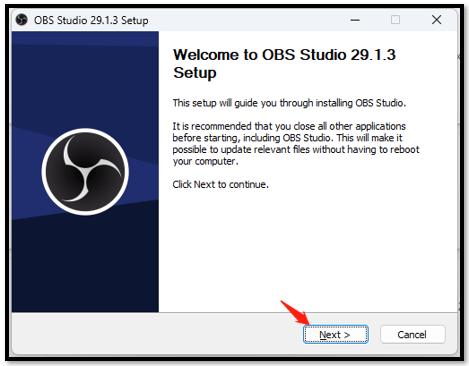
Step 1: Visit its official website and download the installation package;
Step 2: Click on the three-dot icon in the top right of your Chrome browser and select Downloads. Tap the file to begin the installation;
Step 3: When a pop-up window jumps out, tap Next and Next successively. Choose the Destination Folder and hit Install.
Now, you are ready to download videos from any website or create your own works.
How to Record Screen with OBS Screen Recorder
After the installation is completed, the OBS screen recorder can be launched on your computer. The next is to use OBS to record screen and make your perfect videos. If you are a beginner, here are some recommended best OBS settings for recording. For output settings, MP4 is the common option and usually, the bitrate is at 6000kpbs for 1080 resolution. When conducting video recording, the resolution is better to be 1080p.
Now, read on how to record with OBS Studio:
Step 1: Adjust the recording settings
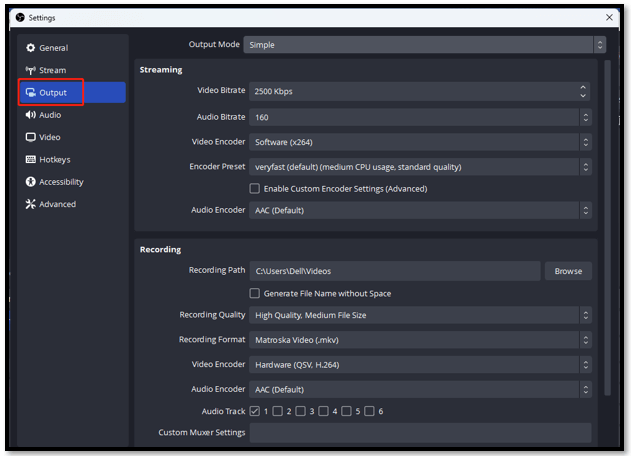
To decide the best OBS settings for recording, select “Settings” under the Controls tab and go to “Output”. You can customize the bitrate, output path, recording quality, and so on.
Step 2: Specify the video quality
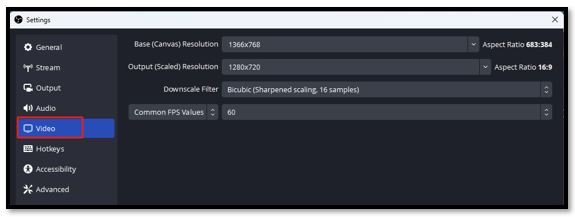
Navigate to “Video” and configure the resolution. The “Base Resolution” is usually set to match the native resolution of your monitor. While “Output Resolution” is when streaming or capturing your own video. Then click “OK” to save all changes.
Step 3: Select what to capture
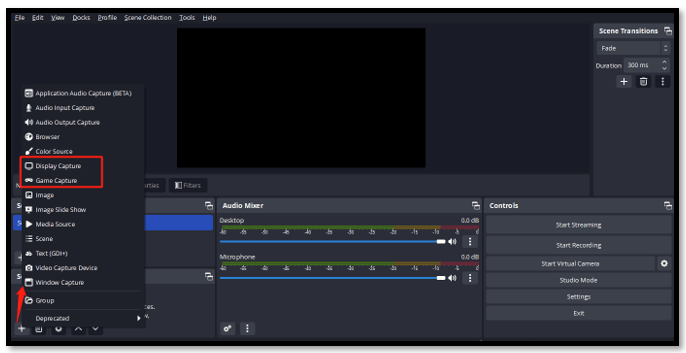
Under the Sources tab, click on the plus icon and choose what you want to add to your output. Select “Display Capture” and click “OK”. Choose the monitor you want to record and press “OK” to finish the OBS recording settings.
Step 4: Start recording with the OBS screen recorder
Find “Controls” and tap “Start Recording” to use OBS to record screen. Then click “Stop Recording” to save the video. Locate “File” in the top left and choose “Show Recordings”. You can find out your OBS recordings and view them.
That’s how to record with OBS Studio with easy steps. However, as the software for live streaming and recording, OBS doesn’t allow you to edit videos. You may need to look for other editing programs to enrich your video.
6 Best Free Video Editing Software with No Watermark in 2023
Which is the best free video editing software with no watermark? If you are looking for this kind of video editor, you can find the ideal one from this article.
READ MORE >Best Alternative to OBS Screen Recorder
The luxurious features of the OBS screen recorder can make a beginner feel overwhelmed in terms of recording. This means that OBS Studio might cost you more time to tinker with it when you want to record a lecture or capture game footage. If you have limited time to devote to capturing your on-screen actions, an OBS alternative like AWZ Screen Recorder can be an optimal option.
AWZ Screen Recorder is an easy-to-use video-making platform. The application enables you to capture hours of activities without latency and frustrating time limits. Both the webinar and microphone are supported to capture your face and audio. It is convenient to decide the video capture quality. You can choose the resolution you like or apply the default one. The user-friendly UI lets all creators have no learning curve to locate the desired feature and eliminates the need to hassle with recording settings.
Click the button above to install this alternative to OBS and check out how to record with the OBS screen recorder alternative:
Step 1: Configure recording settings
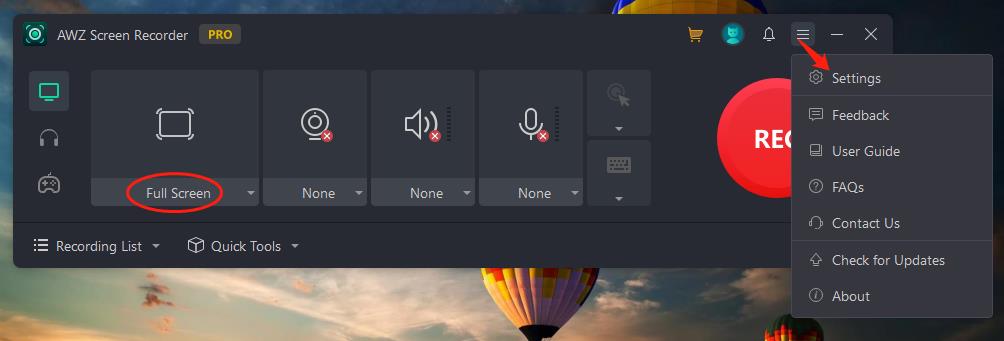
Click on the three-vertical-line icon in the upper right and choose “Settings”. Select the format, frame rate, and quality under the Video and Audio tabs. Tap “Full Screen” and press “Select Region” to decide the recording area.
Step 2: Record your video
Hit the webcam, speaker, or microphone icon to enable the corresponding feature. Then tap “REC” to start recording.
Step 3: Edit the recorded video
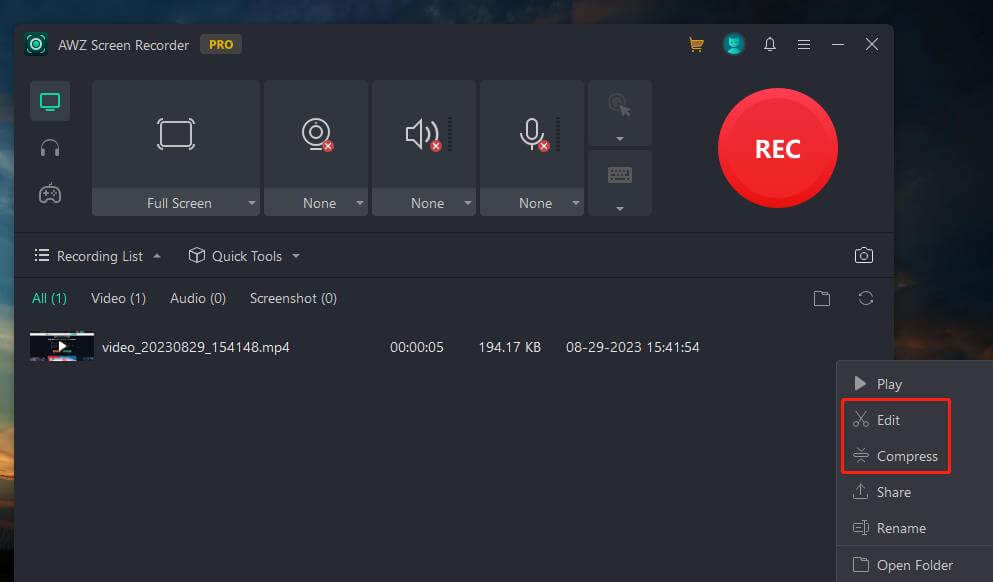
If you want to cut or crop your video in an attempt to reduce the video file size, tap “Recording List” and hit the three-dot icon next to your video. Choose “Edit” or “Compress”.
Final Thoughts
The OBS screen recorder is a highly-rated recording solution for creating high-definition videos. To help users who are still new to this software, this article talks about how to record with OBS Studio, together with a simple introduction to the program and the way to install it.
However, as the UI is not friendly for beginners, AWZ Screen Recorder is recommended as one of the best OBS alternatives to do screen recording. It has easy navigation that allows you to easily adjust recording settings in seconds.