If you are seeking OBS streaming settings for Twitch and YouTube, look no further, as this article is here to help you set up your OBS for seamless streaming. Stay tuned with AWZware to stabilize your streams and other on-screen elements with OBS.
6 Best OBS Settings for Streaming
Here's a quick tutorial to optimize and set up OBS for streaming and configure the OBS Studio settings for live streaming on an HTML5 live channel.
Tip 1: OBS General and Streaming Settings
When setting the best OBS settings for streaming, you must know that the General settings do not directly affect your stream or recording quality. Instead, it forms the backdrop of your OBS experience. You can personalize OBS by changing the platform language or switching between different themes. You can proceed with the following steps.
Step 1: Open OBS Studio settings and click the Settings button at the bottom-right area of the app window. Then, click the General tab and choose your language.
Step 2: Select a Theme, such as a light or dark theme.
Step 3: Next, go to the Stream tab in the left section of the OBS Studio settings window to adjust OBS streaming settings and choose the streaming service.
Tip 2: OBS Output Settings
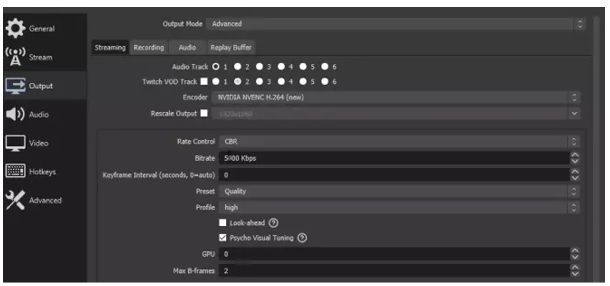
In the Output tab, you can set up OBS for streaming and customize your recorded videos and live streams' encoding, audio, and format settings. Here's how you can optimize OBS settings for Twitch.
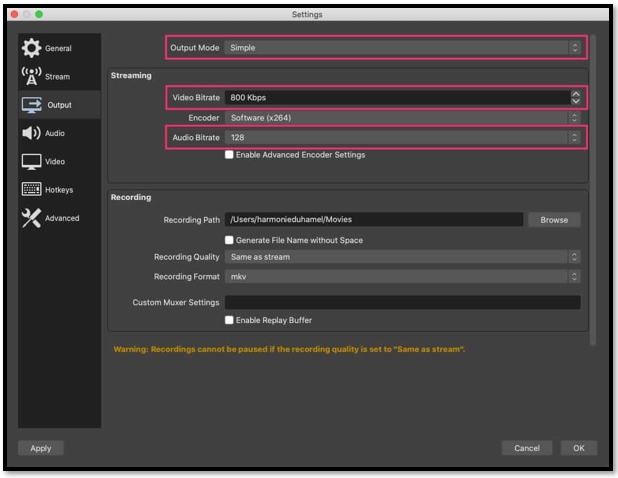
⭐ Encoder Settings
- Software (x264): It is OBS's default option and uses your CPU to process the video. It's renowned for its consistent quality and fits most streaming setups well.
- Hardware (NVENC, AMD VCE): It uses your GPU to process video and, as a result, improves performance and reduces CPU usage, which is especially beneficial for gaming. However, the quality may lag slightly at lower bitrates.
⭐ Audio Settings
- Sample rate: Se it according to your audio equipment and streaming platform requirements, such as 44.1 kHz or 48 kHz.
- Bitrate: Bitrates between 128 and 160 kbps are apt for most audio setups in a streaming context. You may use 320 kbps for streams where audio quality is paramount.
- Channels: Stereo (2 channels) is the standard option for most streams, but you can tailor it to match your specific audio setup.
⭐ Advanced Settings
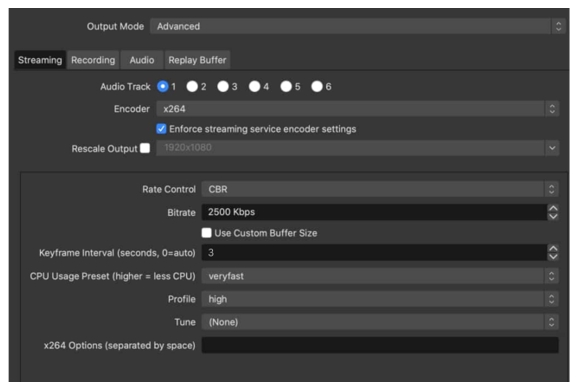
- Keyframe interval: A 2-second setting is recommended to reduce buffering and improve playback on the viewer's end.
- CPU usage preset: This balances CPU usage and encoding quality for software encoding. Set it as "Veryfast" and tweak it later according to your CPU's processing power and your stream's performance.
If you also want to record videos for YouTube in OBS, here are some of the best settings for recording:
Best OBS Settings for Recording: 6 Tips to Record Like a Pro
This post provides the best OBS settings for recording. Follow the complete guidelines to help set up OBS Studio for recording like a pro.
READ MORE >Tip 3: OBS Audio Settings
You can tune up the sonic dimension of your stream to obtain the best streaming settings for OBS. Set the sample rate to configure the audio channels and manage any connected audio devices. You must know that a higher sample rate equals clearer sound for seamless OBS streaming.

Tip 4: OBS Video Settings
The best OBS settings for streaming consider Video settings, too. OBS Video settings allow you to set your base (canvas) resolution and set the downscale filter and fps to ensure your stream flows smoothly. Here's how to optimize OBS settings for Twitch.
- Base (canvas) resolution: It should be in tune with your monitor's native resolution or the desired output resolution. If your monitor resolution is 1920×1080, set it as your OBS base, too.
- Output (scaled) resolution: It depends on the streaming platform's requirements and your internet upload speed. Generally, 720p (1280×720) is a good starting point, but 1080p (1920×1080) can provide a superior viewer experience if your internet connection allows.
- Downscale filter: It is used when your base resolution exceeds your output resolution. For best results with balanced quality and resource usage, choose Bicubic or Lanczos (Sharpened scaling, 32 samples).
- FPS (frames per second): 30FPS is sufficient for most content. However, 60FPS will provide a smoother, more fluid visual experience if you stream high-motion content like video games.
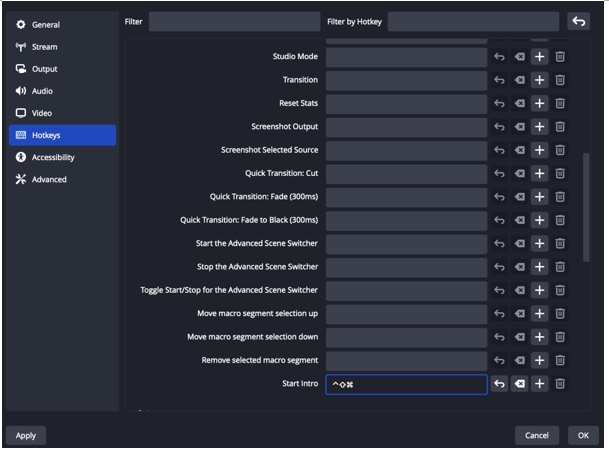
Tip 5: OBS Hotkeys Settings
When you set up OBS for streaming, you can see the Hotkeys settings, as OBS lets you set up custom hotkeys for easy configuration on the fly. OBS streaming settings enable you to swiftly make changes during your live stream without navigating menus to offer your audience a seamless viewing experience.
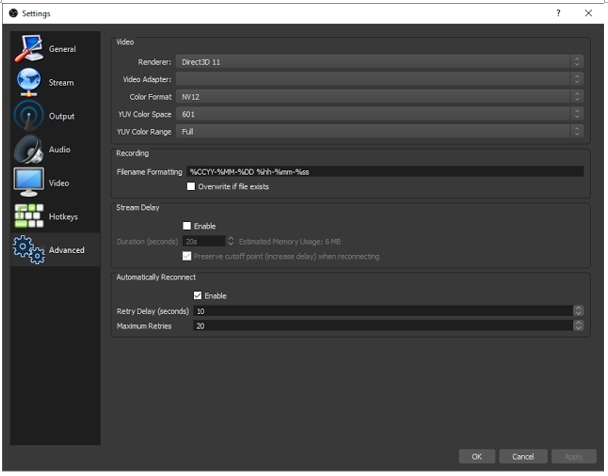
Tip 6: OBS Advanced Settings
You cannot ignore the Advanced settings as they also form part of the best OBS settings for streaming. The Advanced settings are the control panel for specific adjustments, such as color settings and processing priority, especially for users desiring more precise control over their streaming video. However, to stream a game on a low-end PC, it is better to skip this tip.
You may face difficulties editing videos while streaming and recording simultaneously using OBS. The mic choice doesn't display, leading to the wrong mic selection and poor recording. Many users have complained that multiple sources do not work parallelly, and technical glitches deliver a poor user experience. Instead, we recommend you use a competent OBS alternative like the AWZ Screen Recorder, which can easily capture your screen, webcam, and microphone audio to deliver seamless results.
Bonus Part: Record Your Gameplay Without Performance Dropping
You have seen the OBS streaming settings to optimize your streaming experience. However, AWZ Screen Recorder is a better alternative to record your video streams and gameplay, make screenshots, and add annotations while recording.
AWZ Screen Recorder is a versatile screen recorder to help you capture on-screen activities. You can record online meetings, YouTube videos, gameplays, online courses, and more. Whether you need to record 2D/3D games or create videos of gameplay highlights, AWZ Screen Recorder helps do it all and seamlessly share your videos to social handles like TikTok, YouTube, and Vimeo.
⭐ Key Features of AWZ Screen Recorder
- Offers high-resolution webcam recording
- It helps record pure audio or screen/webcam with audio
- Offers basic video editing
- Allows to schedule recording
- Enables full-screen recording and custom recording with auto-region selection
Step 1: Download, install, and run the AWZ Screen Recorder on your Windows computer.
Step 2: Choose a recording mode, like screen, webcam, microphone, or audio.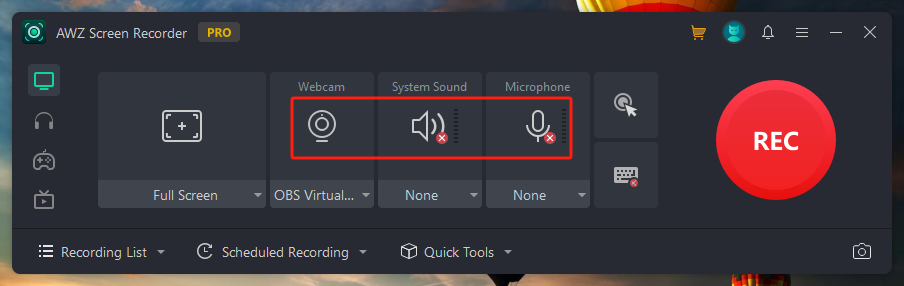
Step 3: Capture the entire screen or record the targeted area and set up advanced capture options. Then, tap the REC button to begin recording your screen.
Step 4: Once recorded, you can playback the video or edit your recordings, including the audio source. Then, output your recording to any format in HD quality.
The Final Words
With limitless OBS options and settings, you might face difficulty in setting up OBS for streaming and feel like you're trying to navigate an intricate maze with no clear map. Setting up OBS for streaming is pretty challenging, especially if you are a beginner and do not know exactly what you want. However, with the above tips, you can set the best OBS settings for streaming and easily create quality videos to impress your audience.
An easier way is to use the AWZ Screen recorder to grab your screen activities with webcam and audio. It further helps you edit and share your recorded videos on social platforms in one click.