OBS (Open Broadcaster Software) is widely used for live streaming and screen recording. However, many users complain that OBS recordings are choppy, which affects the quality of their content. This can be due to incorrect settings or hardware limitations. If you are also facing this issue, you are in the right spot.
In this guide, we’ll discuss the primary causes of OBS recording choppy and how to resolve them with simple adjustments.
Common Reasons for Choppy OBS Recordings
There could be some reasons for this issue:
- Incorrect bitrate and framerate settings.
- Hardware limitations on CPU and GPU.
- Network Connectivity can cause issues, especially during live streaming.
- Incompatible recording settings.
- Higher encoding settings for lower CPU.
6 Effective Solutions to Fix OBS Recording Choppy
Here are the possible solutions for your choppy recording at OBS.
Way 1. Update OBS
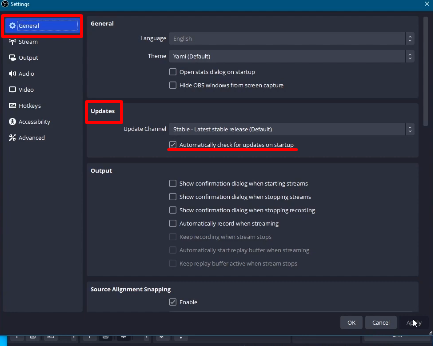
Make sure you are using the latest version of OBS, as each update brings new optimizations. To check for updates, go to OBS settings > General > Updates. Below Updates, select stable, check the box “Automatically check for updates on startup,” and click “Apply.”

This will notify you when an update for OBS is available, and you can update it.
Way 2. Optimize OBS Output Settings
Output settings have a significant impact on the quality of your recording. Here’s how to tweak them for smoother results:
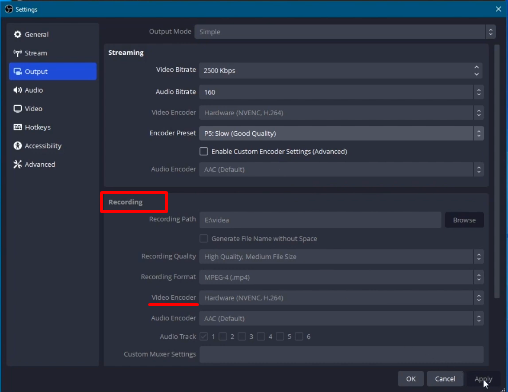
- Bitrate: Open Settings > Output > Recording. For 720p recordings, set the bitrate to around 3000-4000 kbps. For 1080p, try 6000-8000 kbps. Increasing the bitrate too high can overload your system, so adjust it based on your hardware capability.
- Video Encoder: In the same Output section, select your encoder. If you have a dedicated graphics card, choose Hardware (NVENC) for NVIDIA or AMD VCE for AMD. This offloads processing from your CPU to your GPU. If you don’t have a dedicated GPU, select x264, but be cautious, as this relies solely on your CPU.
- Rate Control: Set Rate Control to CBR (Constant Bitrate), which provides a consistent quality level and reduces stuttering.
- Recording Format: Change the Recording Format to MP4 or MKV for better compatibility and smoother playback.

Way 3. Adjust Video Settings
Improper video settings can lead to choppy recordings in OBS. Here’s how to configure them properly:
- Resolution Settings: Go to Settings > Video in OBS. Set Base (Canvas) Resolution and Output (Scaled) Resolution to 1280x720 or 1920x1080. Lower resolution will help if your device struggles with higher resolutions.
- Frame Rate (FPS): A lower FPS reduces the load on your CPU/GPU. Set the Common FPS Value to 30 FPS instead of 60 FPS if you experience lag. This is often enough for most recordings and can greatly improve smoothness.

Way 4. Adjust CPU Usage Preset
The CPU usage preset controls how much CPU power OBS uses. Here’s how to adjust it:
- Go to Settings > Output.
- In Encoder Settings, locate CPU Usage Preset.
- Lowering the preset (e.g., from “Very Fast” to “Faster”) can improve recording quality but affect performance.
- For high-performance systems, you can use Medium or Slow. For older systems, stay at Very Fast or Super Fast.

Way 5. Change CPU Processing Priority
Your CPU generally prioritizes games over other programs. So, the recordings often appear choppy. You can fix this easily by the following:
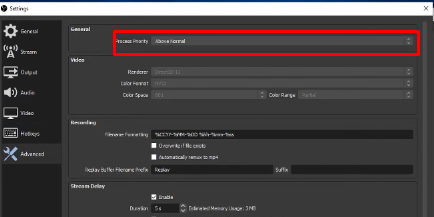
- Open OBS studio and click on File > Settings >Advanced.
- Set the “Process Priority” to “Normal to High” and click "Apply."

This will prioritize OBS over the game, and your recording will remain smooth.
Way 6. Consider Lowering Game/Software Graphics
When recording gameplay, high graphics settings in the game or software can overload your system. Here’s how to optimize:
- Open your game’s settings and lower the graphics quality.
- Reduce resolution, shadow, and texture quality. This lowers the load on your GPU, resulting in smoother OBS recordings.
Bonus: Try AWZ Screen Recorder for Smoother Recording
If OBS continues to give you trouble in recordings or not capturing the game, consider trying AWZ Screen Recorder. It’s a reliable alternative that provides high-quality recording with minimal lag. With easy-to-adjust settings and compatibility across devices, AWZ Screen Recorder offers a free screen recorder with a seamless recording experience without the complexity of OBS. It’s ideal for users who need professional results without extensive setup.
Key Features of AWZ Screen Recorder:
- Capture streaming and gaming videos effortlessly.
- Replay recordings without an internet connection, edit, or add commentary as needed.
- Easy-to-use interface for smooth, uninterrupted recording.
- Options like full-screen, custom regions, auto region selection, scheduled recordings, and more.
- A high-resolution webcam features a flexible option to blur backgrounds.
- Reduces background noise for clearer audio quality.
With AWZ Screen Recorder, enjoy a smooth and versatile recording experience tailored to your needs.
Start a lag-free recording with AWZ Screen Recorder by the following:
Step 1: Download AWZ Screen Recorder software on your computer. Open the program and select a recording mode (screen, webcam, microphone, or audio) according to your needs.
Step 2: Record with the full-screen mode or select a region and set up advanced capture options. Click on the 'REC' button to start capturing your screen.

Step 3: Playback the recording, make edits in audio or video, and save it in HD quality with any format.
Final Words
OBS recording choppy can be frustrating as it wastes your time and effort. You can resolve this by updating OBS, adjusting your settings, and optimizing your system. For an even smoother experience, try AWZ Screen Recorder, an alternative tool designed for seamless, high-quality recordings with simple, user-friendly settings. Enjoy smoother recordings without the hassle. Happy recording!


