So stay with AWZware as here we will discuss the two best ways to find and open the default Windows Snipping Tool shortcut and create a shortcut for Snipping Tool on Windows PCs. But first, let us know what a Snipping Tool is.
What Is a Snipping Tool?
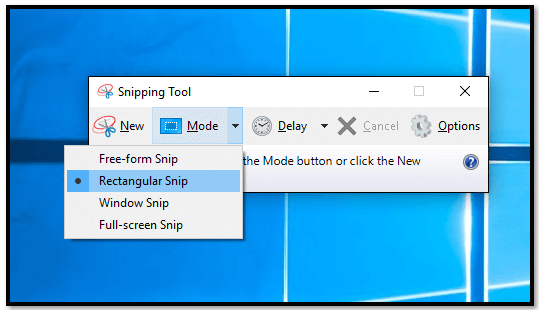
Snipping tool is Microsoft’s built-in app to enable Windows users to take snapshots and copy words, texts, images, graphics, and annotations from all parts of the computer screen and then make changes to the captured snip to save and share them in the preferred format. There are multiple types of snips like Free-form snip, Rectangular snip, Window snip, and Full-screen snip.
Key Features of Snipping Tool
Snipping Tool enables you to perform the following actions to your captured snip and other information on the screen.
● Capture a snip
● Enlarge, rotate, and crop your snip
● Annotate, save, and share a snip
● Print a snip
● Delay your screenshot
● Remove the URL
![7 Practical Snipping Tools for Mac [Free Applications Included]](https://img.swifdoo.com/image/snipping-tool-for-mac.png)
7 Practical Snipping Tools for Mac [Free Applications Included]
Are you looking for a snipping tool for Mac? This article picks up seven easy-to-use Mac snipping tools and helps you to use the snipping tools.
READ MORE >Use Snipping Tool Shortcut to Take Screenshots [Windows]
While a Snipping Tool helps capture a snip and make changes to it, you must know how to activate and open it with the Snipping Tool shortcut. Here are the two methods to assist you with the same.
Default Shortcut for Snipping tool
A Keyboard shortcut is always handy to use the Snipping Tool and eases your work to a significant extent. Here’s how you can use the default Shortcut for Snipping tool and take a snap instantly.
Step 1: Hold the Windows logo key + Shift + S keys.
Step 2: The desktop will darken while you select an area for your screenshot.

Step 3: Upon this, a rectangular mode is selected by default. However, you can change the snip’s shape by selecting Window mode, Rectangular mode, Full-screen mode, or Free-form mode from the toolbar.
Step 4: The screenshot copies automatically to the clipboard. And once you are finished taking a screenshot, a notification appears. You can select it for editing options.
How to Create Shortcut for Snipping Tool on Desktop
Here’s how you can create a Windows Snipping tool shortcut and launch it in no time on Windows 10 and Windows 7.
Windows 10
Step 1: Navigate to Start, select Windows Accessories, and right-click on the Snipping Tool entry. Tap More and choose Open file location to open Windows Accessories folder.
Step 2: Right-click on the Snipping Tool shortcut and choose Properties.
Step 3: Under the Shortcuts tab, choose the field next to the Shortcut key field. Then enter a keyboard shortcut to launch the Snipping tool.
Windows 7
Step 1: Go to Start, click All Programs, and select Accessories. Right-click on the Snipping Tool and choose Properties.
Step 2: Visit the Shortcut tab and click the Shortcut key box. Press any keyboard key as your shortcut to the program.
Step 3: Windows will allow the new shortcut to the Snipping Tool and will embed Ctrl + Alt as the prefix to your shortcut.
For instance, if you have assigned the S key to the Snipping Tool, you must press Ctrl + Alt + S keys to launch the Snipping Tool shortcut.
Step 4: Select the Apply button.
Alternatively, creating a desktop shortcut for Snipping Tool provides greater convenience to all users. Here’s how.
Step 1: Right-click on the desktop screen and click New.
Step 2: Select the Shortcut option from the list.
Step 3: Type snipping tool into the text field of the Create Shortcut window and tap Next.
Step 4: Type and enter a name for your shortcut file, like the Snipping tool, and click Finish.
Bonus: How to Take Screenshots in AWZ Screen Recorder
AWZ Screen Recorder easily captures your screen in a few clicks to stream video recordings on Windows computers. The program offers multiple recording modes to capture on-screen activities and enable you to record gameplays, online meetings, online courses, YouTube videos, and more.
AWZ Screen Recorder also takes screenshots and saves them in any image format. In fact, the video editor enables you to annotate recorded videos or add annotations while recording. With an unlimited recording limit, the program allows you to remove watermarks too.
Key Highlights
● Records 2D/3D games and creates videos of gameplay highlights
● It helps take custom screenshots to make presentations or document
● Offers a high-resolution webcam recorder with audio
● Seamlessly shares videos to YouTube, TikTok, and Vimeo
● It provides a one-stop recording convenience with a built-in video editor
● Captures webcam and microphone audio
How to use AWZ Screen Recorder:
Step 1: Download the program
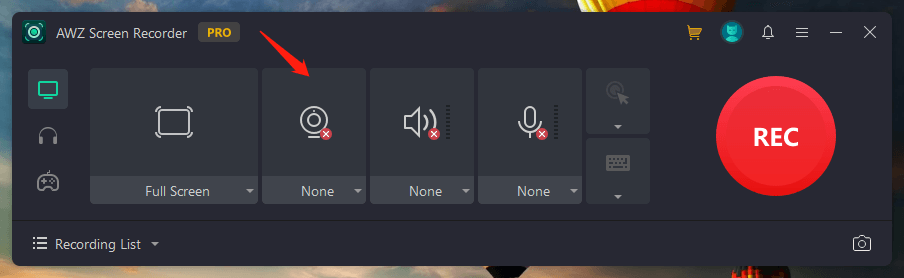
Download and start the AWZ Screen Recorder program on your Windows computer and choose a recording mode like screen, webcam, audio, or microphone.
Step 2: Capture the screen
Once chosen, record the entire screen or your selected region and set up advanced capture options. Click the REC button to record and capture your targeted screen.
Summary
The Snipping Tool shortcut enables Windows users to access the tool quickly, capture the snips to work with your screenshots and save them as an image file. We have already helped you with the methods to find and create shortcuts for Snipping Tool. In addition, the AWZ Screen recorder further enables you to capture the whole screen or targeted screen without compromising on the recording quality. Moreover, the screen recorder also allows you to edit audio and records.