When using media files in PowerPoint, the file size of your presentation will be pretty large, resulting in taking up much storage space and requiring more time when sharing and archiving. However, if you know how to compress PowerPoint, you can effortlessly save disk space and improve the playback performance. In this blog post, we will explore three practical methods to help you compress a video in PPT, generating a small file size without compromising on video resolution or quality. So, stay tuned with us and compress videos in your slides with ease.
#1. uilt-in Tool for Compressing Media Files in PowerPoint
PowerPoint has a free built-in feature for compressing media files in a PPT, with which you can conveniently reduce the media file size in your presentations. Here’s a GIF image that offers you a clear guide:
Only three steps are required to complete video compression in PowerPoint:
Step 1. Open the PPT file you wish to compress in PowerPoint.
Step 2. On the top navigation bar, click File. Then select Info from the left pane.
Step 3. Choose Compress Media and select a compression level.
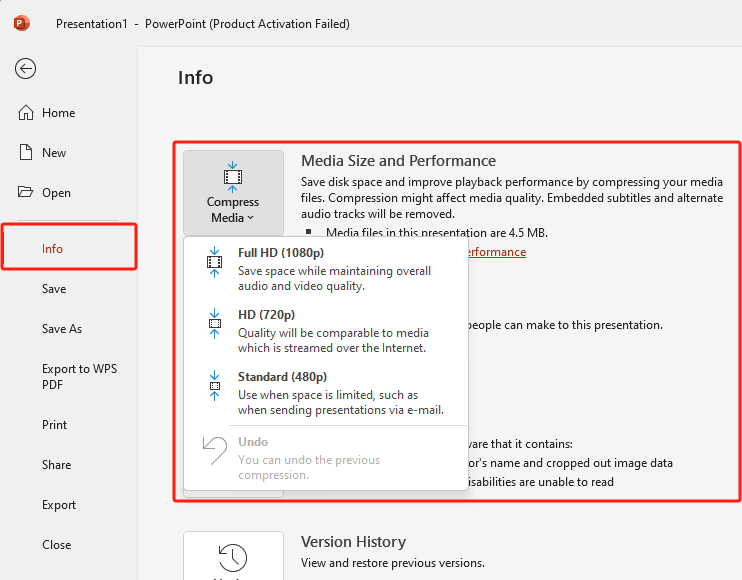
The following three compression levels are offered. Select one according to your actual needs.
- Full HD (1080p): This stands for 1920x1080 pixels. It provides high-definition clarity and is widely used for streaming services, Blu-ray discs, and high-quality video content.
- HD (720p): This stands for 1280x720 pixels. It's not as sharp as 1080p, while it still offers good clarity and is commonly used for online streaming, gaming, and video content.
- Standard (480p): This stands for 854x480 pixels. It's the lowest of the three resolutions and offers basic video quality suitable for small screens or older devices.
PowerPoint will automatically start to compress all the media files in the opened slide. If you need to use the original PPT file, just click Undo to reverse your compression.
#2. Compress a Video in PPT Without Losing Quality
The built-in feature in PowerPoint offers a convenient way to reduce video file size in a PPT. However, by using this method, the compressed videos easily get poor resolutions. So, in this section, we will introduce you to a lossless method to optimize videos in your PPTs: compress videos with a specialized file compressor.
AWZ Screen Recorder is a reliable screen recording tool for capturing video, audio, and webcams on Windows and macOS. It can record all the activities on your computer and save media files in various formats. Moreover, video/audio editing tools such as video editor, video compressor, and denoiser are all available in AWZ Screen Recorder for free.
AWZ Screen Recorder’s video compressor tool allows you to reduce video size without compromising on file quality. It supports a wide range of video formats, including MP4, WMV, AVI, MKV, MOV, FLV, MPEG, ASF, and TS.
To compress PPT videos with a third-party compressor, make sure that you’ve saved them to a local folder in advance. Check the steps below to reduce videos’ file size without a hassle:
Step 1. Free download and install AWZ Screen Recorder on your computer. Then, launch it.
For Windows Users:
For Mac Users:
Step 2. Click Quick Tools > Video Compressor and import the video file you wish to compress.
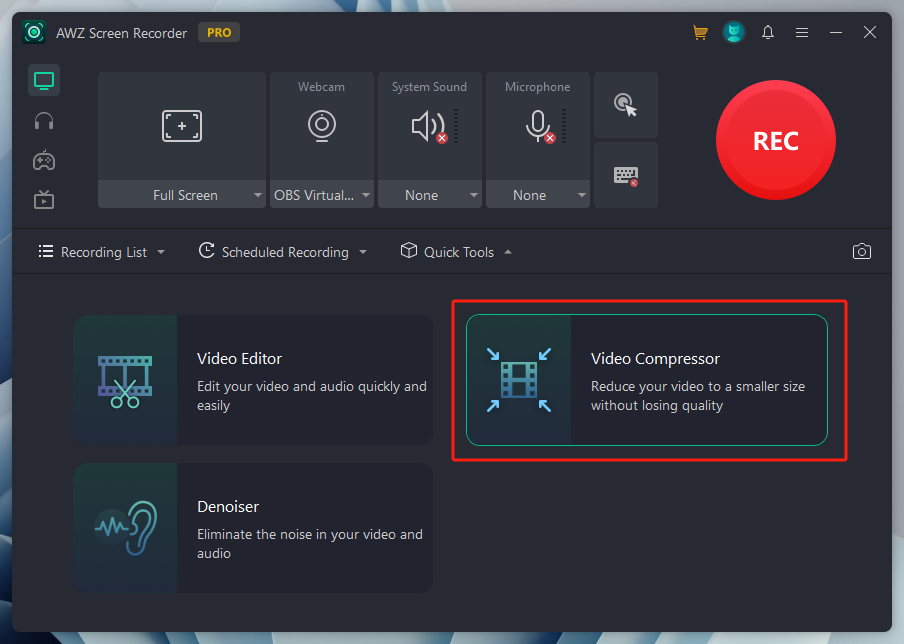
Step 3. Select a compression level and adjust related output settings.
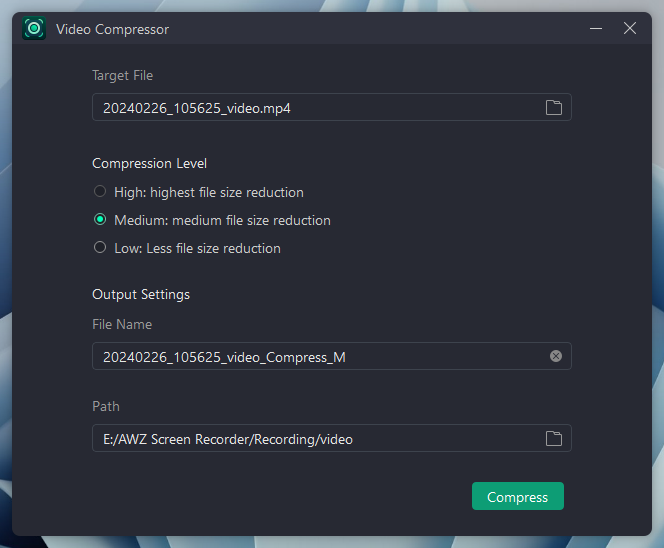
Step 4. Tap the Compress button to process.
More Features of AWZ Screen Recorder
- Record PPT with audio and video: If you need to present a slide remotely, AWZ Screen Recorder allows you to make a video of your presentation with audio recorded.
- Record presentation with webcam: By recording webcam with AWZ Screen Recorder, you can easily video record yourself and present in a presentation, which is widely used for making teaching videos.
- Scheduled recording: To record your screen at a specific time, you can assign a scheduled recording task to start and end your recordings automatically.
- Record screen with mouse and keyboard effect: When capturing an on-screen activity, you can display a virtual keyboard and mouse on your screen to make your action traceable.
- Record gameplay clips with no lag
- User-friendly interface & easy-to-use
- Record system sound & voice from yourself
- Automatically block extraneous sounds
Windows 11/10/8.1/7/XP
#3. Free Compress Presentation Videos with WPS Office
WPS Office is a popular office suite that also shares a great market with Microsoft Office. It integrates a Word processor, Excel editor, PowerPoint tool, and PDF editor into one program, offering you a one-stop solution to manipulate almost all the files in daily life and work.
WPS Slides offers feature-rich comprehensive tools for you to edit presentations. Whether you need to apply various effects, edit text, images, videos, convert documents, or reduce file size, you can easily find a way out within this software.
Check the content below to learn how to compress the selected video in your PPT with WPS Office:
Step 1. Open a slide in WPS Office.
Step 2. Click on the video you wish to optimize.
Step 3. Go to the Format tab and select Compress Media.
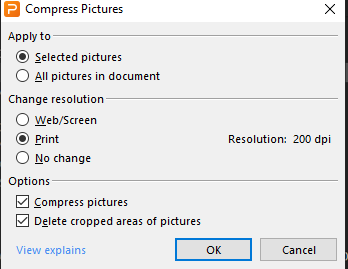
Step 4. Choose a compression quality and start compressing the selected video.
Final Words
That’s all about how to compress a video in PPT. We’ve offered three methods to help you optimize presentations without compromising on video quality. All these three tools are free to use, enabling you to shrink slides without a hassle. With no bias, we highly recommend using AWZ Screen Recorder if you have advanced requirements. It not only helps compress videos, but also helps record yourself presenting a slide with audio. Download and record your screen in AWZ Screen Recorder now!


