Using shortcut key combinations, a mouse, or merely your finger can handily screenshot on a Chromebook. This article summarizes 5 painless tips to capture a snippet on your screen. Follow AWZware and learn how to take a screenshot on Chromebook devices.
How to Take a Screenshot on Chromebook with Built-in Software
Capitalizing on the innate tool is the most simple way to screenshot on Chromebook laptops. The default screen-capturing solution lets you take full or partial screenshots, record screen with audio, and do more. Then, you can make some adjustments to the snippets such as resizing, cropping, rotating, and changing the brightness. The two methods below discuss how to capture screenshots on a Chromebook with or without using the keyboard.
How to Take a Screenshot on Chromebook with Keyboard
If you want to take screenshots on Chromebook laptops swiftly, the shortcut key is the most optimal option to capture the target information. This method can be used to take a full screenshot of the screen or a specified area. With two steps, you can share the snippet with anyone.
Let’s see how to take a screenshot on Chromebooks with the keyboard:
Step 1: Press Ctrl + Show windows at the same time, and it takes a full-screen capture;
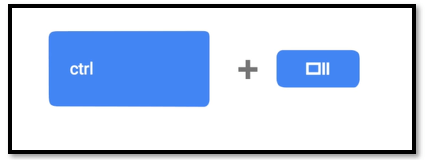
Step 2: To take a screenshot of a certain region, press Ctrl + Shift + Show windows together. Move your mouse to select an area and the screenshot is saved.
How to Take a Screenshot on Chromebook without Keyboard
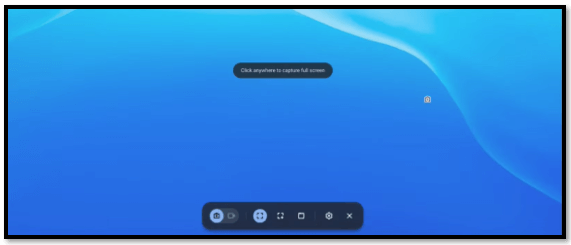
These shortcut keys above usually require two hands to do the combination. Now, you can take screenshots on Chromebook devices without the keyboard. The mouse lets you capture an image of the screen with a single hand. Chromebook offers a quick-to-act tool on the toolbar of your screen. It enables you to activate the built-in screen capture software in seconds and take screenshots on a Chromebook when the other hand is occupied.
Learn how to take a screenshot on Chromebook without the keyboard:
Step 1: Click on the tab displaying time in the bottom right and select Screen capture;
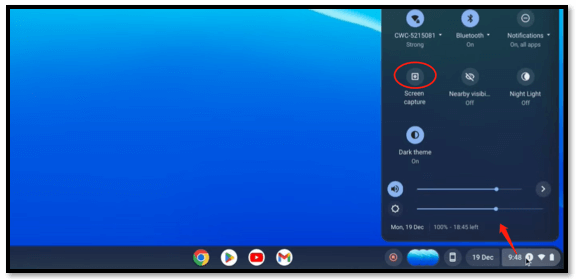
Step 2: Drag a rectangle to select your target area. Then click on the Capture button shown in the middle of the screen capture window to take a screenshot on your Chromebook.
How to Take a Screenshot on Chromebook with a Touchscreen
Many Chromebooks now also have detachables or tablets. If you need to take screenshots on Chromebook laptops with a touchscreen or tablet, this part is helpful. The steps below talk about the way to perform the process in desktop mode and tablet mode.
Hands-on with how to take a screenshot on Chromebook devices with a touchscreen:
In desktop mode
Press Ctrl + Show windows to capture the full screen. Or hold Ctrl + Shift + Show windows, and decide where to take with your hand on the screen;
In tablet mode
Press the power button and volume down button together to capture the screen.
How to Take a Screenshot on Chromebook with a Third-Party Program
In addition to the built-in screen-capturing software on Chromebooks, some third-party programs also enable you to screenshot on Chromebook devices. We are going to present two applications to help you save a screenshot from a Chromebook. Read on to get details of them.
Awesome Screenshot
Awesome Screenshot is a handy application working with Chromebook. It is a Chrome extension that is added to your Chrome browser and saves the storage on your computer. The plug-in enables you to screenshot on Chromebook laptops with the full screen, a visible part, or a selected area. You can add highlights, blur, and text to your snippet for free. Stickers, images, and callout boxes are available for paid users. Additionally, the screen recording feature allows you to record Zoom meetings with good quality.
Here is a simple guide on how to take a screenshot on Chromebook devices:
Step 1: Add this software to your Chrome extension. Click it from the Extension tab;
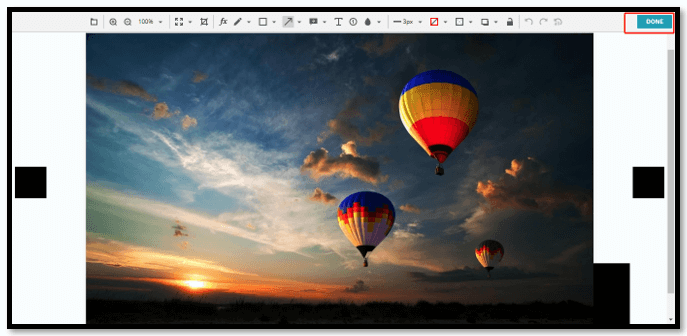
Step 2: To take a snippet of an app or the screen, choose Entire Screen & App Window and select the desired window. Hit Share;
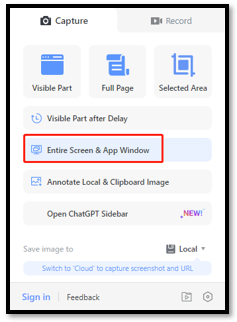
Step 3: Click Done and press Download to save the screenshot.
Nimbus
Nimbus is another Chrome extension that helps you to screenshot on Chromebook computers for free. It can capture the image from a web tab, a window, or your full screen with different tools. A highlight is that it enables you to take a snippet of a whole web page and create a long image. Furthermore, you can select and scroll the webpage to customize the range.
Take a look at how to take a screenshot on Chromebooks in Nimbus:
Step 1: Enable the software and choose Desktop screenshot;
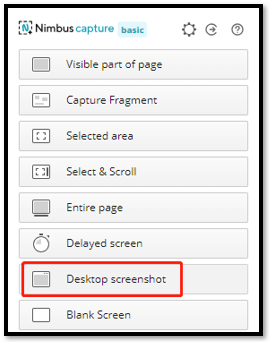
Step 2: Select the screen, window, or Chrome tab you want to save. Press Share and tap Done to download the image;
Step 3: To take screenshots on Chromebooks with the entire web page, select Entire page and it will automatically capture a long snippet.
There are not that many options that allow you to record videos or take screenshots on Chromebook laptops. If you are looking for other screen recorders supported by the ChromeOS system, this post could help you:
6 Best Screen Recorders for Chromebook in 2023
What is the best screen recorder for Chromebook? Check out this post to pick up the ideal recording software to create wonderful videos.
READ MORE >Bonus Tip: How to Take a Screenshot on Windows 11/10
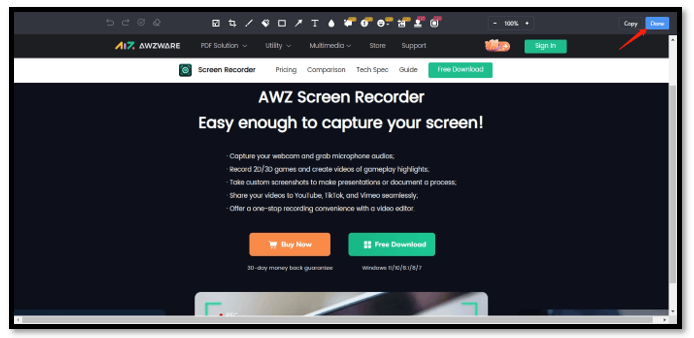
The above is all about how to take a screenshot on Chromebook laptops. As we all know, Chromebooks are portable supplement devices to carry around. However, to cover more work use, many users own a Windows PC as well. Then, the chances are that you need a new snipping tool for Windows like AWZ Screen Recorder to take screenshots for other production.
AWZ Screen Recorder is a versatile screen-capturing application accessible for Windows 11, 10, 8, and 7. It stands out for its intuitive user interface and advanced features to take a screenshot on a Windows PC and record your screen. You can manually select the desired area when screenshotting. Besides, the annotating feature allows you to add text, insert shapes, or draw on the screenshots to emphasize important information. A shortcut key lets you take a snippet in seconds without hassle.
Press the following button to download the installer file on your PC. Then go over how to take a screenshot on Windows with AWZ Screen Recorder:
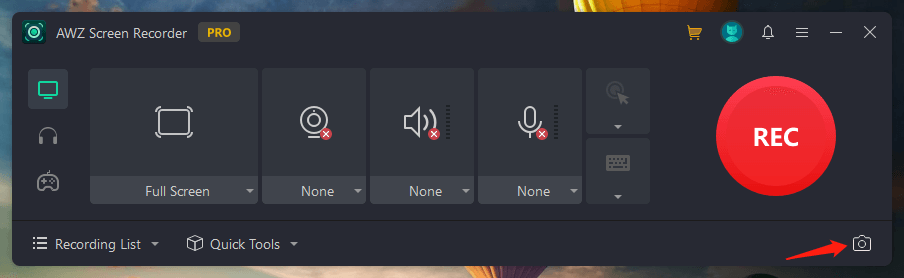
Step 1: Open the software on your PC and tap on the camera icon in the lower right corner;
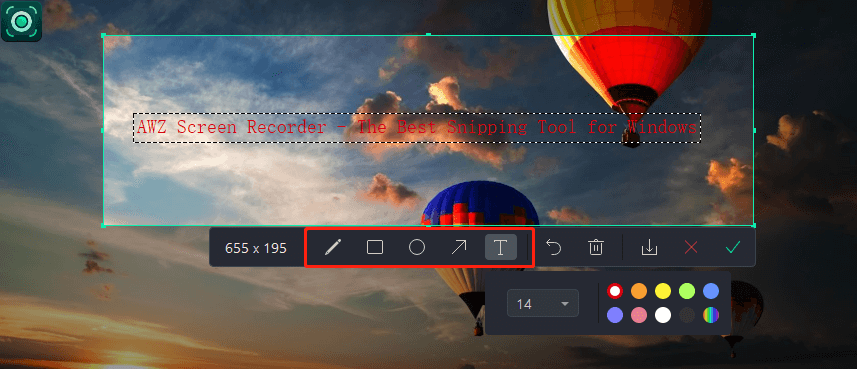
Step 2: Draw a rectangle with your mouse to specify the area you need to take a snippet;
Step 3: Choose the tool from the toolbar to add annotations to the screenshot. Then click the Save button to store the screenshot.
Bottom Line
After reading this guide, you must be familiar with the easy steps for how to take a screenshot on Chromebook devices in different methods. Whether using the pre-installed software or a third-party program, it is hassle-free to select the area of your snip and screenshot on Chromebooks.
For users who own both a Chromebook and a Windows PC, if you want to take snippets on the PC, AWZ Screen Recorder is the right choice to capture the target information in one click.