Taking screenshots in Excel allows you to capture a specific part of your sheet and archive or share specific information with others. Mastering the ability to take Excel screenshots could be the first step. Luckily, Microsoft Excel has built-in tools that help you take a snapshot on a worksheet. The computer itself also supports capturing screens on any application. Now, stay tuned with us and explore Excel snapshotting with our detailed guide.
Quick Answers:
AWZ Screen Recorder is a reliable screencasting program that allows you to record and screenshot on Windows and Mac effortlessly. Download it on your computer and enjoy a smooth recording and screenshotting experience!
For Windows:
For Mac:
How to Screenshot Excel on Windows
Whether you run Windows or Mac operating systems, you have three ways to screenshot on Excel. In this section, let’s begin with Windows.
Method 1. Use Excel Built-in Tools
The Excel app has built-in features that allow you to take a screenshot, enabling you to capture your sheet or other Windows easily. It can be activated within the program and is free to use. Whether you need to screenshot within your spreadsheets or capture other windows, you can easily find a way out in this software.
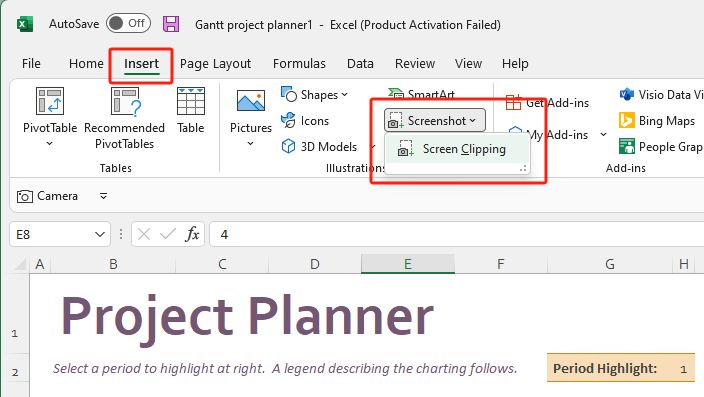
Screen Clipping
Screen Clipping is used to capture other apps running on your computer. It can detect all the available screens and let you take snapshots of images from other apps.
How to screenshot with the Screen Clipping tool:
On the top navigation bar, click Insert > Screenshot.
- If you need to take a full screenshot of the selected program, just choose the window you wish to capture.
- If you want to screenshot a specific area, click Screen Clipping and take a snapshot with your mouse.
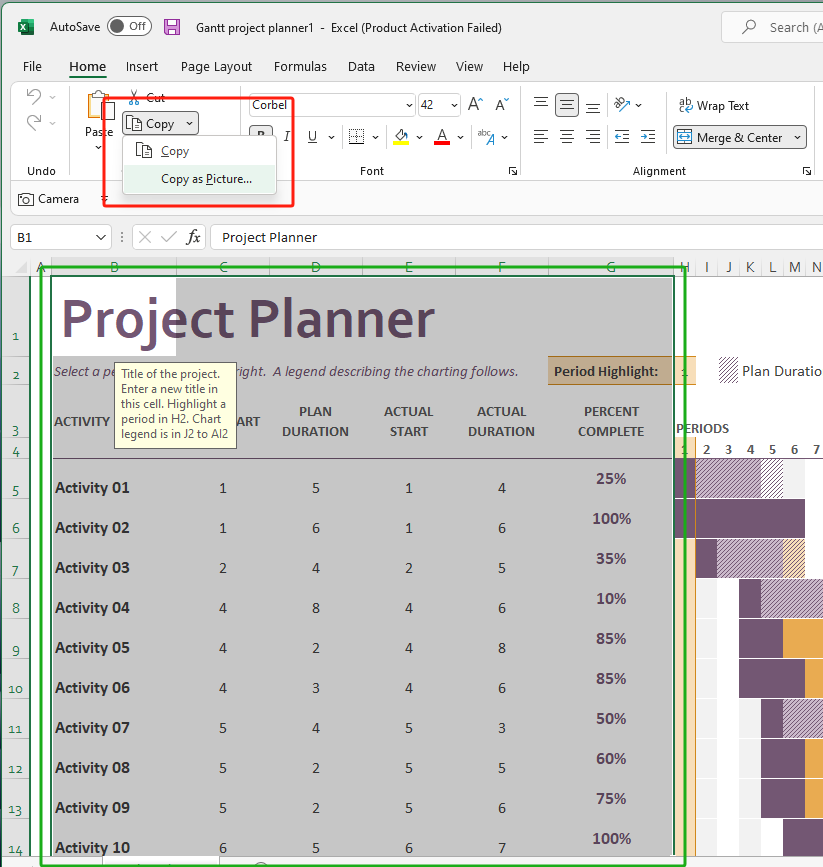
Copy as Picture
Excel provides a copy-and-paste tool to capture text or image information within the spreadsheet.
How to screenshot on Excel with the Copy as Picture feature:
Select the area in Excel where you wish to screenshot. Then, select Copy as Picture from the drop-down menu of Copy (available in the Home tab.)
Method 2. Use Snipping Tool
Snipping Tool is a free screen capture app equipped with Windows operating systems. It offers four snipping modes (rectangle, free-form, window, or full screen) to snapshot your screen. Here’s how:
1. Open a spreadsheet in Excel.
2. Press the Windows logo + Shift + S simultaneously. Or you can access the Snipping Tool app from the main menu.
3. Select a mode and take a screenshot.
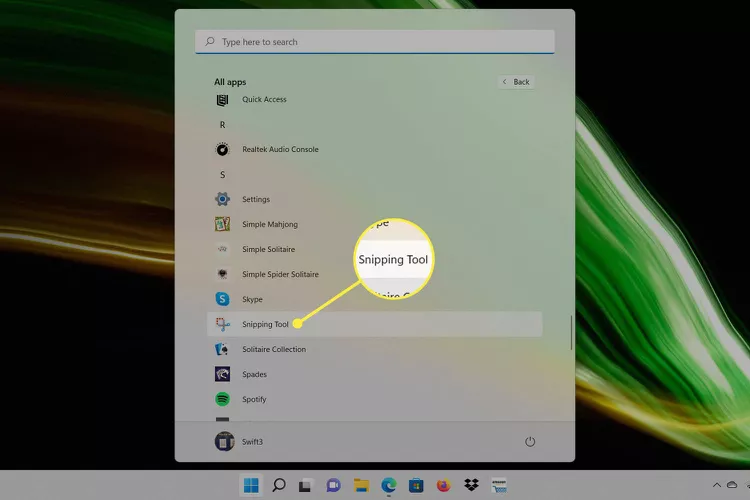
The captured picture will be saved to your clipboard by default, and you can paste it elsewhere.
Method 3. Use a Screencasting Program
In addition to built-in tools, third-party programs are a worthy shot. They often provide advanced options for better screenshotting and annotating.
AWZ Screen Recorder is a popular and feature-rich screencasting program that is available on Windows and macOS. It allows you to take screenshots of any window, app, and area of your screen. Whether you need to capture a selected area or full screen of your sheets, you can effortlessly take a snapshot within this program.
Install AWZ Screen Recorder on your computer and follow our guide below to screenshot the Excel sheet quickly:
Step 1. Prepare the Excel sheet you wish to capture.
Step 2. Launch AWZ Screen Recorder on your computer and click the Camera icon in the bottom right corner (or press F10 on your keyboard.)
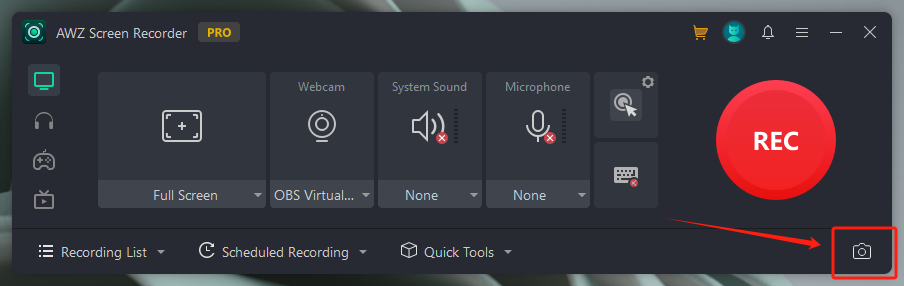
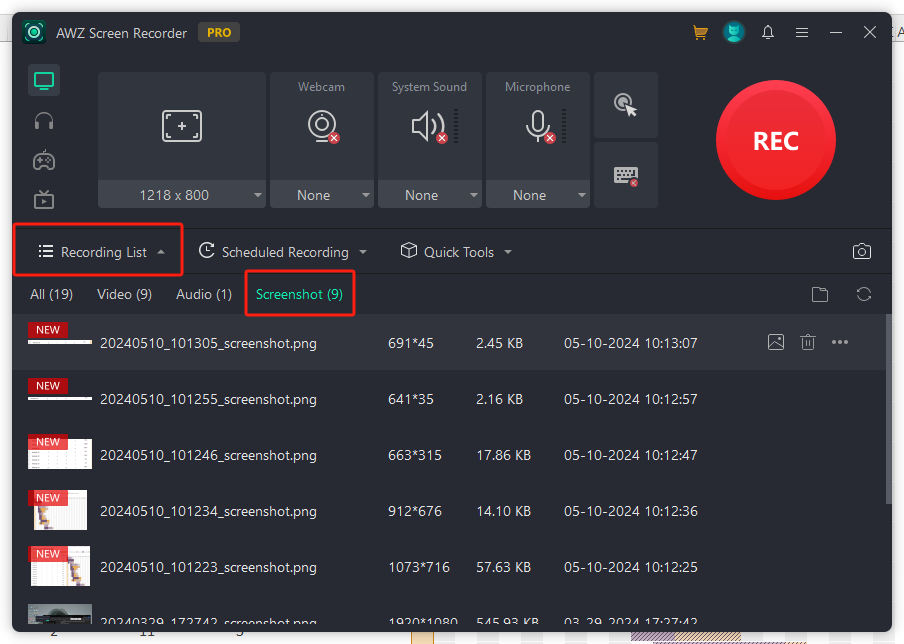
Step 3. Draw a snapshot area with your mouse. Then, click the check icon to save your screenshots to your clipboard. In addition, you can access all the screenshot histories in Recording List > Screenshot.
Moreover, if you need to record your screen with video and audio, AWZ Screen Recorder also emerges as a standout option. It can record all the activities on your screen in high resolution. Just download and use it now!
How to Screenshot Excel on Mac
Mac users also enjoy the above three methods for taking screenshots in Excel. You can access all three tools on your MacBook. The content below shows you how to screenshot Excel on macOS.
#1. Excel Built-in Tools
Similarly, Mac users can also access Excel's built-in functions to take screenshots. Whether you need to use Copy as Picture or Screen Clipping, the steps for screenshotting Excel on your MacBook are nearly the same as those for a Windows computer.
#2. Use Screenshot
Mac users also enjoy an in-built tool called Screenshot, which helps capture screens. Whether you need to snapshot the selected area or the full screen, you can use the offered tools to screenshot your spreadsheet efficiently.
Three methods to take screenshots on your MacBook:
- Capture full screen on Mac: Press Shift + Command + 3 together
- Capture a portion of your screen: Press Shift + Command + 4 together
- Capture a specific window or menu: Press Shift + Command + 4 + Space bar
#3. Use a Screencasting Program
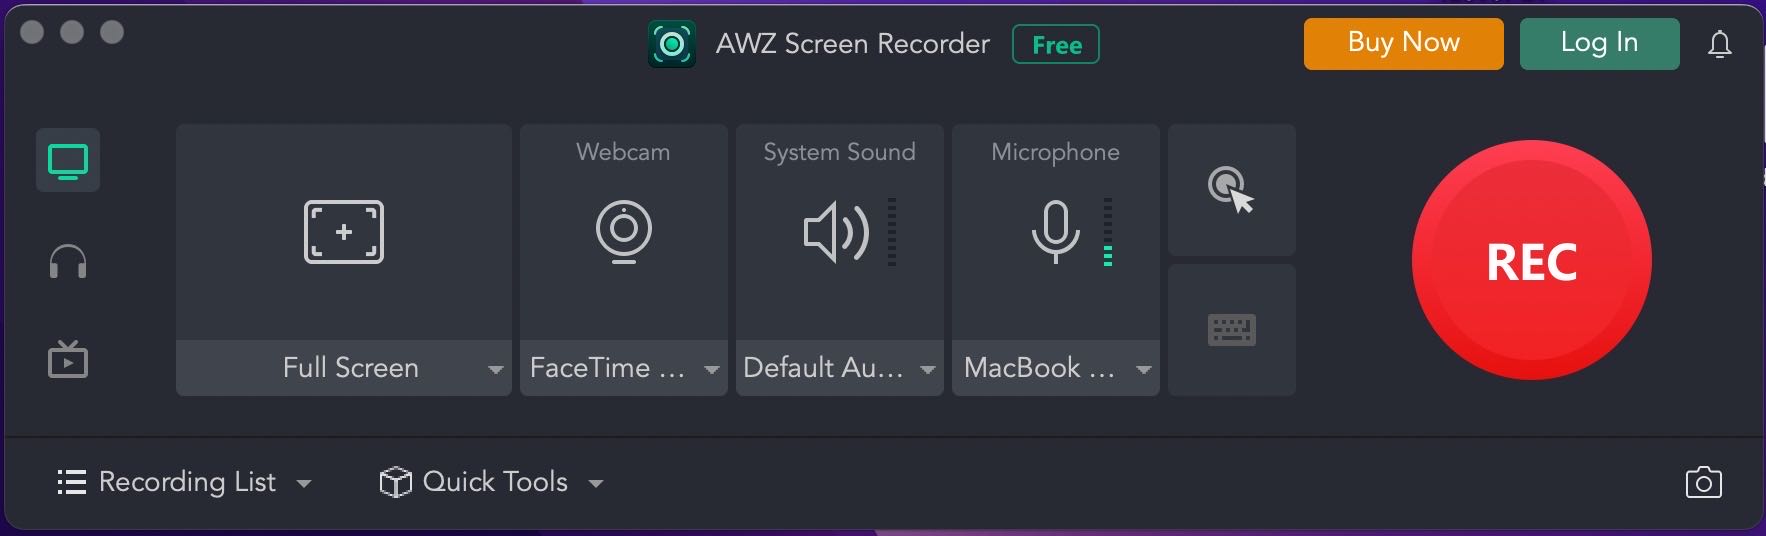
AWZ Screen Recorder has also released a Mac version, allowing you to capture macOS screens. Just download AWZ Screen Recorder for Mac on your device and screenshot Excel with ease:
Steps for taking screenshots on Excel using AWZ Mac Screen Recorder:
1. Launch this screen recorder on your computer.
2. Open the sheet you wish to snapshot.
3. Click the Camera icon in AWZ Screen Recorder and take a screenshot.
4. Use the offered tools to annotate the screenshot.
Final Words
It's easy to screenshot on Excel sheets if you have a proper tool. This comprehensive guide shows you three methods to take screenshots in Excel on Windows & Ma. Choose one according to your requirements now. In addition, we genuinely recommend that you use the AWZ Screen Recorder. Boasting a lightweight file size and clean interface, it becomes pretty easy to snapshot or record your screen. Download and use it now.