Long gone are the days of grappling with lengthy recordings, trying to pinpoint the exact moment you want to keep. Imagine a scenario where you've just pulled off an incredible gaming move, or you've stumbled upon the perfect reaction during a virtual meeting—now, what if you could effortlessly capture the magic of those last 30 seconds on your PC? Wouldn’t it sound fascinating? Join us as we demystify the process, helping you seize those precious moments and save all your clips with ease. Let’s begin an efficient screen recording journey and unveil how to record last 30 seconds on PC.
Comparative Analysis of the 4 Screencasting Tools
Quick Answer:
In this article, we’ll offer you 4 simple yet powerful methods to help you clip the last 30 seconds on your Windows PC. Here’s a brief insight:
- AWZ Screen Recorder: A powerful recording tool that captures video, audio, webcam, and gaming on Windows & Mac.
- Xbox Game Bar: A customizable & free gaming overlay that is built into most Windows operating systems.
- OBS Studio: A free and open-source screen recorder that’s available for Windows, macOS, Linus, and BSD.
- Nvidia ShadowPlay: A hardware-accelerated screen recording utility as part of Nvidia’s GeForce Experience software.
A Comparison Chart of the 4 Screen Recorders:
| Price | Compatibility | Pros | Cons | Ratings | |
| AWZ Screen Recorder |
|
Windows, macOS |
|
|
⭐⭐⭐⭐⭐ |
| OBS Studio | Free | Windows, macOS, Linux, BSD |
|
|
⭐⭐⭐⭐ |
| Nvidia | The Average Cost of a basic Live Stream Software plan is $20 per month. | Windows |
|
|
⭐⭐⭐ |
| Xbox Game Bar | Free | Windows |
|
|
⭐⭐⭐⭐ |
Clip Last 30 Seconds on PC With AWZ Screen Recorder
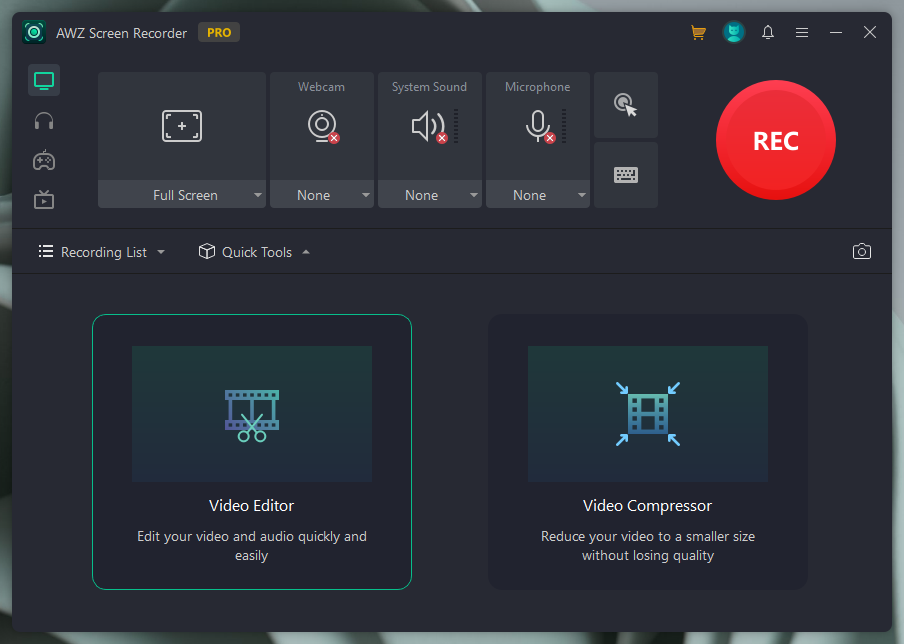
AWZ Screen Recorder is a powerful screencasting tool that enables you to record all activities on your screen with both system and microphone sound, as well as supports screenshotting, and editing & compressing recordings with high quality. Its video editor allows you to edit your video and audio files with basic features such as trimming videos, removing sound from recordings, deleting watermarks, etc., all becomes effortless.
- Record gameplay clips with no lag
- User-friendly interface & Easy-to-use
- Record system sound & voice from you
- Automatically block extraneous sounds
Windows 11/10/8.1/7/XP
Supported media formats when editing:
| Video | MP4, WMV, AVI, MKV, MOV, FLV, MPEG, ASF, TS |
| Audio | MP3, WAV, AAC, WMA, FLAC, OGG, MP2, M4A, AC3 |
Here’s how you can record last 30 seconds on a Windows PC:
Step 1. Free download AWZ Screen Recorder on your PC.
Step 2. Start your recording.
Step 3. Go to Quick Tools > Video Editor and import a recording from your computer or drag and drop this video.
Step 4. Drag the marker on the process bar. Keep the last 30 seconds of the recordings.
AWZ Screen Recorder offers specialized functions for you to record gameplay and streaming videos, making it more convenient and efficient when screencasting, and also guarantees a better gameplay experience.
How to Record Last 30 Seconds on PC OBS
Open Broadcaster Software (OBS) Studio offers a free and professional method for users to screen recording. It not only offers a robust platform for live streaming but is also an excellent tool for capturing those crucial last 30 seconds of your PC screen.
Step-by-step guide on recording the last 30 seconds with OBS Studio
1. Download and Install OBS Studio
Go to the official OBS Studio website and download an appropriate version for your Windows.
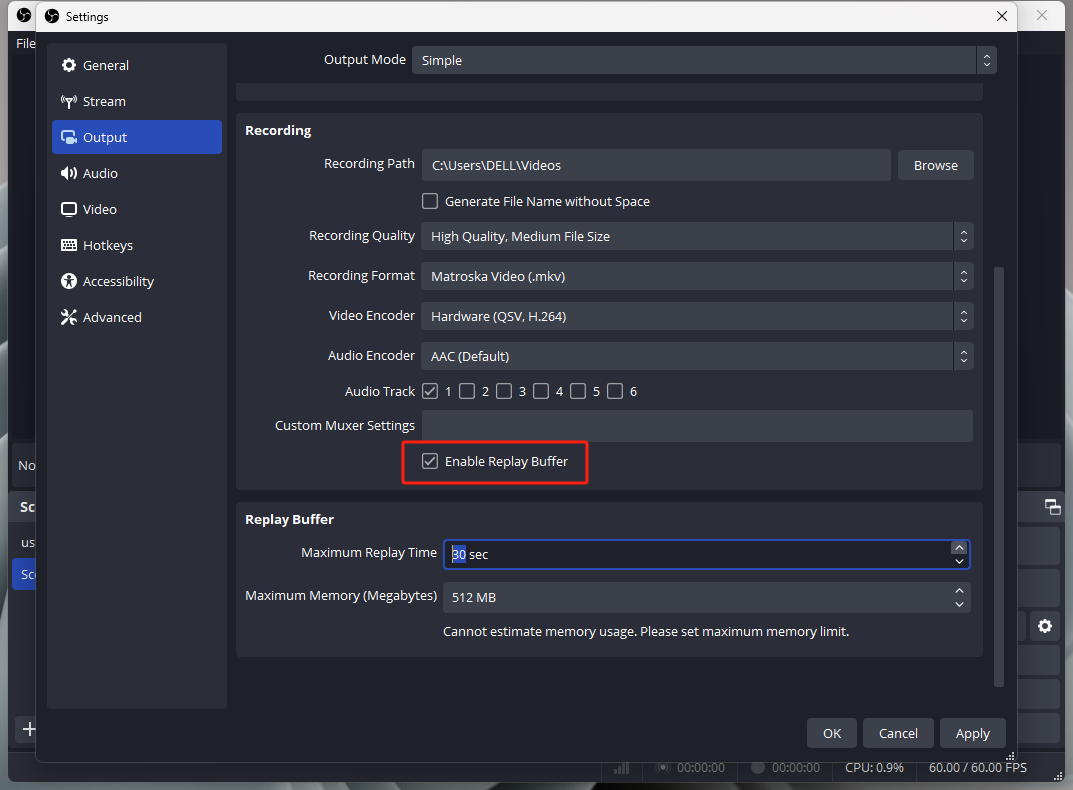
2. Launch this screen recorder and Configure Settings.
Go to Settings and click on Output, adjust related settings such as recording format, quality, and destination folder. In the Output option, check “Enable Replay Buffer” and input 30 sec in Maximum Replay Time.
3. Setting Up Your Scene.
Create a new scene and name it by clicking the plus icon in the Scenes box.
4. Click Start Recording in the Controls box.
By this means, you can easily record last 30 seconds on a PC with OBS Studio. If necessary, use the editing features within OBS Studio to trim and enhance your clip.
Clip the Last 30 Seconds/5 Minutes on PC Nvidia
Nvidia ShadowPlay is a game-changing recording tool that leverages the prowess of Nvidia graphics cards to deliver high-quality, low-impact gameplay recordings. Whether you're executing a perfect in-game maneuver or simply want to immortalize a standout moment, ShadowPlay ensures that you can effortlessly capture and share your gaming highlights.
Here’s how you can record the Last 30 Seconds with Nvidia ShadowPlay:
Notice: Before clipping, you need to confirm that your PC is equipped with an Nvidia graphics card that supports ShadowPlay. Check the official Nvidia website for a list of supported GPUs.
Step 1. Download and install the Nvidia GeForce Experience software if you haven't one. Then open GeForce Experience.
Step 2. Go to the Settings tab and click on Overlay to enable the In-Game Overlay. Make sure the Instant Replay in Features is also turned on and adjust the duration to 30 seconds.
Step 3. Configure related recording settings such as video quality and frame rate.
Step 4. Play your game or engage in any activity on your screen. Start capturing your screen.
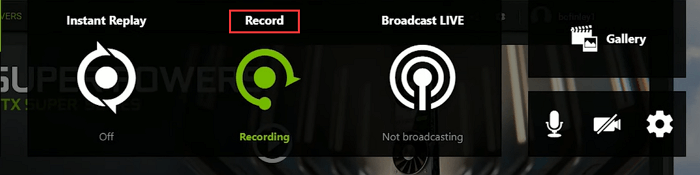
After recording, you can review and manage your recordings in the Gallery section of GeForce Experience. It offers some video editing tools to help you trim and enhance your clips seamlessly.
Record Last 30 Seconds on PC Xbox Game Bar
Xbox Game Bar is a built-in gameplay recording tool for Windows. It works with most PC games and enables you to record your gameplay with no lag. Moreover, it isn’t just designed for gaming—it's also a powerful utility that allows you to capture the last 30 seconds of your screen activity effortlessly. Here’s how:
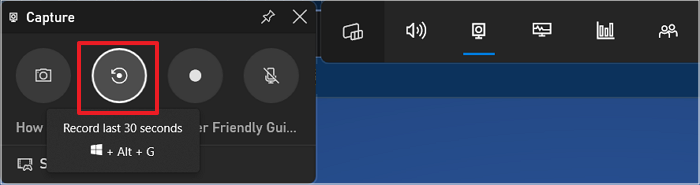
Step 1. Press the Windows key and G on your keyboard simultaneously to activate the Xbox Game Bar.
Step 2. Click the camera icon and prepare to capture the screen.
Step 3. Go to Settings. Select Record in the background while I'm playing a game in Widgets.
Step 4. When a noteworthy moment occurs, press Windows + Alt + G key to clip the last 30 seconds on your PC.
Conclusion
That’s all about how to record last 30 seconds on PC. We’ve covered all the popular solutions you may want to know and offered you a comparison chart of these 4 screencasting tools that enables you to select a preferred one in seconds. Learning how to record screens is important, enabling you to keep all highlights for sharing or future recapping. Simply select a screen recorder introduced in this article and download it directly!
For Windows Users:
For Mac Users: