Can You Record on Samsung TV
Can you record on a Samsung TV? Does Samsung TV offer any built-in recording features? As a smart TV, most Samsung TV models offer a PVR (Personal Video Recording) feature that enables you to capture content currently playing, schedule recordings in advance, and pause/rewind/fast-forward during a live stream. However, please note that to save the recorded content, you will need to attach a USB storage device or a portable hard drive to the Samsung TV.
In addition to the built-in recording feature provided by Samsung TVs, you can opt for cloud DVR services, such as Sling and YouTube TV, to record streaming videos. But you need to pay monthly or even yearly fees for these cloud DVR services. Fortunately, you can also capture on Samsung TVs with the help of reliable screen recorders (like AWZ Screen Recorder), a capture card, and an HDMI cable.
In the following paragraphs, I’ll show you exact steps to record on Samsung smart TVs using its PVR feature and other third-party screen recording programs.
How to Record on Samsung TV with Built-in Feature
The PVR feature of Samsung TV offers two recording modes: instant recording and scheduled recording. When you are watching a live show and want to save it for further viewing, you can use the instant recording mode. If your favorite show is scheduled to air on a future date and you don’t have time to watch it live, you can utilize the scheduled recording mode to record a single episode or an entire series. Now, let’s learn how to record on a Samsung smart TV using its PVR feature.
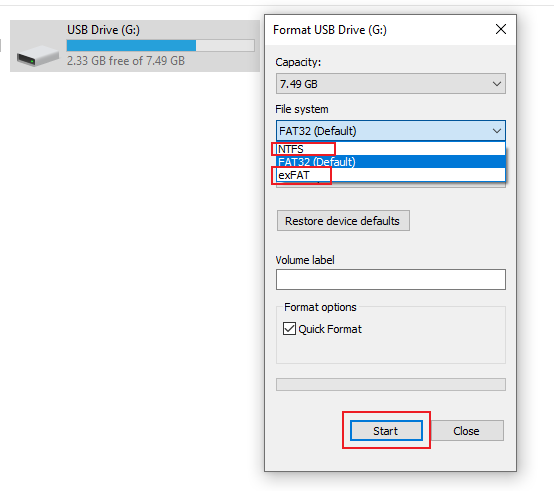
Before getting started to learn the detailed steps, you need to prepare a USB drive (formatted in NTFS or exFAT) and a live digital TV signal via a satellite tuner, antenna, or cable. Next, insert the formatted USB drive into one of the USB ports on your Samsung TV. Then, your Samsung TV will recognize the USB drive and notify you to format it. After you choose the Format button, the Samsung TV will register it for PVR use.
#Record on Samsung TV in the Instant Recording Mode
Step 1. Go to the TV show you want to record first.
Step 2. Press the 123 icon button or the Record button on your Samsung TV remote.
Step 3. Next, a picture of your remote will appear. To start recording, press the Select button on the TV remote to select the Record option.
#Record on Samsung TV in the Scheduled Recording Mode
Step 1. Hit the Home key on the TV remote and press Select to choose the Live TV option on your Samsung TV.
Step 2. Press the up button on the TV remote and select the Schedule Manager option.
Step 3. Go to the Schedules tab on the Recording & Schedule Manager window. Next, choose the Add Recording option. Also, you can select the Add Viewing option to set a reminder to notify you when a show is ready to play.
Step 4. Choose the channel or program you want to record, go to the Repeat option, and select from the Everyday, Select Day, and Do not repeat options for scheduled recording. When the recording is ready to start, there will be a pop-up reminder message about the recording.
What’s more, I also find a useful feature offered by Samsung smart TVs. The feature is Timeshift, which is used to pause or rewind live TV in real time. With Timeshift, you can view missed segments and return to certain parts of the program. Please note that you need to connect a USB drive for recording when using Timeshift. To activate the Timeshift feature, you need to press the 123 icon button and select the Timeshift option.
That’s all about the tutorial on how to capture shows on Samsung TV using its PVR feature. If your Samsung TV doesn’t have the PVR feature, you can keep reading to learn about the PC-based HDMI capture solutions.
How to Record on Samsung TV via Third-Party Screen Recorder
Before delving into the guidance, let’s see what you need to prepare in advance.
- A Windows or Mac computer
- An HDMI cable
- A USB capture device or an HDMI capture card
- A reliable screen recording tool (like AWZ Screen Recorder and OBS Studio)
Next, follow me to do the preparation work. This PC-based HDMI capture solution mainly uses an HDMI cable to connect the PC and smart TV, utilizes the PC screen recorder to record TV shows, and then saves recordings to a capture card.
You need to plug the HDMI capture card into your computer’s USB port. Then, insert one end of the HDMI cable into the HDMI IN port of the capture card and plug the other end of the HDMI cable into the HDMI OUT port of the Samsung TV. Then, you can turn on your Samsung TV and be ready to start recording.
Option 1. Record on Samsung TV Shows Using AWZ Screen Recorder
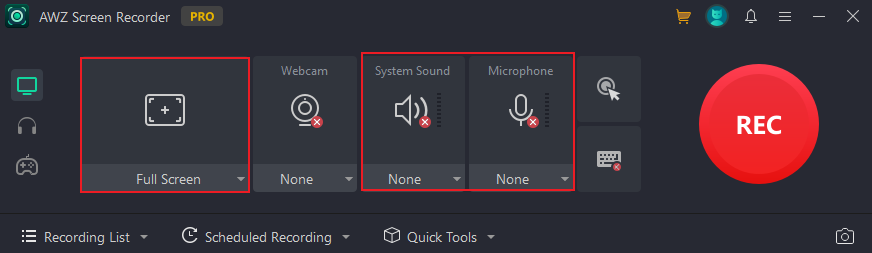
AWZ Screen Recorder is a good choice to record on Samsung TVs. It supports customizing the recording area so that you can record the full screen or a selected region. What’s more, it enables you to record the screen and webcam with the option to capture audio from the microphone and system. Then, you can choose to save your recordings in multiple formats, such as MP4, MKV, FLV, and AVI.
Step 1. Download AWZ Screen Recorder by clicking the button below and install it on your PC.
Step 2. Run this screen recorder for Samsung TV and customize the recording area and audio source
If you need to make a scheduled recording, you can open the Scheduled Recording menu. Click anywhere within the dotted box area, give a name to the recording, set the start and end time of the recording, and adjust other settings. Don’t forget to click Save to confirm the operation.

Step 3. Next, you can click the Hamburger icon and select the Settings option to adjust other recording settings, such as the format, quality, and shortcuts. Later, click Apply.
Step 4. Click REC to start recording on your Samsung TV. When you want to complete the recording, you can press the default F3 key or click the Stop icon in the floating bar.
Other Wonderful Features of AWZ Screen Recorder:
- Record streaming videos on smart TVs.
- Record audio only and save in MP3, WAV, or other audio formats.
- Take screenshots in high quality.
- Provide a built-in video editor and compressor.
- …
Option 2. Capture on Samsung TV Shows Using OBS Studio
Some of you may know OBS Studio as a live streaming tool. Surprisingly, it is also a free and open-source screen recorder that supports any activities happening on the screen. Moreover, OBS supports scheduling recordings. You need to download OBS Studio from its official website and install it first. Then launch it and follow the steps below to record on your Samsung smart TV.
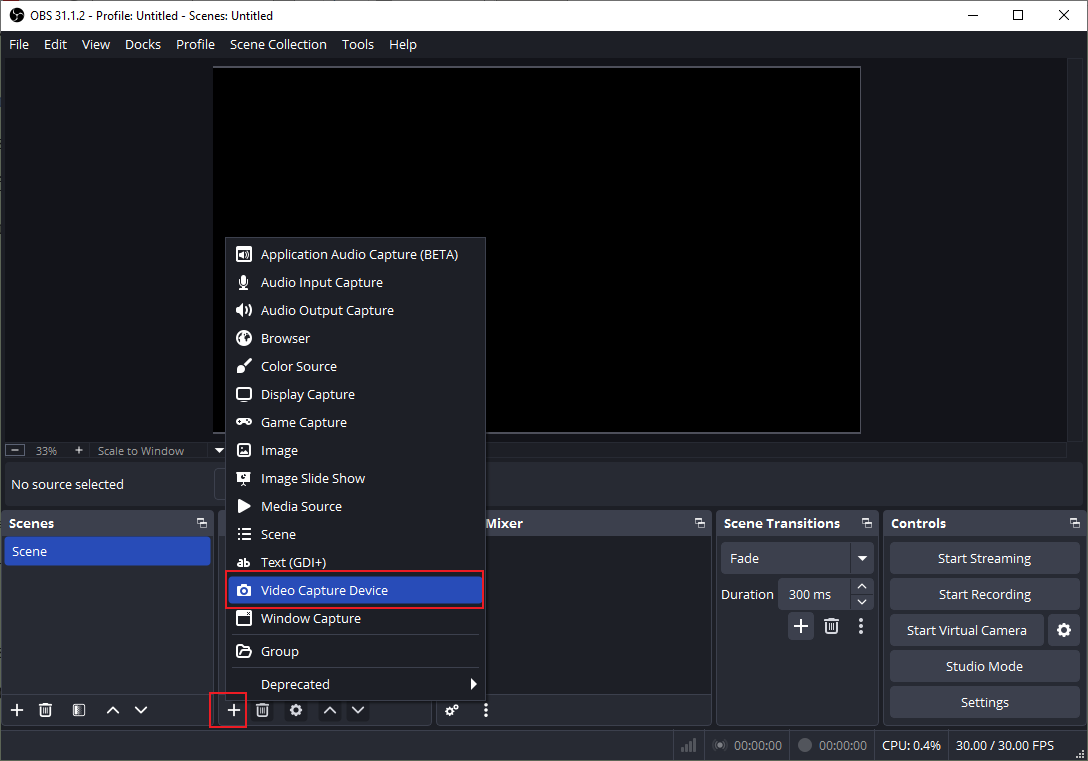
Step 1. In the Sources panel, click the plus (+) icon and choose the Video Capture Device from the list. Next, give it a name and click OK. Choose your capture card from the Device list, personalize other related settings, and click OK.
Step 2. Optionally, you can click the Settings button in the Control panel to change the recording format, quality, encoder, and other settings under the Output tab.
Step 3. Next, it’s time to start recording. Just click the Start Recording button in the Control panel. Once done, hit the Stop Recording button.
Wrapping Up
Owing to the built-in PVR feature of Samsung TV, the task of screen recording on Samsung TV has become easy. It enables you to make instant and scheduled recordings effectively. What can you do if your Samsung TV doesn’t have the PVR feature? Don’t worry, you can also try the PC-based HDMI capture solution. Although this way is more complex than using the PVR feature, it is still workable and worth a try! Once you choose the PC-based HDMI capture solution, AWZ Screen Recorder can do you a favor.