Whether using a PC or a laptop running on Windows 10, there are easy-to-follow tips to help you do screen recording with voice. This post does a quick write-up on how to record screen on Windows 10 with audio using different tools. Stay tuned with AWZware, let’s learn the way to screen capture videos on Windows 10 in a few clicks.
How to Record Screen on Windows 10 with AWZ Screen Recorder
AWZ Screen Recorder is a video-making solution compatible with Windows 10, 11, 8, and 7. It enables you to record your screen on Windows 10 with both your system audio and your microphone. This desktop program is the best pick for screen recording long videos, including online lectures and remote meetings without delay. You can upload your recorded videos to YouTube, Vimeo, Google Drive, and other platforms swiftly after recording.
Click and download the application on your laptop or PC, then we will go over how to record screen on Windows 10 with audio in AWZ Screen Recorder:
Step 1: Enable the Speaker and Microphone features

Open this screen recorder for Windows 10 on your PC or laptop. Click on the drop-down arrows below the speaker and microphone buttons respectively. Then choose your available devices to let the program access audio and your voice when recording your screen on Windows 10.
Step 2: Specify the recording area
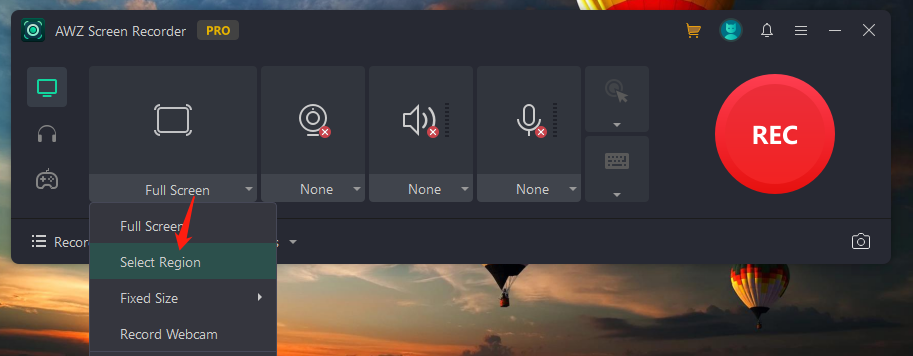
Tap “Full Screen” and choose “Select Region”. Draw a rectangle to select the area you want to record.
Step 3: Start screen recording on Windows 10
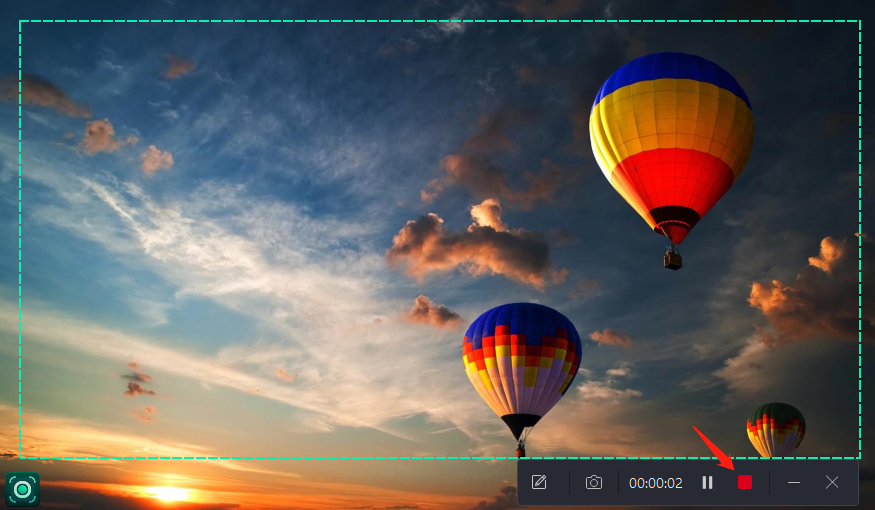
Click “REC” to screen record on Windows 10 with audio. When the recording is completed, click the red button to stop taking the video of your screen.
After screen recording on your Windows 10 laptop or PC, this software allows you to compress the video with innate tools. This makes it easier to reduce your video file size to save storage space.
How to Record Screen on Windows 10 with Advanced Screen Recorder
Just as its name suggests, Advanced Screen Recorder is packed with both basic and sophisticated screen recording tools to enhance your process of capturing on-screen activities. The program allows you to record an HD-quality video with audio and your webinar and supports Windows 10, 11, 8.1, etc. To protect your copyright, it lets you design your own watermark in different styles to increase brand awareness. You can create a pre-recording schedule to start and stop recording an online meeting automatically, even though you are not in front of the screen.
See how to record screen on Windows 10 with its advanced features:
Step 1: Run this software on your PC and click Select Region to decide where you want to record;

Step 2: Press Audio to let it capture the audio from your computer;
Step 3: Tap the Record button to record your screen on a Windows 10 running computer.
How to Record Screen on Windows 10 with Built-in Xbox Game Bar
For users who don’t like downloading additional programs, the built-in screen recorder for Windows 10 is recommended: Xbox Game Bar. It is designed to capture your in-game footage and chat with Xbox friends. The tool now can serve as a video recording application to screen record all your on-screen activities.
Let’s take you through a complete guide on how to record screen on Windows 10 with audio in the Xbox Game Bar:
Step 1: Press Windows + G on your keyboard at the same time, and the Xbox Game Bar will show up on the upright of your screen;
Step 2: Choose Capture and hit the record icon in the Capture window. It will record your screen on Windows 10 in 3 seconds.
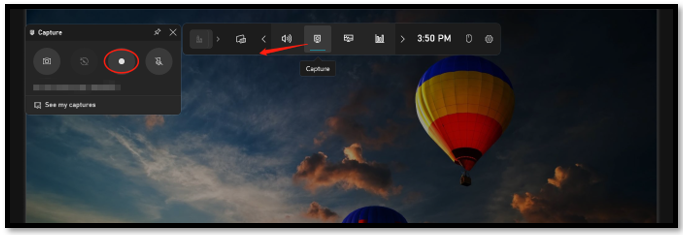
Step 3: In the Capture Status window, click on the microphone tab to let it screen record with your voice. Then tap Stop Recording to complete the task.
How to Record Screen on Windows 10 with an Online Tool
An online site like FlexClip is another special pick to record your screen on Windows 10 with audio while removing the hassle of installing a new program. It is a free web-based workspace working in Google Chrome, Firefox, and other popular browsers. You can capitalize on the site to take a video of your screen with audio from the microphone and computer. However, the maximum length for recording one video is 1 hour.
Learn how to record screen on Windows 10 in FlexClip:
Step 1: Go to this online screen recorder for Windows 10 and tap Start Recording;
Step 2: Choose Screen Only and press Next Step;
Step 3: Allow the software to use your microphone and select Microphone + System Audio. Click Start Recording;
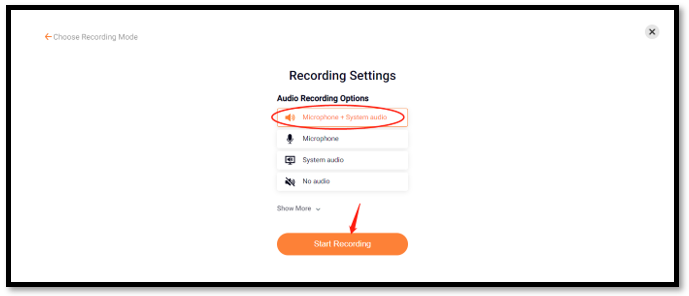
Step 4: Select the screen you need to record and tap Share. Then it will screen capture a video on your Windows 10 computer.
After screen recording on Windows 10, the online site enables you to edit the recorded video without registration. You can make a video with music, trim unnecessary clips, and add subtitles to enrich your video content.
How to Record Screen on Windows 10 with a Chrome Extension
Online screen recorders for Windows 10 have one drawback: they are not stable when recording. If you pursue a more stable service without installation, a Chrome extension can be helpful.
Scrnil is a highly-rated plug-in available in the Chrome web store, which means it is accessible to any device running on Windows 10 as long as your computer can use the Chrome browser. It enables you to record your desktop, a web tab, or an application flexibly while safeguarding your other private on-screen activities. When the screen recording task is completed, you can convert the file to any video format including OGG, MP4, and MOV.
Grab the step-by-step guide on how to record screen on Windows 10 with audio in Scrnil:
Step 1: Access the plug-in from the Chrome web store. Press Extensions and choose Record Video;
Step 2: Choose Desktop and enable Record Mic Sound. Tap Start Recording;
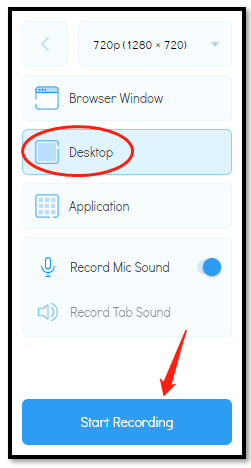
Step 3: Choose the screen that needs sharing and check Share system audio. Click Share to record your screen on Windows 10.
Besides performing screen recording on Windows with audio, the extension has various video-converting tools that allow you to convert OGG to MP4 or conduct other transferring tasks.
Verdict
This is all you want to know about how to record screen on Windows 10. Four practical applications are recommended to take a video of your screen. If you don’t want to install an extra application, the built-in Xbox Game Bar could help you screen capture videos on Windows 10. However, it has limited features when it comes to adjusting recording settings and making edits. A proficient desktop screen recorder for Windows 10 provides more options for screen recording on Windows with stability.


