In this article, AWZware demonstrates how to compress a video on Mac offline and online with 5 programs. Both external and preinstalled video compressors for Mac are included to help you make a video file size smaller.
How to Compress Video on Mac in AWZ Screen Recorder
AWZ Screen Recorder is the right go-to for making a video file smaller on a Mac. More than just a screen recording software, it offers two free video editing tools – a video cutter and video compressor to make edits to a video file and keep the video watermark-free.
Regarding the compressing tool, three compression levels are available when deciding how much to reduce the video file size on Mac. The low compression level can retain the video quality to a great extent after compression. MOV, MP4, AVI, FLV, and other popular video formats are supported to perform the task.
Don’t forget to install it on your Macbook by clicking on the download button below. For how to compress videos on Mac devices in AWZ Screen Recorder, please follow the instructions:
Compress a Video on Mac in AWZ Screen Recorder
Step 1: Run the program and tap Quick Tools. Choose Video Compressor;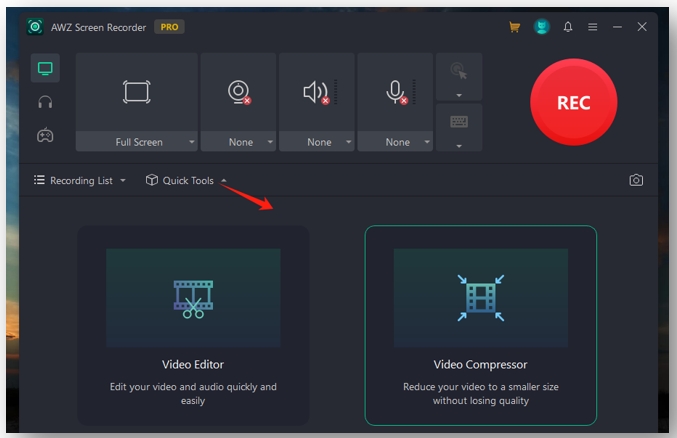
Step 2: Click on the indicated area to add your video from a local folder;
Step 3: To preserve the quality, select Low as the compress level. Then hit Compress to make the video file smaller on your Mac.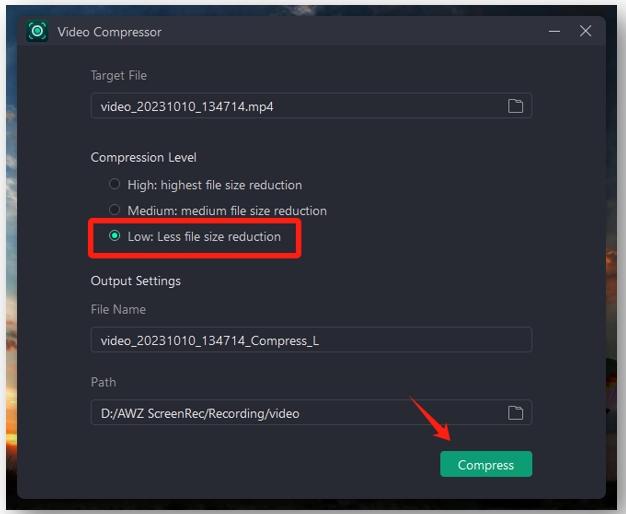
Make Video Smaller in AWZ Screen Recorder
How to Compress Video on Mac in QuickTime Player
QuickTime Player is one of the best video compressors on Macbook to reduce video file size. This built-in video player lets you get the job done with 4 options, including 4K, 1080p, 720p, and 480p. If you want to compress a video file on your Macbook without visible quality loss, 4K and 1080p are recommended to shrink the video size.
Check out the quick guide on how to compress videos on Mac devices in QuickTime Player:
Step 1: Open the video in the software and go to File in the upper left corner;
Step 2: Select Export As from the drop-down menu and choose 4K or 1080p as the desired resolution;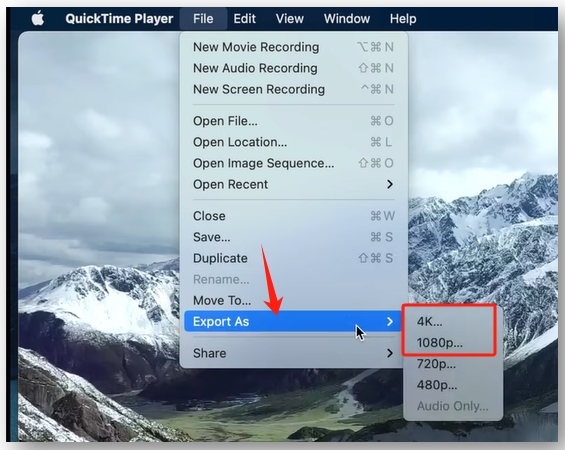
Step 3: Rename the file and tap Save to compress the video file on your Macbook.
How to Compress Video on Mac in iMovie
Another free video compressor for Mac is iMovie. This preinstalled video editor allows you to change the resolution and quality in an attempt to compress a video file on a Macbook. You can customize the quality to a desired Mbps and preview the estimated video size after compressing. If the compressed file is still too large for transfer or management, it lets you cut or crop a video to remove unnecessary parts to further reduce the video file size.
The following steps tell you how to compress videos on Mac without losing quality in iMovie:
Step 1: Enable the video editing app. Tap Create New and select Movie;
Step 2: Hit Import Media to upload a video;
Step 3: Navigate to Share in the top right and press File. Set Quality as Medium, click Next, and tap Save to make the video smaller on the Mac.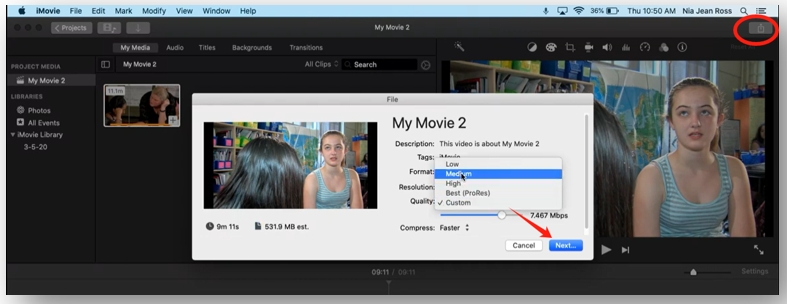
How to Compress Video on Mac in Clideo
For users who like online video compressors on Mac, Clideo is an optimal choice to reduce video file size on a Mac device. Except for uploading videos from local folders, the web-based video editing platform enables you to import files from Dropbox, Google Drive, and Google Photos. Free users can enjoy two compression levels to conduct the task. However, after compression, a watermark will be applied to your video and only pro users can remove it.
Read on how to compress a video on a Mac in Clideo online:
Step 1: Visit the website of Clideo and press Choose File to add your video to its workspace;
Step 2: Select Basic and click on the Compress button to compress the video file on your Macbook;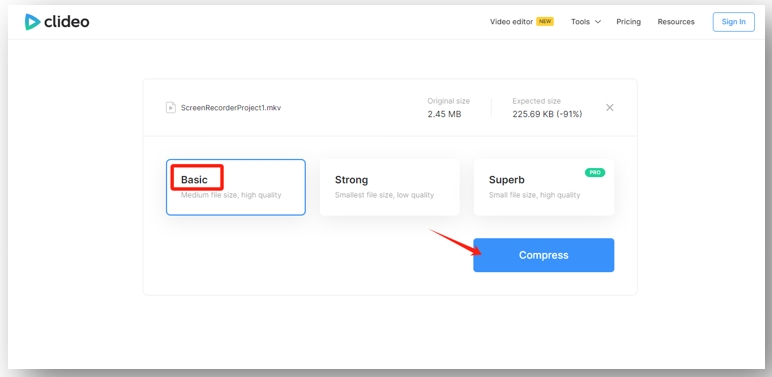
Step 3: Tap Download the save the compressed video.
How to Compress Video on Mac in Kapwing
Another online website to compress video files on Macbooks is Kapwing. The site offers multiple features to deal with various video editing needs such as adding subtitles, making video files smaller, and converting videos. It lets you configure the compression level on your own and can directly convert any video to MP4 when completing the job.
Here is the walkaround about how to compress a video on a Mac with Kapwing:
Step 1: Locate the online video compressor for Mac and click Compress video;
Step 2: Drag and drop your video to the designated area;
Step 3: Go to Export Project and press 720p. Drag the slider to specify the compression level. Then hit Export to reduce the video file size on your Mac.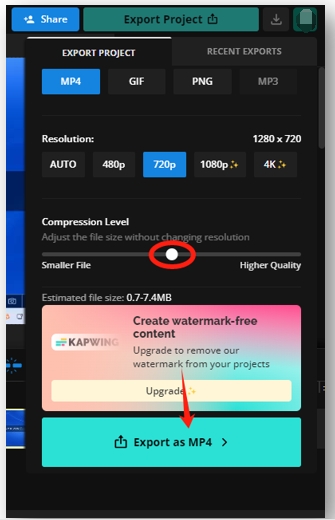
Conclusion
We have listed 5 methods for how to compress videos on Mac devices with offline and online applications. It is never a problem to reduce the video file size without losing its quality. For users who need a watermark-free video compressor for Mac and multiple features, AWZ Screen Recorder is recommended. Free video editing tools are provided and no watermark will be applied to your video. Besides, various video recording features help you enrich your video content.