Get your Macbook ready and it is easy to screen capture videos on Mac. In this guide, AWZware is going to walk you through how to record video on Mac with four practices. Stay tuned with us to complete Mac video recording tasks effortlessly.
How to Record Video on Mac with QuickTime Player
QuickTime Player is the default screen recording program of Apple. It allows you to take a video on a Mac for free with a custom area or full screen. Fundamental tools such as a video editor and Mac snipping tool are provided. All the generated videos are saved in MOV format. As an innate program, it saves you the trouble of installing an extra application to do Mac video recording tasks.
Explore how to record video on Mac with the screen capture video app:
Step 1: Click on the search icon, and search and click QuickTime Player to enable the app. Then tap Cancel when a pop-up window displays;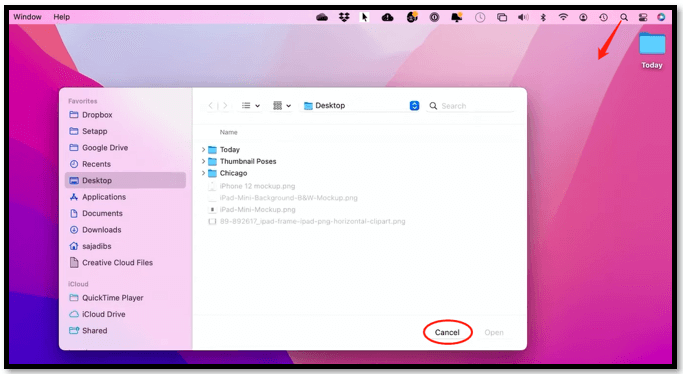
Step 2: Navigate to File and choose New Screen Recording; 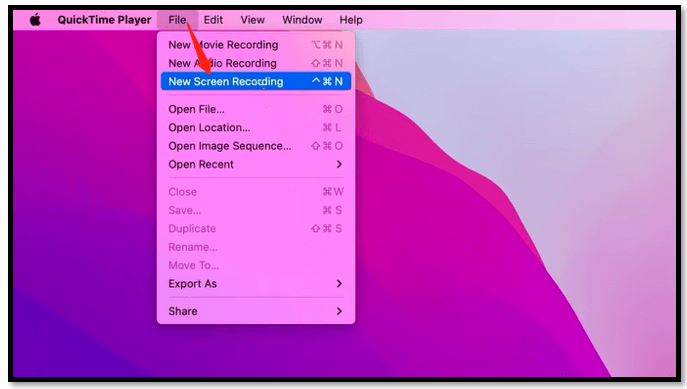
Step 3: Click the screen icon in the middle to choose whether to record the full screen or a selected area. Tap Options to select an output path and press Record to record a video on a Mac.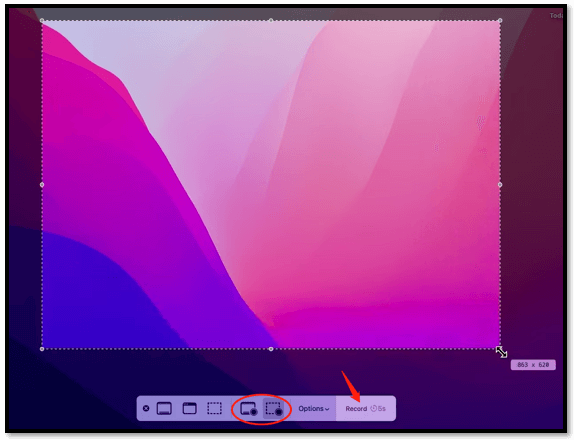
To stop recording, just click on the stop button shown next to the iCloud icon. This is the method for how to record video on Mac with QuickTime Player. Then you can edit it and share it on YouTube or TikTok.
However, this default screen recorder only takes a video on a Mac with audio from your microphone. If you want to record both the audio from your computer and your microphone, an additional screen capture video plug-in is required. The following section introduces the way to record video on Mac with internal and external audio.
How to Record Video on Mac with Internal and External Audio
BlackHole audio loopback driver is the plugin that you might need to take a video on a Mac with computer audio. It takes the audio output from your Mackbook and plugs it into the default record screen video program. You can record gameplay on your PC with both the game sound and your voice.
Follow the steps below to learn how to record video on Mac while capturing the audio from your Mac and microphone:
Step 1: Once you have the plugin on your PC, search for Audio MIDI Setup and locate the extension;
Step 2: Click the plus icon in the lower left and select Create Aggregate Device. Then check Built-in Microphone and BlackHole 16ch;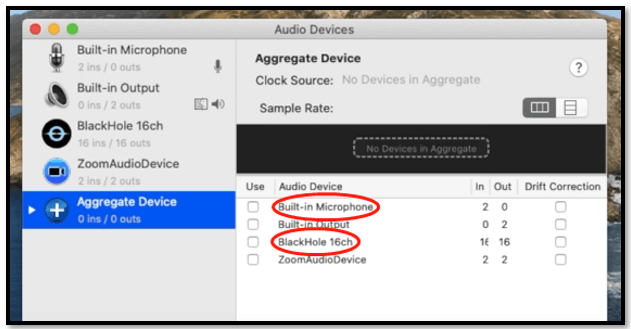
Step 3: Click the plus icon again to choose Create Multi-Output Device. Select Built-in Output first and tick BlackHole 16ch;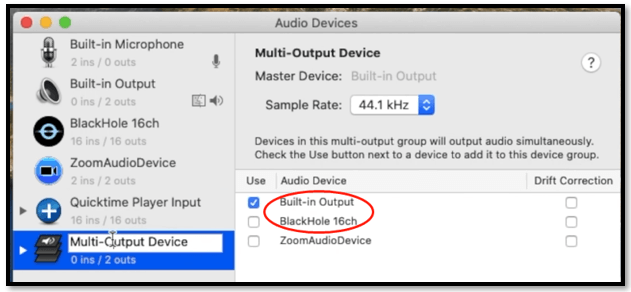
Step 4: Go to System Preferences and tap Sound. Choose Output and select Multi-Output Device. Now you are ready to record videos on your Macbook;
Step 5: Finally, open QuickTime Player, click File, and tap New Screen Recording. Navigate to Options and choose QuickTime Input to screen capture videos on Mac.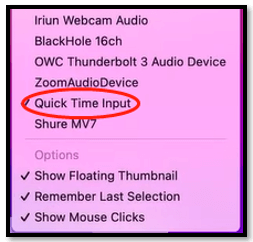
Then you can record a video on Mac with both internal and external audio for free. Except for recording screen videos with audio, how to record video on Mac with your webcam is another problem. No worries, the next part has got you covered!
How to Record Video on Mac with Your Face
Recording a video of yourself on Mac is important when you want to film a tutorial video, capture a Zoom meeting, or do other related tasks. QuickTime Player also has this Mac video recording feature and it automatically opens your camera on your Macbook.
Discover how to record video on Mac with your face:
Step 1: Launch the in-built screen recording app on Mac and tap File;
Step 2: Choose New Movie Recording and your webcam displays your face on the screen in a window. Click the red button to screen capture video on your Mac with only your face; 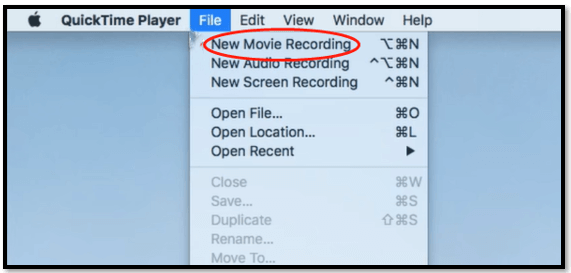
Step 3: If you want to take a video on a Mac with both the screen and your face, tap File and select New Screen Recording before starting to record yourself on Macbook;
Step 4: Tap the red button in the Screen Recording window and a pop-up shows up. Click on your screen and it films a video on your Mac with your face.
As you can see, though this record screen video program allows you to screen capture videos on Mac for free, it creates a hassle to perform each task as you want. If you find it troublesome to use the in-built screen recording app or install a new one, then an online tool is the right go-to for how to record video on Mac.
How to Record Video on Mac with Online Tool
ScreenApp is a free online screen recorder to take a video on a Mac or Windows-running computer. The intuitive interface is packed with all the basic tools to record yourself, the screen, and both. It provides clear and smooth Mac video recording services that help you capture extraordinary seconds as a film.
Take a look at how to record video on Mac with an online record screen video app:
Step 1: Go to the web-based software and click RECORD NOW FOR FREE;
Step 2: Follow the instructions to allow it to access your microphone and webinar;
Step 3: Select the way to take a video on your Mac and click the drop-down arrow to choose the audio you want to capture. Then tap Start Recording;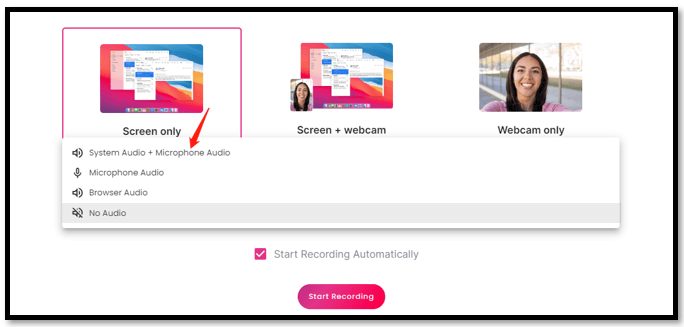
Step 4: Choose the desired window and click Share to screen capture videos on Mac.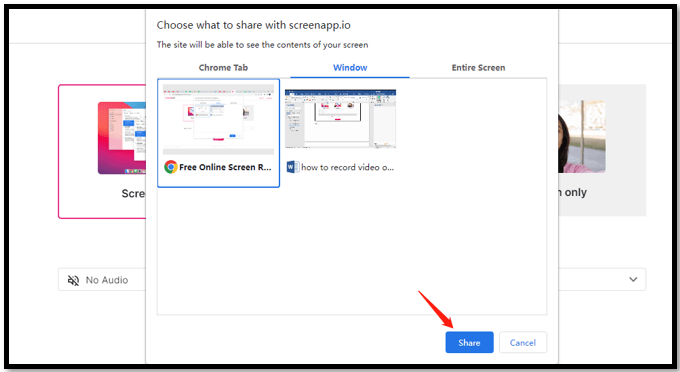
When you finish recording the video on your Macbook, tap “Stop sharing” and click the “download” button to save your recorded materials.
Bottom Line
We have demonstrated four methods for how to record video on Mac. Hope these tips can solve your Mac video recording problems and help you make great videos. If you only need the basic tools to screen capture videos on Mac, QuickTime Play is the free built-in app. If you want to perform the task hassle-free, a professional online screen recording program like ScreenApp enables you to record a video on a Mac without installation.


