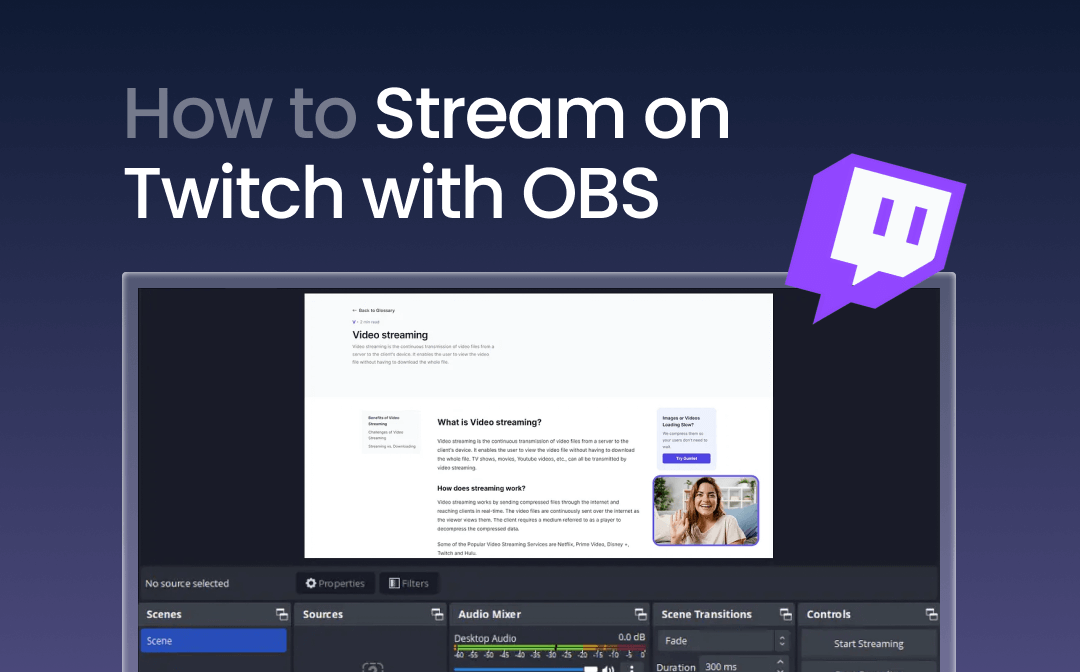
Twitch has become a powerful source for live-streaming and sharing other gaming content with online audiences. OBS is used by content creators to optimize the live streams with several customization options before starting streaming.
This guide teaches everything from setting up OBS for Twitch to broadcasting your live stream. Plus, we’ll introduce a comprehensive screen recorder tool, AWZ Screen Recorder, for the best stream recording.
How to Stream on Twitch With OBS
Here are the easy steps to start streaming on Twitch with the OBS Studio, a free, open-source streaming software that allows you to broadcast your screen smoothly. First, download OBS from obsproject.com and install it on your computer.
Follow the guide below and stream on Twitch with ease:
Step 1. Connect OBS to Twitch
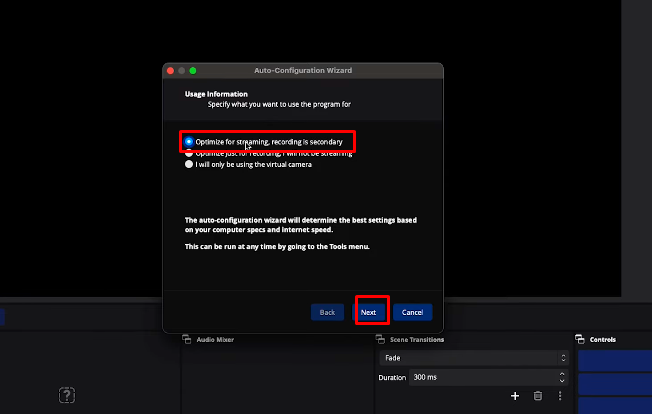
Once you’ve installed OBS Studio, you’ll be greeted with an Auto-Configuration Wizard. Let this wizard run to optimize OBS based on your system’s hardware, which will help get your streaming setup off to a smooth start.
Start the Auto-Configuration Wizard: In the pop-up menu, select "Optimize for streaming, recording is secondary" and click “Next.”
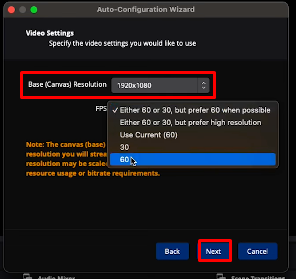
Adjust Resolution and FPS: Set the Base (Canvas) Resolution to 1920×1080 (a reliable standard) and set the FPS to 60, then hit “Next.”
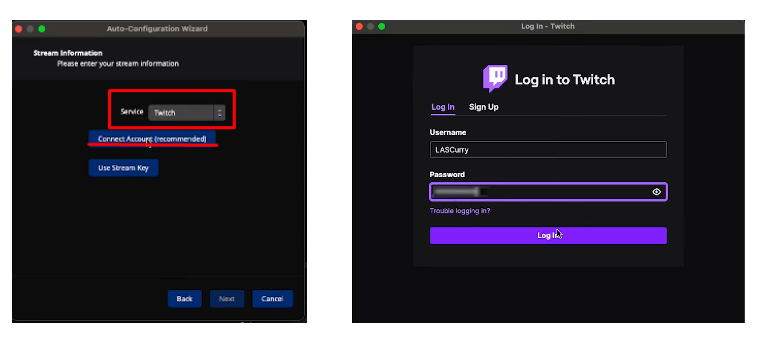
Select Your Streaming Platform: In the following menu for stream information, choose Twitch from the available options.
You’ll see two ways to connect your Twitch account:
- Connect Account (Recommended): For a fast setup, click “Connect Account.”
You’ll be prompted to log in with your Twitch username and password. Enter the required details, authenticate with the code sent to you, and submit to complete the login process.
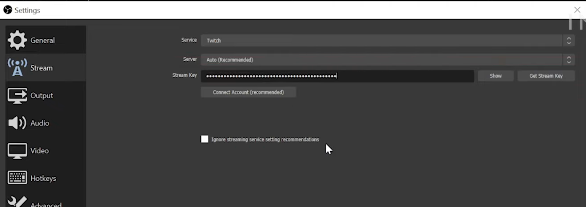
- Use Stream Key: If you prefer to use a stream key, log into your Twitch account. Click on the profile icon in the upper-right corner, select Creator Dashboard >Settings from the left menu, and then navigate to stream. Copy your stream key from here and paste it into the “Use Stream Key” box in OBS settings for Stream.
Once the Auto-Configuration Wizard finishes its setup, click “Apply Settings” to finalize your connection.
Step 2. Other OBS Settings for Smooth Streaming on Twitch
To stream smoothly on Twitch with OBS, start by checking your internet speed. A stable upload speed of at least 20 Mbps is recommended to avoid lag. Follow these steps to fine-tune your OBS settings for optimal streaming performance:
General Stream Settings:
- Click on Settings at the bottom of OBS, then select “Stream” to confirm everything is connected.
- Enable the "Ignore streaming service setting recommendations" checkbox.
Video Settings:
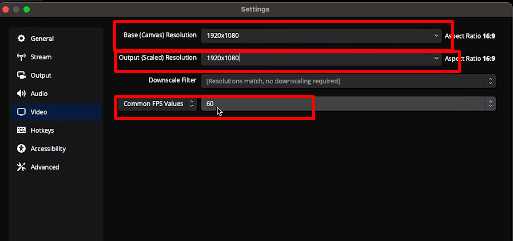
- Go to the Video tab and set the Base (Canvas) Resolution and Output (Scaled) Resolution to 1920×1080 for consistent quality.
- Set the Common FPS Value to 60.
Output Settings for Smooth Streaming:
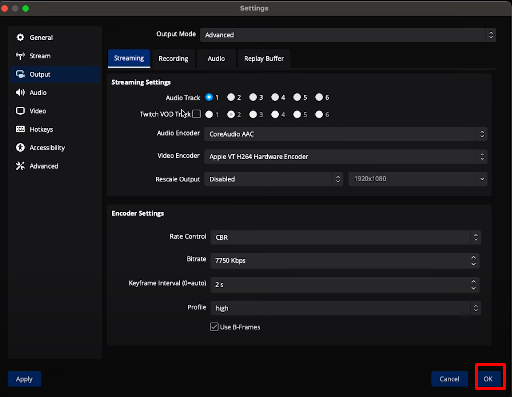
- Navigate to Output and set the Output Mode to Advanced to access detailed streaming options.
- Output settings for Mac and Windows are quite different. Complete the setup by the following:
For macOS:
- Audio Encoder: Core Audio AAC
- Video Encoder: Apple VT Hardware Encoder
- Rate Control: CBR (Constant Bitrate)
- Bitrate: 7750 kbps (for 1080p at 60 FPS on Twitch)
- Keyframe Interval: 2 seconds
- Profile: High
- Use B-Frames: On
For Windows:
- Audio Encoder: FFMPEG AAC
- Video Encoder: NVIDIA NVENC H.264
- Rate Control: CBR
- Bitrate: 7750 kbps (for 1080p at 60 FPS on Twitch)
- Keyframe Interval: 2 seconds
- Preset: P6 Slower (Better Quality)
- Tuning: High Quality
- Multipass Mode: Two passes (quarter resolution)
- Look-ahead: On
- Visual Tuning: On
- GPU: 0
- Max B-Frames: 2
- Profile: High
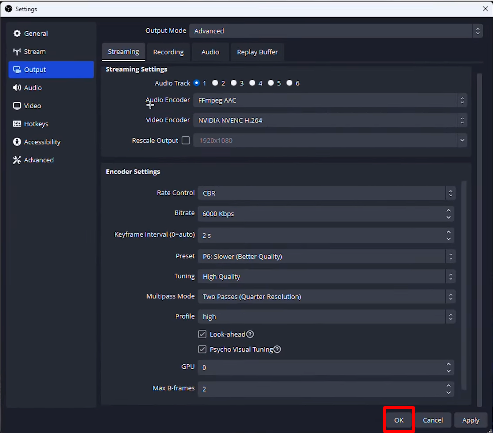
Once you've customized these settings for your device, click “OK” to save.
Now you have everything set up for streaming with OBS on Twitch.
Step 3. Start Streaming
When ready, click “Start Streaming” to go live on Twitch. It’s better to do a test stream to check your audio, visuals, and overlays for any issues.
To make your stream look more professional, consider adding overlays like a "Starting Soon" screen, a countdown timer, or other visual elements before going live. These touches help engage your audience right from the start.
Bonus: Enhance Your Twitch Stream With AWZ Screen Recorder
OBS is excellent for live streaming. However, some content creators prefer to record gameplay or tutorials separately before going live or want to record live streams to use later and customize them as needed.
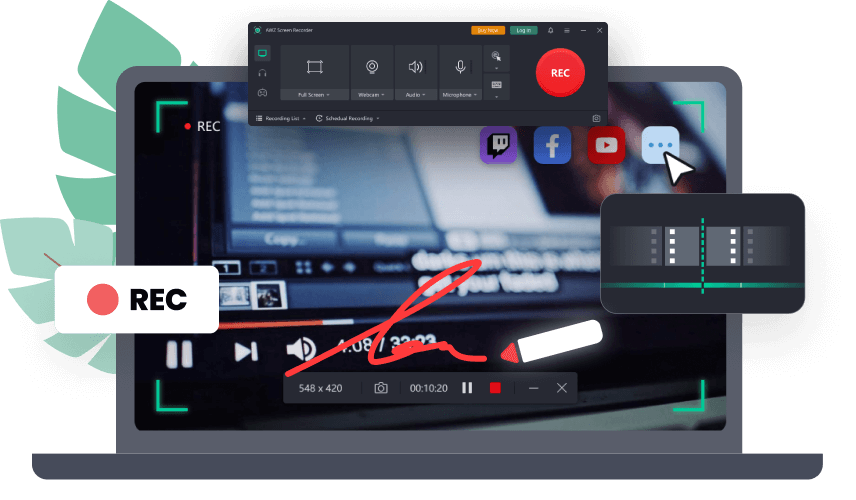
AWZ Screen Recorder is a great addition to your streaming setup, as it offers high-quality screen recording and easy editing features. It is also the best OBS alternative for creating gaming highlights if you are facing the OBS not capturing the game glitch.
AWZ Screen Recorder key features:
- Smooth video and audio recording by using the webcam and microphone.
- It’s a free screen recorder and records 2D/3D games easily to create highlights of the game.
- Offer different modes for screen recording with a video editor to edit online videos, meetings, and much more.
- Take screenshots of any part of the screen with annotations.
- Easily share the recordings to YouTube, Vimeo, and TikTok.
- Improve audio recording experience with a noise reduction feature to block extraneous sounds.
Start Recording Your Live Twitch Stream on OBS With AWZ Screen Recorder by the following:
Step 1: Download AWZ Screen Recorder from the official website on your computer.
Windows operating system:
macOS:
Step 2: Open the program, select a recording mode full screen, webcam, or microphone, and click on “Rec.”

Step 3: After recording, replay the video and make edits. Save the file in any HD format and share it anywhere.
Read the article below to learn 6 solutions for solving the "OBS Game Capture Black Screen" issue:
OBS Game Capture Black Screen for Windows 10/11: 6 Solutions to Fix It
This article fixes the OBS game capture black screen problem with 6 solutions. Check them out if your OBS is not capturing games on your computer.
READ MORE >Conclusion
Twitch is an excellent tool for live streams, and streaming on Twitch with OBS allows you to customize the live streaming, add overlays, and much more to make it more engaging and smooth. With a screen recorder tool like AWZ Screen Recorder, you can easily record your live streams and edit video or audio per the project requirements. Enjoy your time on Twitch, and happy streaming!


