If you want a starter-friendly screen recorder that can record everything, consider downloading AWZ Screen Recorder.
Download AWZ Screen Recorder for Mac
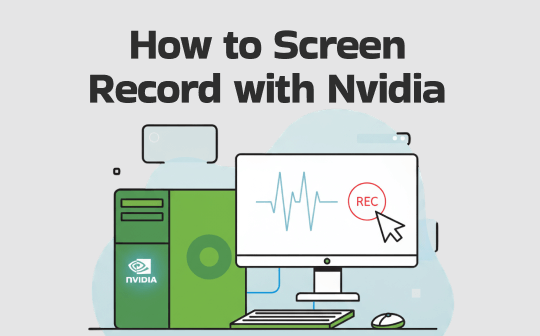
How to Record with NVIDIA
NVIDIA allows you to record gameplay on PCs as long as you need. You can record hours of a video on NVIDIA by manually starting and stopping recording. Only Windows 7 has a 4GB file size limit that may restrict the recording time. NVIDIA allows you to screen record games with a preset or customized hotkey or the record button.
Here is how to record with NVIDIA GeForce.
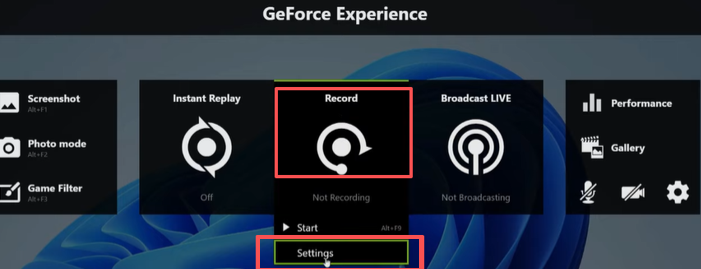
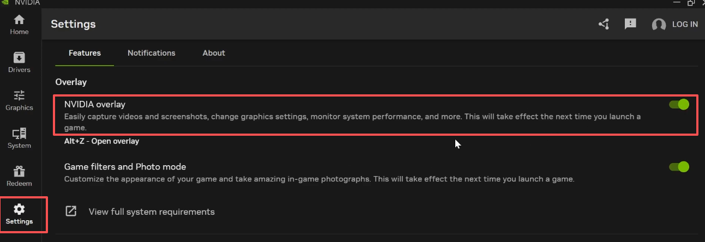
Step 1: Click Settings in NVIDIA to toggle on NVIDIA Overlay and press Alt+Z on your keyboard to open NVIDIA Shadowplay or the GeForce Experience.
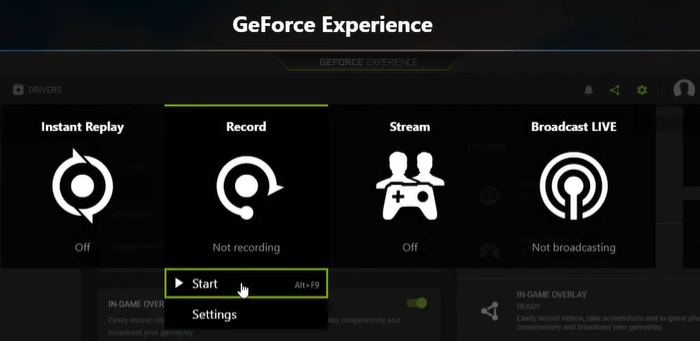
Step 2: Click the Record button in GeForce and choose Settings.
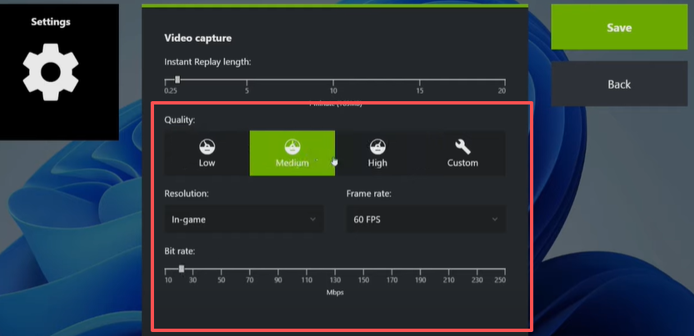
Step 3: Ignore the Instant Replay length, and select the recording resolution, quality, frame rate, and other options. Click the Save button.
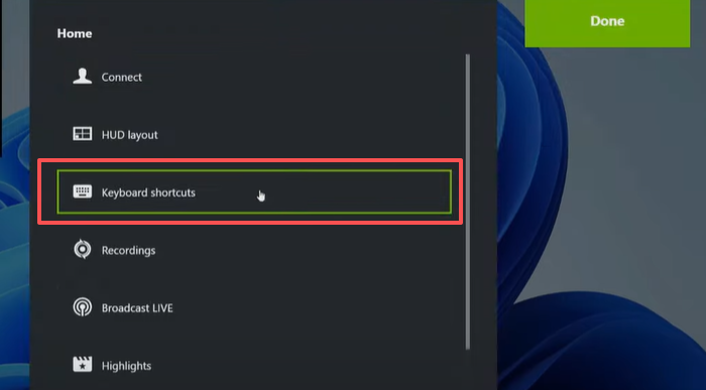
Step 4: Click the gear Settings icon in the first interface to set the Keyboard shortcuts option, select the saving location from the Recordings option, and adjust other settings.
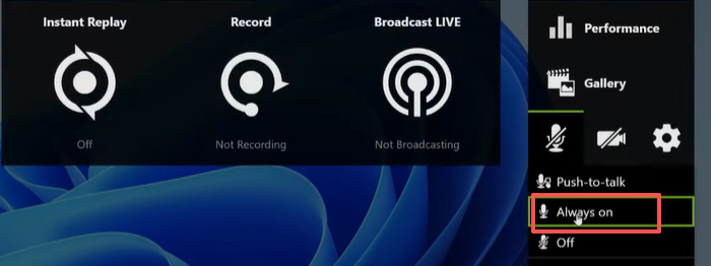
Step 5: When you’re done, go back to the home interface to turn on the audio.
Step 6: Have NVIDIA screen record with the default Alt + F9 shortcut or your customized shortcut.
Step 7: After you record with NVIDIA, press the shortcut again to end the recording.
The method to record screen with NVIDIA GeForce Experience follows a similar workflow in the new NVIDIA app. Hold down Alt + Z, click the Record button to set the recording parameters, go back to hit Settings to set audio or shortcut options, return to the previous panel to turn on the microphone, and tap the Alt + F9 NVIDIA key for recording to begin.
NVIDIA Record Last 30 Seconds/5 Minutes/10 Minutes
After learning how to record on NVIDIA GeForce, explore how to record the last 30 seconds on a PC with the NVIDIA app. The NVIDIA app is replacing the GeForce to offer screen recording functionality. The overall operations are similar to before. Its “Instant Replay" feature lets you record from several seconds to up to 20 minutes.
Check out how to record with NVIDIA to save gaming highlight clips.
Step 1: In the NVIDIA app, click Settings and turn on NVIDIA overlay.
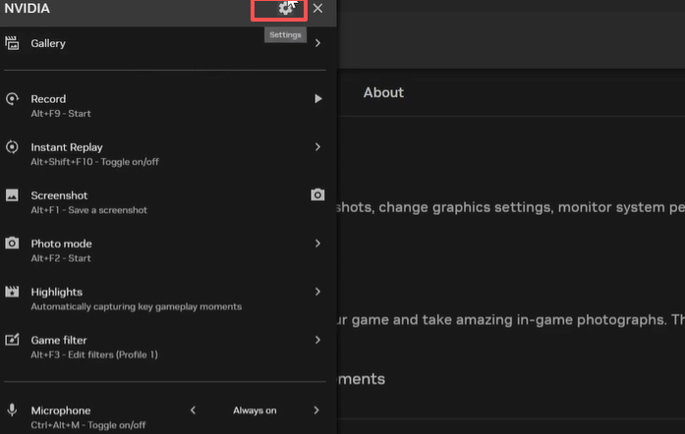
Step 2: Tap the Alt + Z shortcut to open the NVIDIA overlay, and click the gear icon.
Step 3: Select the Video Capture option. Drag the slider to set the NVIDIA screen recording length to 30 seconds, 5 minutes, or 10 minutes.
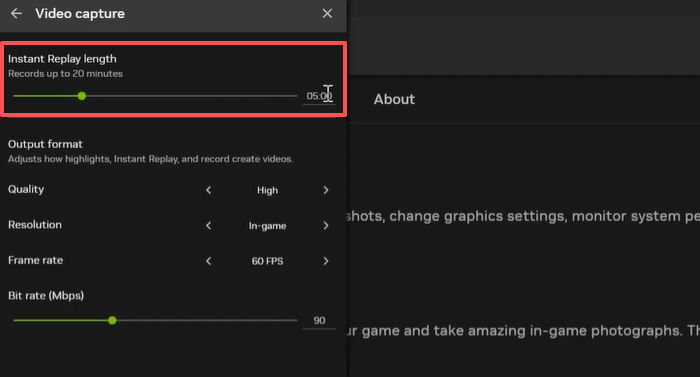
Step 4: Configure the recording format, quality, and other output options, and return to the former interface.
Step 5: Choose Instant Replay to enable the Instant Replay option.
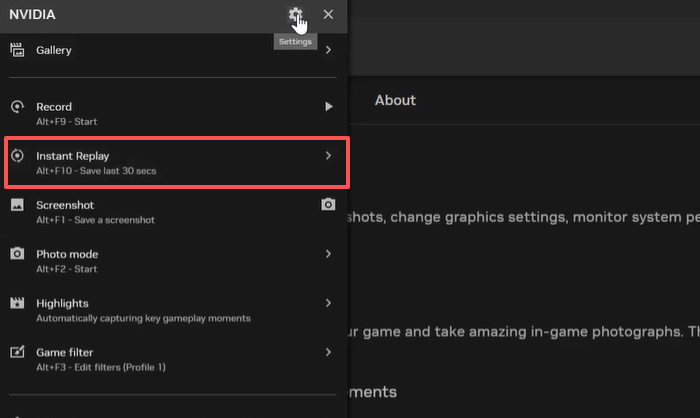
Step 6: Then, you can screen record using NVIDIA with Alt + F10, the default shortcut for recording the last 30 seconds.
NVIDIA GeForce lets you record the last 30 seconds or 5 minutes in almost the same process, while on a different UI. Click the Settings button in GeForce, select Video Capture to set the instant replay length to 5 minutes or 30 seconds, adjust the bitrate or other video options, and then return to configure the audio or other details. Click Done and press Alt + F10 to immediately record game clips on your PC with NVIDIA.
NVIDIA Shadowplay Record Desktop
If you are a laptop user, it may be difficult to record with NVIDIA. That’s because the laptop screen is connected to the integrated GPU. NVIDIA Shadowplay can only record the screen running with the NVIDIA GPU, but not your laptop's desktop. You can go to the NVIDIA control panel to check that.
But no worries, this part walks you through how to screen record using NVIDIA GeForce on a desktop.
Step 1: Search and open the NVIDIA Control Panel from the Windows search bar.
Step 2: Click 3D Settings > Manage Display Mode > NVIDIA GPU only.
Step 3: Restart GeForce Experience NVIDIA Shadowplay for recording using the shortcut Alt + Z.
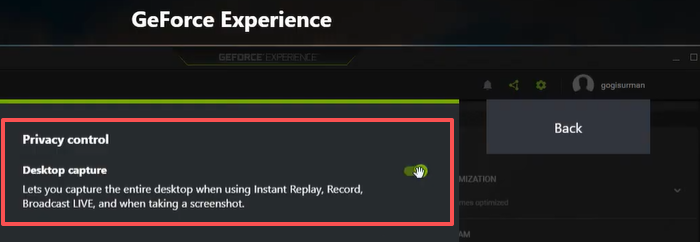
Step 4: Click Settings > Privacy control and turn on and activate Desktop capture.
Step 5: Go back to choose the Record button to start recording.
How to Screen Record with NVIDIA Alternative
If you feel it's cumbersome to set up the NVIDIA screen recorder and record the desktop with it, why not try an alternative? AWZ Screen Recorder is an ideal option when it comes to recording games, streaming videos, and webcam. It allows you to record anything happening on your screen from the desktop, microphone, browser, and computer system.
It offers broad customizable options, including the recording area, output quality, video format, and keyboard shortcuts. There are essential editing tools for you to trim, compress, and reduce noise in recordings for perfect production. All is packed in an intuitive and compact user-friendly UI.
Without further ado, look at how to screen record with the NVIDIA screen recording software alternative.
Step 1: Download and install the best screen recorder for Windows 11/10/8.1/8/7 or macOS 10.13 or later.
For Windows:
For Mac:
Download AWZ Screen Recorder for Mac
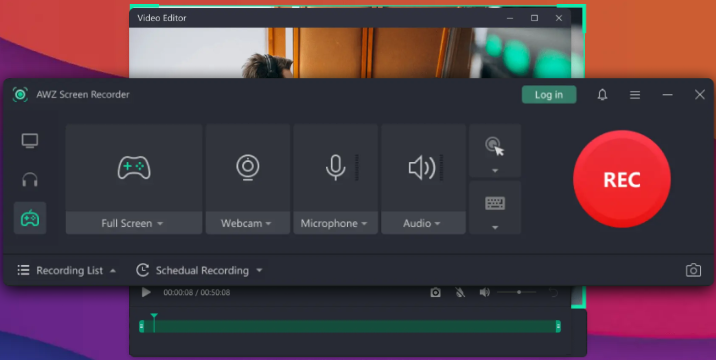
Step 2: Launch it and click Settings (three horizontal lines) to select various recording options to your liking.
Step 3: Enable what to record in the main interface, such as webcam, keyboard strokes, and audio.
Step 4: Click Full Screen and use Select Region for partial screen recording if needed.
Step 5: Press the Start/Stop recording shortcut F3 and Pause/Resume shortcut F4 to complete your recording.
Conclusion
The rise of game players and video creators has brought up many excellent screen recording programs. NVIDIA is great for many users to record gaming moments and even do live streaming. It can record long videos and short-form videos with a specified length. Despite lots of advantages, it still has downsides that may let you down. If you are thinking about turning toward another application to switch between, look no further than AWZ Screen Recorder. You can even record videos with virtual backgrounds using it.